A small artificial pond in the country. How to make a decorative pond at your dacha with your own hands
How nice it is to enjoy beautiful images of nature, to breathe clean air. And there is a wonderful place for this - the dacha. Here you can realize your ideas. One of them is building a pond at the dacha with your own hands. Near such a body of water it will not only be pleasant to relax, but also boldly show off to your guests the masterpiece you created with your own hands. The size of the pond will depend on the free space on the territory, and the arrangement will depend on each person’s personal imagination and financial capabilities.
General principles
Read also: How to make and decorate beautiful garden beds with your own hands: simple, tall, smart. For flowers and vegetables. Original ideas (80+ Photos & Videos) + Reviews
Before you begin actual construction, you need to carefully prepare. For this you will need:
- determine location
- choose shape, size and style
- purchase the necessary materials
Planting of vegetation around the reservoir is carried out at the final stage.
Location determination
Read also: How to make a patio at your dacha with your own hands: a variety of design, finishing and arrangement options (85+ Photo Ideas & Video) + Reviews
For good functionality and attractiveness of the pond, it is necessary to choose the right place for it. It should not be exposed to the scorching rays of the sun, nor in the shade of trees. Lighting plays a big role because flowers planted around will not be able to fully grow if there is a lack of light.
An open area is not the best place for a pond for the following reasons:
- It will be unpleasant to relax on hot days under the scorching rays of the sun
- Unicellular algae with large quantities light grows stronger and causes water to bloom
- Living organisms that will populate the pond will die from the heat at shallow depths
The best option is a site that is not surrounded by trees and is located next to a building or fence. Here in the morning and evening the sun is not so hot, and at noon the shadow cast from the building will give the necessary coolness.
You should not plant trees near a pond, because... their roots can damage the foundation of the pond. For the same reason, do not place a pond next to an already growing garden.
It is necessary to think in advance about a nearby source of electricity for arranging lighting, installing a filter, and a pump.
The construction of a decorative pond does not have strict requirements. The shape may vary. The perimeter, as a complement to the overall design of the site, is decorated with plants.
In order not to make a mistake with the location, it is advisable to draw the outlines of the future artificial lake in advance using twine or sand.
During the day, you need to observe how the lighting changes.
Shape and style Whatever design is chosen, it must be combined with general view throughout the territory.
For example, a round pond looks good in an area designed in the English landscape genre. Irregular shapes are suitable for a dacha made in an oriental style. There is no need to try to design a pond, adhering to clear geometric shapes
. It is important that the shape simply harmonizes with the overall design of the garden. As far as the free area of the site allows, this will be the size of the future creation. It's important to know that
A larger reservoir is easier to maintain. It makes it easier to create a stable and sustainable ecosystem.
Read also:Materials
How to make gabions from mesh with your own hands: turning your summer cottage into a cozy corner, decorated with designer taste | 120+ Photos & Videos
- In order to equip an artificial reservoir and provide waterproofing protection, various materials are used: Concrete – often used to create precise geometric lines
- . Quite complex construction Plastic containers - used on small areas
- (up to 5 m2). They are easy to install. They have a long service life Waterproofing film
- - good for a special project. It is elastic, but easily damaged. There are the following types: PVC (polyvinyl chloride)
- – deformed areas can be easily removed with glue Polyethylene
- – lower in cost, but not durable. In case of damage, self-adhesive tape helps Butyl rubber - most best view
. Available in different thicknesses. The greater the expected depth, the thicker the film is selected
Read also:
Plastic mold base Once you purchase a ready-made form, you can create an artificial lake with your own hands quickly and easily.
Even a beginner can handle the installation. It will take no more than 2 days.
For garden ponds, ready-made structures made from fiberglass are also used. This material is more expensive. It is also durable and can last much longer than plastic.
Installation plastic mold carried out in the following order:
- Initially, you will need to dig a pit that matches the shape of the workpiece. To do this, the finished container is installed on the ground. Around it, along the perimeter, with an indentation of 15-20 cm to the sides, sticks are stuck into the ground. A rope is stretched across them. The plastic container is removed for a short time. A hole is dug along the outlined outlines. It should be 30 cm higher in height. At the end of the work, you need to check the evenness of the bottom using a board or a special device
- The bottom of the pit is covered with a layer of sand, which will act as a base. Then the form itself is installed. All free spaces between the walls of the mold and the edges of the pit are filled with sand and moistened with water. This will make it easier to shrink
- The final stage is filling the form with water and decorating the banks with beautiful stones and planting plants.
Film base
Read also: Practical DIY fencing: installing a chain-link fence (Photo & Video) + Reviews
The use of waterproofing film as a basis provides great opportunities for recreating a reservoir of various shapes, even the most unusual.
PVC film is also not afraid of exposure ultraviolet rays, temperature changes. Its color lasts for a very long time. The service life is up to 10-15 years.
Butyl rubber film is more reliable. It is more expensive in price. It is used to create deep ponds.
The material is purchased with a reserve (+50 cm on each side) to ensure that its edges are well secured along the banks.
The work is carried out in the following order:
- The outlines are marked with lime or sand
- A shallow ditch is dug. Excavated soil is not thrown away
- New outlines are indicated. The bottom should be the deepest
- Using string and measuring tape, calculate the required footage of waterproofing material
- The bottom is covered with a layer of sand. Then non-woven fabric or geotextile is spread to protect the film from possible contact with roots or stones
- The film is spreading. The bottom and ledges are pressed down with pebbles
- The pond is slowly filling with water. It is important that the base material settles gradually
- After 2-3 days, the shores are drawn up. The edges of the cellophane are tucked in. Tiles and stones are placed on top, filling the resulting gaps with sand.
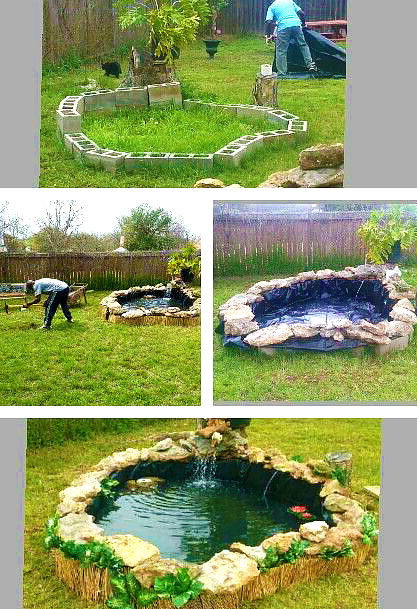
Base from an old bathtub
Read also: Terrace attached to the house: 150+ Best photo ideas of 2018-2019
In fact, to recreate a decorative reservoir, any containers that are no longer suitable for use on the farm can be used as a basis. For example, an old bathtub.
The course of action will be as follows:
- A pit is dug to fit the dimensions of the bathtub, +20 cm on each side. It should be slightly deeper than the base. A groove is dug along its perimeter. It should be about 30 cm in height and width
- The bottom of the pit is carefully leveled. Its horizontalness is checked using a special measuring tool.
- The bathtub is installed in a pit. Empty spaces on the sides are filled with sand (soil)
- Next, you need to prepare a mixture consisting of tile adhesive and water. Pigment is added to give color. This mass is applied to the sides of the base from the inside. There is no need to try to align it well. The walls will acquire dark color and structure similar to natural soil
- The glue should completely harden within 24 hours. To do this, everything is covered with cellophane and left
- To better strengthen the bathtub, a metal mesh is placed on its sides. It is cut into pieces and laid along the borders and inside the base (at 1/2 of the recess). The bottom is left uncovered
- Next, a solution (cement, water, sand) is prepared for bonding and applied on top of the mesh. It also doesn't need to be leveled much. To make the mesh more natural and strengthen, stones are inserted into the mixture. The drain is carefully cemented
- Clay is poured onto the bottom of the base, water is added and the solution is mixed. It is applied to the sides to cover the cement and fill the void between the stones. The solution must be allowed to dry for several hours.
- The finished base is filled with water. Aquatic vegetation is planted in the grooves in a circle.
After a couple of days the water will become a little cloudy. A decorative lake will look completely natural, hiding its true origin.
It is better to lay stones along the edges of the base on the mesh large size. This will give the shape of the pond clarity and the banks a natural look. When laying out the fragments, you do not need to adhere to the strictness of the forms. The relief will look more natural with irregularities and elevations. And if you alternate large stones with handfuls of crushed stone, this will add greater beauty to the resulting pattern.
Decoration
Read also:
Creating such beauty is a troublesome task, but the result will be worth it
A homemade pond looks very beautiful if fish swim in it and plants grow around it. This is a truly picturesque picture.
Certain vegetation is selected for different depths of the reservoir:
- no more than 30 cm– yellow iris, marsh marigold, pontederia cordate
- 30-50 cm– common arrowhead, reed, broadleaf cattail
- more than 50 cm– water lilies, lotuses, water hyacinths
Among the fish that are suitable for a home lake, crucian carp, veiltails, individual species carp family. To ensure that the water does not spoil and the living creatures are not harmed, a filter must be installed.
Creation of a decorative lake on personal plot- the matter is a little troublesome, but the result will be justified. This is incredible a nice place
for a holiday that fully suits the tastes of the owners. Every day you will be able to enjoy the water surface, bordered by tastefully selected plants. Which is especially important on hot days.
Every plant has its place
- Even with the appropriate experience in arrangement, sometimes some mistakes are made. Below are tips that you can follow to avoid disappointment from your own work: There is no need to be afraid to pour soil into the created lake . When gardening, many people prefer to plant plants in plastic containers . It is not right. Plants grow better in natural soil. It contains clay, which strengthens well root system
- and is not washed out with water. The pond will not be dirty For decoration, it is better to use stones of different sizes.
- In this matter, it is important not to overdo it, so as not to get an absurd picture of an area littered with stones Great depth is not the main thing. Firms dealing earthworks
- , deep reservoirs are often dug. This is done only for profit. If you plan to organize a pond with further breeding of fish in it, an average depth will be sufficient For the cleanliness, freshness of the reservoir and transparency of the water in it,
- installation of a special filter and pump is required. The pump must be selected correctly, because its power depends on the volume of water Every plant should grow in its own place . Most often, it is in this situation that mistakes are made. It must be remembered that, for example, a water lily planted in a coastal zone will wither. The same thing will happen to ferns in shallow water.
- List of plants with favorable zones for them: shore line:
- fluffy, marigold, snake knotweed coastal area:
- elderberry, lily of the valley, conifers area with water depth up to 20 cm:
- susak, arrowhead, reed area with water depth more than 20 cm:
- water lily, water lily decoration according to water level
The pump looks like a small container that can be easily disguised with stones. It is placed on concrete slab or brick. For laying water pipe
and electrical wires are marked. A cable is placed along it into a reinforced pipe. Everything is covered with stones. A breaker is used to connect the pump to electricity. Don't forget to change the filter in a timely manner. Whether you like to swim or just relax near the water, relaxing on the shore of a body of water is one of the wonderful pleasures of summer. But not every summer resident has the opportunity to build a summer house near water. Therefore, sooner or later, each of us thinks about how difficult it is to make a pond on the site with our own hands. Ideally, we see a pond in a dacha not only as a decorative element landscape design
 However, faced with colorful descriptions of the technical difficulties, costs and nuances of regular care, many of us give up on this idea.
Let's start with the basics - what fundamentally distinguishes a pond from a swimming pool is the self-regulation system.
DIY swimming pond. We'll walk you through the process of creating a pond step by step, so you can make your own garden pond - creating a cool oasis in the middle of the heat right on your summer cottage 
, where with every light breath of fresh breeze our everyday worries disappear.
A garden pond is a living organism. 
The pond at the dacha imitates the process that nature uses to keep lakes clean. Everything from the size and shape of the pond, plant species and water circulation are designed to maintain the pond in a stable natural state. 
The problem that a pond owner faces is maintaining a balance between plants and water - the plants either die or cover the entire surface of the pond. Only a pond that represents a balanced ecosystem provides optimal water clarity and quality, and maximum enjoyment from swimming in the pond. The water in the pond must circulate among the roots of the plants to cleanse itself. Plants enrich the water with oxygen, which supports the vital activity of beneficial bacteria that utilize pollutants and potentially pests
, and also create habitat for dragonflies, frogs and other aquatic inhabitants. The result is a stable, ecologically diverse system. Nature has revealed its technology to us and we need to use it carefully.
Water is a living biologically active component and all purification occurs due to the work of plants and beneficial microbes. For this purpose, the pond has a swimming area and a filtration area for plants. The filtration zone is actually the swamp part of our water zone, and just like in nature, it is this zone that guarantees the cleanliness of the entire reservoir. This zone must occupy at least 50 percent of the total surface area of the pond.  If you have noticed, in nature there are almost no tiny bodies of water with consistently clean surface water - they quickly become overgrown or silted up. Natural stable biological balance can be achieved in ponds with an area of 100 sq.m. Smaller ponds require more of our attention because... Their biological balance is precarious. Therefore, to maintain cleanliness, these ponds include a skimmer and UV sterilizer, but still offer a chemical-free swimming area and support the growth of aquatic plants.
It is useful to regularly enrich the water with oxygen by adding a small waterfall, stream or fountain to the pond. Although, an aerator can be used for the same purposes.
How is water purified in a pond?
 You can see that the process of filtering water in a pond is not complicated:
1. Water from the swimming area flows into the regeneration area.
2. Water circulates back to the bathing area.
Through drainage pipes under the roots of plants in the regeneration zone and/or after the skimmer, water is pumped through a UV sterilizer into a waterfall, stream or to the bottom of the swimming area. The pipe leading to the bottom of the swimming area is raised slightly above the bottom so that the flow of water prevents the formation of silt on the bottom.
What should the shape of the pond be?
The pond bowl looks more like a soup bowl with large rims than a bathtub. The height difference should be about 30 cm for every meter of depth. It is this shape of the pond bowl that ensures the stability of the walls. The picture shows cross section pond with planting and swimming area:

After compacting the surface layer of soil in the pit, geotextiles and a sealed liner are laid on the bottom of the pond. In the plant area there are drainage pipes and gravel. In order to separate the swimming zone from the plant zone, a small mound is formed - its top is 3 cm lower from the surface of the water. You can make it from bags of sand or gravel. The mound allows water from the swimming zone to pass into the plant zone, where the water is filtered by plant roots, and at the same time protects the plants from fluctuations in the water of the swimming zone. 
This pond design will allow you to conveniently clean the swimming area without affecting the plant area. In addition to cleaning the water, the shallow waters warm up quickly and provide habitat for frogs and other invertebrates, which you will appreciate when they begin to eat mosquito larvae.  To imitate the natural contours of a pond, use a combination of different pond edge profiles. If you place plants on the terraces of the pond, it is better to do this in pots so that they can be easily removed when cleaning the pond.
What size pond is suitable for our site?
The optimal size of the pond is 1/10 of the area of your site.
What about mosquitoes?
One of the first questions that arises when you hear the word “do-it-yourself pond” is what about mosquitoes? Mosquitoes breed only in stagnant water, but the water in a pond will never be static, so mosquitoes will find it unattractive for their habitat. Even if at some point they appear, the ecosystem of the pond in the form of frogs will reduce their population to a minimum. 
Why make a pond at your dacha?
People who make a pond with their own hands make this decision because they want to see their pond as a beautiful part of the landscape design and at the same time have a clean attractive place for swimming on a hot day.
Is it possible to have fish in a swimming pond?
Unfortunately, the fish, on the one hand, happily eats beneficial microflora, on the other hand, is a carrier pathogenic bacteria, therefore there should be no fish in the baths. 
Is it possible to make a sandy beach on a pond?
The best solution for entering the pond is a walkway or ladder. For a beach entrance to the water, you need enough area, because... The angle of entry into the water is small. In addition, the sand quickly silts up - those beaches that we see are often simply trampled down to sand, most of The banks of the pond are usually densely overgrown with plants. 
Should I swim with frogs?
Yes, frogs are full-fledged and important inhabitants of the pond. Additionally, to purify the water in the pond, it is good to have bivalve shells or pearl barley, which filter water up to 40 liters per day. You can also get snails (coils, livebearers) - they eat dead plants and clean the pond well. 
What's the best place for a pond?
It is better to place the pond away from trees, because... falling, the leaves will rot in the pond. Moreover, growing roots can damage the waterproofing film or tilt the finished container. The illumination of the area should be about 5 hours in the morning, and the rest of the time should be in partial shade. The pond does not need high illumination because... leads to increased formation of algae and overheating of water in the reservoir. 
What to do with a pond in winter?
In winter, the pond, like natural bodies of water, freezes. There is no need to drain it. For the winter, all equipment (pumps, filters, skimmers) must be removed from the pond.
Does soil type affect the creation of a pond?
No, the composition of the soil does not affect it. There is a misconception that it is good when the level groundwater high. In fact, groundwater at the freezing level is more of a problem. When ice freezes, it can bulge the bottom of the pond. This is especially problematic if the pond is made on the basis of a rigid finished mold. 
DIY pond made of film.
The main question when creating a pond is how to make it waterproof. There are several types of pond waterproofing - film, clay castle, concrete and rigid form installation.
Installing a rigid mold is a simple and durable method, but they are usually produced small sizes up to 3.5 sq. meters. Their service life is 10-50 years.
Waterproofing with concrete is the most expensive; in addition, to protect it from frost, it requires additional treatment with a frost-resistant agent and liquid glass.
A clay castle is the cheapest in terms of materials, but the most labor-intensive. In order to waterproof a pit with clay, the compacted soil is covered with wood ash or soot. Then a 15 cm layer of clay dough is applied to the walls and compacted. When the layer dries, apply a second 30 cm. When the layer is almost dry, crushed stone is poured onto it, slightly pressing it into the layer.
The optimal solution for the construction of ponds with an area of more than 5-6 sq.m. - film waterproofing. 
How much film is needed for a pond:
Film length= pond length + 2 pond depth + 50 cm margin for fasteners.
Film width= pond width + 2 pond depth + 50 cm margin for fasteners.
The film is available in widths from 2 to 10 m and lengths of 10-50 m. Knowing your needs, you can choose the optimal roll. Buy the film before digging a pit; this will allow you to cover it immediately when the pit is ready, preventing its edges from fraying.
Which film to choose for a pond.
PVC film for a pond is cheaper, but over time it is destroyed by ultraviolet radiation, its service life is 8-10 years.
Butyl rubber fabric is more expensive, but has protection from both ultraviolet and cold. The service life of such film is 50 years.
DIY pond construction photo.
A do-it-yourself pond begins with marking a pit. The curved shape can be marked with a hose. We remove the turf along the coastline and remove the soil with a bayonet - this will be the line of the swamp zone, then the next level of soil is removed inside the resulting border, and so on. As a result, our terraces will be 50 cm wide with slopes of 20 cm. When the pit for the pond is ready, all solid objects that can damage the film: stones, roots, etc. , we remove. We level and compact the walls and bottom of the pit.  Before work, the film is laid for several hours on sunny place so that when it warms up, it becomes more elastic. Film installation is done in warm weather. Overlapping panels of geotextile or felt are laid on the compacted pit; they are needed to protect the waterproofing film from protruding roots and stones over time.
Spread on top of geotextiles waterproofing film with a margin of 50 cm at the edges of the pit. The edges are temporarily fixed with stones. The film is allowed to sag a little, smoothing and leveling it to the shape of the pit. 
The film inside the swimming area can be protected with dry stones stacked on top of each other. 
Instead of stones, you can use bags of gravel or sand. But keep in mind that it is more convenient to care for a pond with film walls. – it is easier to clean it from silt and mud. 
Fill the pit with water in portions, removing air bubbles from under the film. 
When the pond is completely filled with water, securely fix the ends of the film in a trench, which is made at a distance of 15 cm from the edge of the pit. In a trench 20 cm deep, the edges of the film are wrapped in a roll and covered with stones and pebbles.
We make a pond with our own hands. Coastal decoration.
After you have made a pond with your own hands, before you start decorating the shore, you need to water it generously and wait 2-3 days, because... shrinkage is possible. In addition, during this time the water in the pond will settle.
We mask the film on the shore with crushed stones, stones, and snags. We plant plants in shallow water. A pond needs plants that saturate the water with oxygen. There are many suitable plants - reeds, crabgrass, iris, bathwort, marigold, arrowhead. Any plant that grows on the shore of a natural body of water will be suitable for your pond. Don't forget about algae, such as hornwort, which just floats in the water. Deciduous ornamental shrubs It is better to plant behind marsh herbs that are planted directly on the shore. 
Illumination adds additional charm to the pond. 
Floating flower beds look seductive on the surface of the pond. 
Pond safety.
If there are very young children in the family, then perhaps the construction of a pond should be postponed until they are older. It is necessary to consider visiting the pond by elderly people and children school age. Make a convenient ladder to enter the pond, don't forget to clean it so it doesn't become slippery! It is better to cover all other sides of the pond, except the entrance, with plants. 
Pond care.
The new pond will take on its natural appearance over the course of a year - while it forms its own ecosystem. Small world your pond is very vulnerable. The pond may quickly heat up or freeze, water may evaporate, or the pond may overflow after rain. This puts stress on aquatic life that cannot immediately transition to a safer, more stable environment. 
Therefore, your pond, like any living organism, requires care. On a hot day, you need to add water, collect debris that floats on the surface with a net, check whether the plants have grown or perhaps something has not taken root and needs to be replanted. However, a surprising number of life forms will colonize your new pond; they will quickly explore new waters and stay if conditions suit them. 
The quiet splash of water is the most enchanting melody of a hot summer; water bewitches, attracts and seduces us with a playful play of light, transparent depth and invigorating coolness. A DIY pond will give your dacha a special charm.
And a pond. Even a small body of water attracts those around you like a magnet. Water is fascinating even in small quantities... Moreover, you can build a pond with your own hands in a few hours. But this is a small artificial reservoir. Building a large one will require both money and time.
Where to dig
Small artificial reservoirs are best viewed from above. Therefore, if there is a corresponding depression on the site, it is best to do it here. There is, however, in this negative side: You will have to raise the edges of the bowl higher to rainwater didn't get inside. The second option is to come up with a water drainage system (make a drainage system above the reservoir).
If there is a key somewhere on the site, it is logical to make a natural pond by digging or deepening the existing bowl, lining its borders with cobblestones or stones, and planting plants. The stream, which is sure to exist in this case, can also be improved by lining its edges with cobblestones, drowning them in the soggy soil, you will give greater strength to the bank, and you can plant moisture-loving plants between them.
Even a small waterfall is a magical sight. How to dam a pond if there is a natural stream on your site - dig a pit, cover it with stones and direct the stream into it
Not everyone has such a luxury on their property as a stream or a spring. We have to make artificial reservoirs. When properly designed, they look no worse than natural ones.
How to make an artificial pond with a bowl (without film)
The simplest and quick way to make an artificial pond at the dacha - bury the finished bowl in the ground, shaping and decorating its edges. There are plastic bowls - ready-made different forms, sizes and colors (mostly blue, green and black).

Setting up a plastic garden or country pond is not a difficult task. Here are the step-by-step instructions:
- It is necessary to dig a pit in the shape of a bowl. If the shape is very non-standard, you can turn it upside down at the installation site and outline the outline with something (even dig it with a shovel). The bowl is taken to the side and a pit is dug. It should be a little larger in size - a little wider, but not deeper. The edges should either be flush with the ground or protrude slightly. If you can raise the edges a little, it will be even better: when it rains, dirty water will not flow in.
- After the required depth is reached, the bottom is leveled to the horizon: it is first leveled with a shovel, then compacted and the excess is removed with an even bar. The surface must be smooth and hard: the plastic must have good support. If the ground is poorly leveled (clay), you can pour 5-10 cm of sand, wet it and compact it.
- The next stage is the installation of the bowl in the pit. If the bottom has been made level, the edges of the bowl will be level with the horizon. Now the space that remains between the wall of the bowl and the pit must be filled with soil or sand and compacted well.
- Now it’s time for the design: the installation is complete, you can fill in the water.
How to use this technology to build a pond in the courtyard with lighting, see in this photo report (you can scroll through the photo gallery yourself by clicking on the thumbnails below).
We are digging a pit. We decided that the sides would be 1-2 cm higher than the level of the path - there would be less debris inside, and we would decorate the edges with stones. On this side, a little lower maximum level They cut a pipe into the bowl to allow excess water to drain. She was taken to the sewer
But it is not always and not everywhere possible to constantly add and remove water to the pond. Then you will have to either plant plants that will clean it, or change it periodically.
Pond from an old bathroom
You don't have to buy a bowl at all. Any container can be used. Even old bath. It turns out very well. All the steps are the same, the pit is dug first, a bathtub is placed in it, what goes next, see the series of following photos. In them, a pond from an old bathtub is transformed into a truly charming corner.
The platform was also entangled with wire - so that the clay did not float and the platform did not sag. This is already a month later, such beauty - a garden pond built with my own hands makes me happy
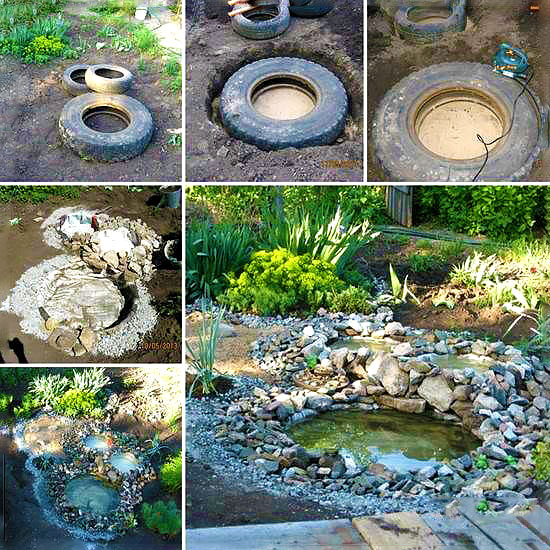
Pond from a car tire (with film)
A mini-pond can be made from an old car tire, or rather from a tire. The larger it is, the larger the reservoir. The most difficult thing in this matter is to cut one side part. If the resulting edges are sharp, they need to be sanded. The second most difficult task is to dig a hole of the appropriate size. The difficulties ended there. The rest is quite easy.
The cut tire is installed in the hole, covered with earth on the sides, and compacted well. Also, earth or sand is poured inside and the bottom is leveled. Take a piece of thick polyethylene film, you can fold it in half and cover the resulting tank. Don’t try too hard: just pour water, it will straighten the film itself.
Instead of polyethylene, you can take banner film (available from advertising companies that produce outdoor advertising) or a piece special for swimming pools and ponds. They are much stronger (but more expensive).
The protruding ends of the film are tucked around the walls of your pond and decorated with stones. The construction of the pond is completed, next comes decoration and planting. See how to make a pond from a tire in the photo report.
The next stage of making a mini-pond for a summer residence is decorating the edges with stones
There is certainly nothing complicated about such a device. Anyone can build such a pond at their dacha with their own hands, and the investment is minimal.
In general, mini-ponds are made from tanks, barrels, pans, even flower pots. The main thing is that there is a body, and designing it is not very difficult: experience gradually comes. They are placed in the garden, at the dacha, near the house. It is possible to supply water, make a stream, it can be placed under trees, for example, or shrubs. Both beauty and benefit at the same time.
Making a pond with film
By creating this artificial pond from film, you almost exactly repeat the work described above, only without installing a bowl:
- mark the shape of the future pond;
- dig a pit, forming ledges if necessary;
- clean the bottom of any sharp objects: roots, stones, etc.;
- level the banks of your pond;
- spread the waterproofing film;
- fill the pond with water;
- fix the edges of the film;
- decorate.
A country pond created using this technology can be of a more substantial size. An important point: simply making a pit on loose soil and laying down film will not work. We will have to come up with some measures to strengthen the banks. In this case, you will have to either install a bowl, or make a more serious structure - from brick or concrete. Next, let's look at examples of how to inexpensively make a pond from film.
First project: sides flush with the ground
Eight simple steps and your pond at the dacha is built. How to dig and arrange a pond at your dacha and make it look natural, see the photo report.
Second project: raised sides
The second version of a homemade pond in the first stages is built in almost the same way as the first. Only after the pit reached the design depth were the sides raised, lined with bricks along the edges and concreted. The result was a pond with raised sides. A water circulation system has also been made. It is shown in the figure below.

As you can see, this pond is more multi-layered and its displacement is more serious. If you want to have a pond of at least medium size and not build a serious bowl, you can do as shown in the figure: fill the created pit with sand, cover it, and only lay the film on top. Geotextiles evenly distribute the load and do not allow plants to grow. This is especially true if you are building a pond in your garden and there are shrubs or trees nearby.
Serious projects: brick and concrete
If you want to have a large pond in your country house, and you want to build it yourself, you will have to study the topic of building swimming pools. Firstly, the construction of the bowls repeats all the stages one by one. Even the forms are sometimes made stepped. True, the banks are not decorated with plants, and they are not planted in the pool itself... But the construction process itself, with reinforcement, plaster, and waterproofing is the same. Moreover, the water supply and water treatment system is also similar. Except that they are not used in ponds. chemical methods cleaning, but filters, screamers and ultraviolet can be used.
In general, a large pond is not a cheap pleasure. Moreover, it requires expenses not only for construction, but also for maintaining a large reservoir in in good condition: Filters need to be cleaned regularly and cartridges or media replaced. But of course the pleasure is great...
Not the largest pond, but it required 10 bags of cement, 30 bags of sand (20 coarse and 10 fine), a hydrophobic additive - 5 bags to make the concrete water-repellent. Plastered on a mesh fixed in the ground
Pond Plants
When shaping or choosing a bowl, consider not only its shape and depth. If you want plants to grow in your pond, a marshy riparian area is necessary. If you form a pond using film, you can make a profile approximately like the one in the picture.

It is more convenient to do this if you fill the pit with a layer of sand at least 15 cm thick. With its help you can make the relief the way you like. To make the work easier and the film not torn, lay geotextiles on the sand. This thin membrane is very tear-resistant. You can do whatever you want without breaking it. Having formed the desired bottom topography with its help, you can line the film and lay stones on it, fill it with water and plant plants for the pond at different levels.
To ensure there is enough oxygen in the water, you can plant Elodea, hornwort and swampweed. They are in the photo below. Planted in water, these are aquatic plants.

Reading time ≈ 10 minutes
To improve your site, you can build on the territory beautiful pond at the dacha with your own hands, using modern landscape ideas with examples of photos and design techniques. An artificial pond will bring harmony to the surrounding space and add originality to the landscape design.
Natural green pond on the territory of your own dacha
Pond at the dacha
Sometimes an artificial pond in a suburban area is more of a necessity than a decoration. If there is a long stream running through the area or waterlogged soil is present, the disadvantages can be turned into advantages. A pond in the country, built with your own hands, will create an atmosphere of calm and relaxation.
What type of reservoir can be created at the dacha:

The first garden ponds appeared in countries Ancient East, and only then this fashion reached Europe and Russia. Fountains and mini-waterfalls with massive stone borders began to be built near the palaces.
The pond can be:

The pond can be made in different styles:

The improvement of a picturesque pond at the dacha, made with your own hands using landscape design ideas, is shown in the video below with photo examples and detailed instructions.
Smart planning
When arranging an artificial pond in the garden, it is necessary to draw up a detailed project plan and comply with certain conditions.
Actions must be planned step by step:
- Selecting a location.
- Determination of sizes and shapes.
- Selection necessary materials.
- Stylistic decision.
- Plants and flowers.
- Decorative elements.
First, you should walk around the territory of your dacha, carefully examining every corner and sketching out the shape of the future reservoir on paper.

Place for a pond
This is an important planning stage in which several criteria should be taken into account:
- Soil features.
- Landscape relief.
- Climatic conditions.
- Illumination.
- Green vegetation.
- The presence of a natural reservoir on the territory.
In such a pond it is unlikely to be possible to keep large fish or swim in hot weather, however, there should be enough space for the location of the structure itself and drainage of water. The home eco-system should resemble a mirror pond, not a swamp.

How to choose a place:

Reservoir zoning:
- Coastal part. Occupies approximately 12-30 cm, used for shallow water vegetation and arrangement of the entrance area.
- Shallow part. Zone for plants and flowers – from 30 to 90 cm.
- Deep water part. The size can be from 1 meter and must be below the freezing level of the soil. Fish for decoration or breeding may live here.
A great idea would be to complement the beautiful lighting with musical accompaniment. This design looks impressive and impressive.

Material
Construction materials must be strong, reliable and durable. Concrete is most often used, but today lighter materials and structures have appeared, for example, polyethylene or butyl rubber.
The most popular options:

To protect the film when laying out the bottom, you should lay a small layer of geotextile under its surface. This way, crushed stone and sharp stones will not be able to damage the film structure.

Step-by-step instructions for arranging a “flexible” pond
A film-based pond is easier to build than one made from concrete and more reliable than one made from a plastic form. The recommended length of the film should be equal to the length and double depth of the reservoir itself + an additional 40-50 centimeters just in case. The desired film width is the width, double the depth of the pond and 40-50 centimeters for the rest.
Main stages of arrangement:
- Soil preparation and marking.
- Excavation work to create a pit.
- Installation of bowl or film flooring.
- Filling voids with river sand.

What may be required for work:
- Construction shovel.
- Irrigation hose.
- Pump for determining water filling pressure.
- Compressor (for a fish pond to saturate the water with oxygen).
- Cleaning filter (for fish farming).
- Cord, rope, pegs or light sand for marking the territory.
- Sterilizer for water purification.
- Construction wheelbarrow for earth.
- Butyl rubber film.
- Adhesive for film (“Tangit”, adhesive tape etc.).
Making a reservoir:
- Creating a sketch. Drawing the shape, all details, decor and location on paper auxiliary equipment taking into account the size and depth of the bottom.

- Transfer the mini-circuit to the soil using a garden hose or river sand. The contours should be marked with sand that differs in color from the ground. According to the drawn outlines, a groove should be dug to a depth of 25 centimeters.

- Removing the fertile layer and digging a hole. To do this, you will need a shovel (a construction excavator for a pool or large pond with a fountain) and a cart for removing soil from the territory.
 The hole is dug according to the depth of the coastal, shallow and deep water zones calculated in advance. The deepest part should be in the center and be dug last. Each time you should fix the depth line using markings.
- Measuring the size of the pit. The walls of the pit are well compacted, and an additional 40-50 centimeters need to be added to the edges to determine the future size of the covering material. The parameters are measured with a cord or rope and then transferred to film.

- Waterproofing film. The bottom of the pit is covered with a small layer of sand and geotextile to ensure reliable protection film surface. When the substrate is ready, the film is carefully laid, tightly fixed to the base with glue and pressed well to all surfaces.

- Filling with water. Water is poured in carefully and gradually using a hose, avoiding sudden pressure.

- Consolidation. The edges of the waterproofing are fixed in a pre-dug trench along the contour with a depth of 25 cm and covered with earth and crushed stone, after which they are well compacted.
 The edge of the reservoir is secured with rods, stones or large boulders. This stage is suitable for placing and planting plants and flowers. Be sure to leave a small fold at the bottom so that the film does not tear when filled with water.
- Standing water. The finished reservoir should be left for 1-2 days so that the water settles well, after which the excess ends of the film are cut off. During this period, you can form beautiful sides, arrange the remaining decor and complete the landscaping work.

To strengthen a gently sloping bank, you can use a geogrid or geomat in combination with clay and black soil to make the pond look neat and well-groomed.

The size and shape of an artificial reservoir depends not only on the dimensions of the site, but also on the imagination of the owners themselves. The aesthetic and decorative components undoubtedly play an important role here. If you follow all the recommendations and strictly follow the instructions, you can create the pond of your dreams in your country house. How to make a pond in the garden with your own hands, using landscape ideas with photos and diagrams, is shown step by step in the video below.
At the dacha, city dwellers like to spend their free time on weekends, relax and enjoy the beauty of nature. To make your vacation more enjoyable, create a pond in your yard. In this article you will learn how to do DIY pond at the dacha photo step by step. This work can be done by anyone, regardless of their level of training and knowledge. Construction will take 5-10 days and requires the purchase of necessary materials. As a result, you will receive an aesthetic element of landscape design with minimal monetary costs for equipment.
Before starting work, decide on the location and type artificial reservoir. The best place- lower part with sufficient solar lighting during the day. It is advisable to start construction away from large trees, which pollute the water with fallen leaves and disrupt the waterproofing. The shape of the pond depends on the wishes and imagination of the home owner. Its depth: 0.5-1.4 m.
Species classification of artificial reservoirs
The shape and size are up to you. Decide on the type of pond:
- mini. An excellent element of landscape design;
- decorative pond. It is decorated with decorative elements and plants;
- water. Designed for fish breeding;
- pool. Used for swimming.
Pay attention to the choice of the shape of the reservoir, especially the mini version. To create it, old bathtubs, deep basins and other containers made of strong, durable materials are used. The choice of base will determine the shape, size and depth. For a bathtub pond and basin, select 3-7 plant species.

Interesting fact! Pond round size make it easier than all other types! It is suitable for decorating the garden and yard of a country cottage. To form them, use concrete rings, wooden tubs and molds from durable plastic. The use of car tires is allowed.
The rectangular shape of the reservoir is combined with flower beds of a similar shape. This The best decision for landscaping the interior of the yard. Use of irregular shapes, curved lines and exotic plants- an option for fans of creative solutions and modern design.
How to choose a design style
It will seem challenging task. To get the desired result, you should read the relevant literature and our advice. The number of modifications is huge, among them you will find the one you need. For fans of classics and brevity, the formal style is perfect. Such a pond has a precise shape, simple design, and a minimum number of decorative elements and plants. Arrange it on the site in the Art Nouveau, hi-tech, minimalist style.

Romantic individuals should pay attention to landscape solutions for arranging a reservoir on the site. This is naturalness irregular shapes. You are not limited by certain rules and can realize your ideas. Take into account the terrain and budget so that unpleasant situations do not arise during the work. On flat terrain it is possible to create all types of ponds, and for sudden changes, slides and bridges are suitable. Here you should be careful at every stage of work, to the choice of materials, laying the film and digging a pit.
Choosing a place to get started
This is a crucial stage. Make sure there is sufficient depth of groundwater in the area to prevent unpleasant consequences in the future. The value is needed to determine the depth of the pond. Proceed to choosing a location by finding an area that gets 5-7 hours of sun a day. This way the planted plants will be able to develop and grow normally. Shady areas and places under tall trees are the worst solution for starting work on an artificial pond.
Make sure that the pond looks aesthetically pleasing, harmonious, and has a proportional shape from all sides of the site. On its surface in sunny weather clouds, a house, and plants will be reflected. This is a beautiful element of landscape design for a country cottage, available to your family right now!
When choosing a place to dig a pit, pay attention to the following factors:
- garden plot area;
- terrain;
- soil and depth of groundwater;
- amount of time exposed to direct sunlight.
Pond area- a place where the sun shines 5-7 hours a day, with good visibility from all parts of the site, a sufficient degree of surrounding landscaping. Decorate finished design Can be plants in barrels. Provide power to the reservoir to provide illumination at night and connect filters, a pump, and music.

Planning is an important stage of work that should be given attention and the sequence should be considered. Decide on what is feasible design solutions, buy decorative elements, plants, choose a design style. Plants are planted according to different schemes, having studied which you will create a unique composition.
The sizes of reservoirs vary. For small area Set the container to 10 liters. It will not dry out, will take up little space and will make the yard aesthetically pleasing. But growing plants and breeding fish in it is impossible. An old bathtub will do for him, plastic container, basin. After choosing a location, you should dig a hole 30 cm deep more height container used. Level and compact the bottom of the hole, lower the bathtub into it, filling the free space with earth.
To add naturalness to the created pond, paint the bathtub with paint. It is acceptable to use paint in natural shades, finishing materials, concrete mortar. Pots with flowers on the sides will be beautiful decorative element created composition.
Medium sized pond - original solution for owners of a spacious yard. By creating such beauty yourself, you will make the yard a real work of art, turning it into reality design ideas. The device is complex, but you can make it in the following ways:
- The reservoir bowl is made of concrete mortar. This is a time-consuming and expensive method;
- installation of a purchased plastic container. It will determine the size of the pond, its shape, depth. Choose between single-level and multi-level systems;
- film with waterproof properties. Simple and fast. You will create a unique design yourself without significant time investment.
For a PVC pond, prepare a film, a shovel, ropes, bricks and gravel, sand, and stone slabs. You will need 5-7 days to work. First of all, mark the pond using rope and stakes. After marking the dimensions, start digging a hole according to the diagram you made. For a large pit, rent an excavator. Afterwards, inspect the bottom of the hole, remove sharp stones, branches, and roots. Cover the surface with sand, 10-15 cm thick, cover it with the prepared material, level it and secure the edges of the film with stones.

The next stage is filling the prepared pit with water. Only after this should the unnecessary edges of the film be trimmed 24 hours after completion of the work. Decorate the shores using pebbles, pots, plants, and landscape figurines. Install the pump by connecting the filter. Remove all pipes unnoticed and disguise them with plants, flowers, and stones. The final stage is planting plants from the pond.
Pond sizing
Sizes do not always depend on the financial capabilities of the owner country house. The dimensions of the pit are determined by its location on the plot, the width and length of the allocated land. Also consider the following zones:
- for planting plants (10-40 cm);
- place for deep-growing plants (40-100 cm);
- for fish breeding (from 1 meter). Depends on the number and size of fish.
Interestingly, large ponds are easier to maintain than small ones. Every master will confirm these words to you.
The dimensions can be determined by the parameters of the purchased plastic container or old bathtub, the wishes of the home owner, and the purpose of the artificial pool. Tires, bathtubs, PVC film, concrete mortar, basins, plastic bottles- all this will become material for creating an aesthetic design on a personal plot in the hands of a talented person. The choice is up to you!
Rules for digging a pit from experts
Having chosen a place for a reservoir, mark the area in accordance with the size of the container. Use sand, rope, paint, stones, and a strong stream of water for this. Then start digging. Do small amounts yourself with a shovel, and for the pool, rent special equipment and hire workers. The depth of the pit will always be 5-30 cm greater than the height of the container used.

After removing the stones from the bottom, level and compact it. Use a layer of sand 5 cm thick. Install the container or lay out a layer of film, securing it with stones along the edges. After completing the creation stages, proceed to improving the area around the reservoir. Try to give the creation a natural look by using plants, stones, and figurines planted in containers. It is possible to install a fountain to create a harmonious composition.
To achieve an unusual effect, use lighting and music, entrusting the work to a specialized company.
Do not forget to change the water in artificial ponds 2 times a year. This is necessary to maintain its purity and prevent the appearance of unpleasant odor, what will happen after the development of microorganisms begins. The process is natural and cannot be prevented. To improve cleanliness, snails, water striders, and fish are used. You can catch this living creature in a river or buy it in a specialized store. Economical option- order online.


. Fill in the missing letters and explain the spelling of the words.")


- Girls and women almost always associate white shoes with a wedding dress, although the white color of shoes has long been no longer required. A...
- New
- Turkey stewed in a slow cooker: spicy, with vegetables, in sour cream, cream and walnuts
- Types of speech: description, narration and reasoning
- Martyrs Tatiana. Moscow Church of St. Martyrs Tatiana Temple of the Martyr Tatiana at Moscow State University schedule
- Milotici: return of the Russian village Moravov Alexander Viktorovich
- Why you shouldn't cry in front of the mirror
- Recommendations: what to grease the pies to make them rosy and appetizing
- Actors Spiderman Aunt May Aunt May in Spiderman
- Making sounds for children Lessons on making sounds for children
- Pink salmon in the oven - delicious and easy recipes for baked fish Pink salmon fillet baked with vegetables
- Deciphering the natal chart of the house
- What does mulberry help with?
- Photo report “Birthday of Samuil Yakovlevich Marshak in the group”
- Breathing at high pressure Breathing correctly at high pressure
- Bryansk State University named after
- Tasks to test spelling and punctuation literacy
- Application...burning, grow...sti, to...sleep, m...roll, warm...up, sk...roll,...
- The Forex Economic Calendar is a reference book for every trader, regardless of trading experience and level of professionalism, and especially...
- Representatives of the arachnid class are creatures that have lived next to humans for many centuries. But this time it turned out...