How to paint a wooden swing. DIY garden swing: a selection of design ideas and ways to implement them
DIY garden swing at the dacha can be made from scrap materials using photo or diagrams from the Internet. Construction will require time and skills from the master, but the result will delight children, family and guests. In addition, a ready-made factory swing will cost three times more. When starting to choose a model for a future design, listen to the wishes of your household and involve them in the creation process.
Where to start?
Builders advise starting the construction of a structure by choosing its location. At the dacha, it is installed in a resting place, so that it does not interfere and has enough space for swinging. In the case when summer cottage there is little space for installation, they are considering landscaping the street area. If you plan to install stationary structure, then for installation you will need concrete foundation. If the rocking chair is portable, you will need reliable fasteners. They use pins that are driven into the ground and the legs are attached to them. Mobile swings can be mounted on hanging hooks, in which case they can be easily transported from home to garden by securing them to a suitable support.
How to determine size?
Its size depends on the category for which the structure is intended. Depending on your preferences and family conditions, the swing may be for adults. They are made in the form of a comfortable bench or rocking sofa, equipped with a canopy, and decorated with soft pillows. Guests of the older generation, swaying slightly on a comfortable sofa, will be happy to have a conversation over a cup of tea.
Children's swings are made small and reinforced with straps, providing for a large swing amplitude. In this option, the main thing is safety. Therefore, during construction, sharp corners are removed and the surface is made as smooth as possible. For a children's model, an important element is the color scheme and seating comfort. It is painted in different colors, involving the child in this activity.

The structure for the whole family is large in size. It is designed for mom, baby and dad to ride at the same time. Its weight is calculated at 250 kg and above. The supports are made solid, dug into the ground and filled with concrete. The structure is intended for year-round use, so it is painted, equipped with a roof and not decorated with textile elements. Small pillows or blankets are laid down immediately before use.
On a note. The canopy not only protects riders from rain or scorching sun, but also protects the structure from fading and corrosion.
Common types of country swings
You can adapt materials for skating that have already been used, but are still quite durable. For example, a car tire, construction pallets, canvas, an old skateboard or a wooden box. They buy chains and fasteners, carabiners or hooks and hang them in the garden on a strong branch. Using building and available materials, the following types of swings are made:
Singles consist of a seat and suspensions that are attached to a support. Their weight and size are designed for children.

Hammocks belong to portable types. They are a comfortable hammock that can be hung with one or two hangers from any crossbar. It is in the spirit of those who like to read it in the fresh air. For production, strong fabrics and strong ropes, as well as carabiners, are selected. The durable hammock can support the weight of an adult man.
Sun loungers- These are frame models, shaped like a lounger floating in the air. Used as supports metal carcass. This model is complex in execution; it is easier to buy it in a store and assemble it on site.

Hanging come in different modifications, widths and lengths. The common feature is a seat with chains attached to the side.
Advice. For a homemade country swing it is not necessary to build strong supports. More often they are hung on a suitable branch of a garden tree. But it is safer to install poles with a fixed crossbar.
Step-by-step instructions for creating a hanging wooden model
To make a swing for big company, use the design diagram in the form of a hanging bench with a backrest. The main material is high-quality inexpensive wood. To create the model, boards and beams are purchased from hardware store, it also contains bolts, hooks and chains for attaching the bench to the support. The master selects the dimensions at his discretion, choosing a comfortable backrest height, seat width, and bench length.

Required Tools
A standard set of woodworking tools will be useful for the job:
- jigsaw and circular saw for sawing boards;
- drill for preparing holes at the joints of parts;
- screwdriver for tightening fasteners;
- plane and sander to remove uneven surfaces of wood;
- marker (a slate pencil will do);
- construction corner or long ruler;
- building level for level installation of supports.
Basic materials
Main construction material- soft but durable wood. For example, spruce or pine. Birch lumber has excellent quality characteristics; it is durable and inexpensive. For construction you will need 15 beams 2.5 m long (25 mm by 100 mm), 1 crossbar 2.5 m long (50 mm by 150 mm), glued slats 1.5 - 2 m long.

Additional materials:
- Galvanized screws (with rings for fastenings) 2 pairs;
- Wood screws No. 3.5 and No. 5 - 200 pcs;
- Chain from 5 m (length selected according to the dimensions of the structure)
- Fastening carabiners – 6 pcs;
- Varnish, wax, stain for applying a protective layer 3 l;
- Flat brushes for painting – 2 pcs.
Sequencing
First, make a bench for sitting. Having determined its length (from one and a half meters), boards are prepared the right size and drill holes in them for fastenings. According to the diagram, the frame is assembled and the slats are attached to it, equipping the back and seat. If you have sufficient carpentry skills, make a seat with a shaped back by cutting out the parts according to a template. Armrests are attached to the finished seat (one side to the back, the other to the seat). All parts are cut exactly to size, given a shaped shape and polished. The finished rocking chair is varnished in several layers, allowing each layer to dry. Then screws with rings are attached to the lower side of the armrest on the left and right and chains with carabiners at the ends are inserted into them. A cozy bench for friends is ready. It is hung from a strong tree and rolled around.

Instructions for creating a metal model
The metal construction is durable and reliable. To create it, you will need special skills in welding, cutting metal, and mixing concrete. The metal model has a long service life, meets safety requirements and can withstand weight up to 250 kg. In order to assemble it you will need the following materials:
- hollow metal pipe with a diameter of 50m total length 12.5 m;
- rod reinforcement with a diameter of 18 mm and a length of 8 m;
- pine board 5 m (50 mm by 20 mm);
- metal screws, bolts, nuts,
- concrete (water, cement, sand and crushed stone);
- enamel paint 3 l and flat brushes.

To cut, weld and strengthen pipes you will need the following tools:
- Bulgarian;
- file and sandpaper;
- welding machine;
- bath for mixing concrete mixture;
- shovel and bayonet.
Procedure
Metal swings are made stationary. Therefore, a place for them is carefully selected. Having cut the pipes for support according to the selected drawing (for example, side posts and a crossbar of 2 m each and pipes for the base of a suitable size), they are welded and the joints are ground.

The finished structure is dug into the ground at least 70 cm. To do this, dig 4 holes, place the swing legs there and fill them with concrete. To make it, mix cement and sand one to two, adding one part of crushed stone. Having stirred the mixture well, pour water into it and knead the mixture to the thickness of sour cream. Pouring the homogeneous mixture into the pits, it is allowed to harden for 7 days. When the support becomes stable, hooks are welded to the crossbar to which the seat will be attached. It is assembled from reinforcement. Weld a frame for a base of convenient sizes, attaching two handrails to it. Their ends are bent into the shape of rings and hung on hooks at the top of the beam. For seating, prepare boards according to the size of the base and attach them with self-tapping screws.
Note: the edges of the boards must be free of knots and torn edges. They are sanded and coated protective layer varnish or paint.
Conclusion
When installing a swing at a summer cottage, a convenient and safe place is selected for it. There should be no debris, broken glass, or wire protruding from the ground nearby. The structure itself and the area under it are made comfortable for riding, and take into account the possibility of falling. That is, if a child jumps carelessly, he will rest his feet on green lawn or sand, not in concrete screed. The safety of the child comes first and decorative look facilities and its sports and gaming area on the second. If you have free space at your summer cottage to place play or sports equipment, install it next to the swing. It is also made by hand and painted in bright colors.

Swings for adults are equipped with an approach path and a equipped area. Often a barbecue is placed next to them for a pleasant time with friends. In this case, consider lighting the site in the evening.
48 photos of garden swing ideas:

Remember the childhood sensations of swings? This is not only pleasant, but also useful - monotonous rocking trains the vestibular apparatus, and also calms you down. nervous system. The second property is very useful nowadays. Such a pleasant treatment - relaxation after a busy day. Moreover, anyone with “straight” arms can make a swing with their own hands. There are, of course, complex models, but there are many more simple ones.
About designs
Like most outbuildings, swings are most often made of wood. The posts and crossbar are made from timber, logs, the seats are made from planks and even from parts of home furniture.
A little about the designs. There are three main types of hanging swings, or as they are also called - boat swing, sofa, bench, etc. The main difference is in the type of supporting structure: there is A-shaped and U-shaped. You can see an example with racks folded into a triangular structure above, and in the photo below an example with a U-shaped rack. This is more likely with a hanging bench and it is built according to the same type, only taking into account swinging loads.
There is a third type - this is a complex structure that requires certain skills - it is based on hinged joints and they swing from the feet resting on the floor. We will immediately provide photos and diagrams for those interested (you can expand them to full screen if you click on the arrows in the upper right corner of the picture).
We make a swing with our own hands from wood
Most often, they make their own design in the shape of the letter “A”. It is simpler and requires less material consumption. Let's look at the components and fastenings in more detail, talk about materials, protection against destruction and stability.
Materials
Let's talk about what to make a wooden swing from. The choice of lumber cross-section depends on the planned load. If it is assumed that one adult will sit, the posts and the top crossbar are at a minimum - 50 * 70 mm. If a larger number of “seats” are expected - two or three, then the cross-section of the beam is at least 100 * 100 mm, preferably 100 * 150 mm. It has been experimentally established that such a design, when using 100*100 timber, can normally withstand a total load of about 200 kg. If you need more, take a larger section, or place logs))
About what the bench/sofa is made of. The frame will use a 70*40 mm block, the backrest height will be at least 600 mm, and the seat depth will be at least 480 mm. You can experiment with the depth of the seat and the angle of the backrest: there are options for a “lying” position. Accordingly, the length of the sofa and the dimensions of the structure change greatly due to this. For fastening, use 200 nails or studs of at least 10 mm in diameter.
How to position the racks
A diagram with dimensions and a list of required materials is shown in the photo below. To be honest, few people make them from such materials as indicated in the specifications. More often they install beams.
There are varieties of this design: with or without a lower frame. If the swing is installed on a rigid platform and the fastenings are made rigid, on studs, without the possibility of play, then such a structure will stand without problems. If in doubt, you can make a timber screed along the bottom, nail it to the covering with pins, or drive the staples into the ground.
A crossbar has been added here, there is nothing to move apart. The simplest design, but the “legs” can move apart
For those who are afraid of lateral loads - the design in this axis is not the most reliable - you can suggest installing the racks with a slope. The area will be large, but the stability will be high.

If installation in the ground is intended, parts of the racks that will be buried must be treated with bio-protection. A cheap option is to place it in a vessel with used oil for several hours. Dry, then bury. They bury it to a depth of at least 50 cm, pour a little crushed stone on the bottom, set up racks and concrete it. If you are afraid that this is not enough, attach several strips of metal crosswise at the bottom. The hole will have to be dug larger, but the retention area will be larger.

Methods of fastening the crossbar
In all swings of this type - with the bars of the posts sawed at the top - the problem is the attachment point of the crossbar, to which the bench is then attached. In the photo above it is solved reliably, although not entirely aesthetically pleasing. The trouble is that aesthetic methods are difficult to implement. And, if you're not selling, it's quicker to make something inelegant but reliable. So, in order to secure the crossbar, an overhead beam is attached below the intersection, pulled to the posts with pins. The cross member rests on it, which is held against lateral shifts by uprights and fasteners - nails and studs.
Another way to install the crossbar is to attach the side posts in an "X" shape. With this option, the supporting beam fits perfectly. It is additionally secured with nails, and the posts are tightened with studs. See the next photo for this option.

Everything is fine, but the length of the sofa is not enough...
Using the same principle, a swing is assembled with your own hands from logs: the sides are fastened crosswise, and a support log is laid on top. If timber is sometimes assembled with nails, then in the case of logs, pins are mainly used.

For those who are familiar with carpentry, there are other options: half-wood. Such a project is in the photo gallery below with close-up some key nodes.
How the racks are fastened together - view from the inside
Photo gallery of homemade swings on chains
And a few photos of different swings made on the basis of an A-shaped structure.
Made from thin logs under a reed roof - looks great Chic option— 3-seater, or maybe more, swing Another option in which all the “finishing touches” have been added - stands in the form of the letter “X” and on a slope One of the modifications is more difficult to manufacture This is a whole swing house....cool Right away and stairs...
Attaching the swing to the crossbar
The mounting for the swing also requires clarification, that is, it is not obvious to everyone how to hang a bench-sofa on the crossbar. First, the crossbar is drilled from bottom to top through. A bolt is passed through the hole, to which a ring nut is attached. One or two wide washers are placed under the nut head so that it does not press down under the weight.

It turns out that the ring nut is located at the bottom. You can attach a carabiner to it, throw a rope or cable, etc. Just pay attention that the carabiner should hang normally and freely on the ring-nut. And two chain links should fit freely in the carabiner. Therefore, it is advisable to buy everything together in one store: you can try on the entire knot at once.

By the way, in the rigging store you can come across other devices that can be adapted to attach chains or ropes from the swing seat. For example, such as in the photo below.

They are designed to lift a load of 0.5 tons, so there is no point in using them for children, but for swings for adults it is fine.
This type of fastening has a significant disadvantage - a creaking sound is heard when rocking. You can get rid of it temporarily by lubricating the unit, but this operation will have to be repeated periodically. The solution is to make a unit on bearings, but you can’t do without welding.
DIY metal swing
Their design is exactly the same. The material is different, and the method of fastening it is different. This is welding. For those who are familiar with it, it will not be difficult to cook something similar. And for inspiration, a photo report.
Below is a drawing of this swing with dimensions. Some clarification is required. In the figure there is a pipe welded around the perimeter (this plane is shaded). It is buried and therefore not visible in the photo. It was made in order to increase stability: friends have considerable masses. For the same reason, metal plates are welded onto the ends of the racks. The installation was complicated, but the swing is firmly in place.

It took 22 meters to make profile pipe 50*50 mm, for a seat 25*25 mm - 10 mm, boards 2000*120*18 - 7 pieces and the rest - fasteners, paint, anti-rust.
There is another way to attach the swing to the crossbar. He's in the photo.

A way to attach a metal swing to a crossbar
A swing made from a profile pipe has an original shape - the posts are not linear, but curved. If it is possible to do something like this with wood, it can only be done by a master.
Baby swing
For children, you can make the same design, but smaller in size.

There are several other models for , as well as . Here are the first ones - a swing-scale or a balance beam.

Swing for children - balancer or scales
Everything is clear, questions may only arise regarding the fastening unit. Below is a drawing with dimensions. To decorate the upper part, steel plates are fixed inside. To make them swing, a hole is drilled into which a pin is threaded. You can improve the “rolling” by inserting bearings.

You can quickly and easily make a swing-nest from a tire (car tire). Bolts with eye nuts, but of a smaller diameter (don’t forget about the washers), are installed into it at the four corners; ropes or chains are attached to them, and you can even throw them on the appropriate branch on a tree, or hang them on a horizontal bar.

Swings are not just for fun. For adults, they calm nerves, improve mood and put thoughts in order; especially if you sway and contemplate the clouds in the sky. Children and teenagers on swings train their vestibular apparatus, develop coordination of movements, and, as they say, feel physics with their whole body. Schoolchildren who know how to swing well on swings, as a rule, do better academically and immediately grasp such difficult concepts as, for example, the moment of inertia of a body.
Making a garden swing with your own hands is not a difficult task. Who, as a child, did not swing on a plank suspended from a tree branch on ropes? Or didn’t he flop into a river or pond while swinging on a bungee? And having at your disposal a certain amount of material, a simple tool and not entirely crooked hands, you can build a relaxation corner in any situation, which in its effect is not inferior to a rock garden arranged according to all the rules, see fig.

Dacha grace
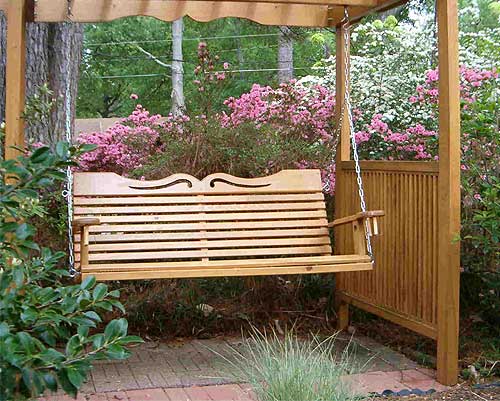
Outdoor and yard swings are placed wherever there is space. At the dacha, too, in general, there is not an abundance of it, but for yourself it’s worth figuring out how to collect dacha pleasures into one eden: you save space, and, if you really want to relax, then there are beds that make your hands callused, your eyes didn't cause calluses. Here, as usual, everyone is their own boss. However, there is a very good universal option: hang a garden swing in a pergola, see fig. If it is, of course, strong enough for this. Dig up and arrange a decorative pond nearby - and you’re ready to create a piece of paradise with your own hands on less than 1 acre.

About metal swings
They most often make their own swings from wood: it is more familiar, more comfortable and easier to work with. But if, say, the whole world were to equip a children's playground, then a stronger and fireproof structure would be needed, so that the urchins would not have to be pulled back every now and then, and it would be difficult to damage the swing by hooliganism, which, alas, will not be tolerated. In such a case - in Fig. Below is a drawing of a classic, so to speak, yard swing made of metal: pipes, corners, strips, rolled wire, with a canopy. In the future, we will pay more attention to wooden swings, except for those cases when metal is needed for strength: for a sports corner for a teenager, etc.

Note: There are also cases when metal as a structural material for a swing is chosen according to other criteria. For example, at pos. 1 pic. on the right is a forged swing. Their production requires high skill, and to order it is very expensive, but the prestige is obvious. But at pos. 2 in the same place - a metal swing made from channel scraps. For those who know how to handle welding machine and with a grinder, their construction is a matter of half a day, and the bright coloring masks the utilitarian nature of the material.

The best for children
People don’t start swinging on the hanging swing right away. For kids who have just learned how to properly rearrange their bottom two, it’s just right to ride on a pendulum swing. Which, by the way, also develops motor skills and strengthens the musculoskeletal system. Parents who have built a children's pendulum swing for their offspring are soon convinced: abrasions on the knees and elbows, broken noses, roaring and resentment from both have noticeably decreased. Although, of course, it’s still not without it. But the swing will help children develop reasonable caution and common sense, avoiding serious injury.
It is known how a pendulum swing works. Shown in Fig. This option is interesting because it requires as many as 11 nails for metal fasteners:

Parts marked (!) are made of hard, fine-grained deciduous wood - oak, beech, hornbeam, walnut. The ends of the pendulum axis do not need to be ground to a perfectly round shape: it is enough to plan them more or less evenly so that they fit into the sockets with a slight interference, and shake the board several times to get it to work in. If the fibers in the axle and support posts are oriented mutually perpendicular (which can be easily observed by cutting them from one board), then the swing will last for many years, and the rubbing surfaces will soon become mirror-smooth and durable, as if they were turned from steel on a machine.
The pendulum swing can be made portable so that, say, you can take it to the veranda for the winter. 2 ways to do this are shown there, pos. a and b. According to method a, the ends of the racks are concreted in an unusable tire; Method b is obvious and simpler, but both riders may fall to the side along with the swing. By the way, you can get a lot of other benefits from old swing tires; We will return to them later.
Swings for older children are made hanging, like for adults (see below), with some features:

- The supporting beam of the swing is made of timber with an extension to which a ladder leads, see fig. on right.
- It’s even better, if there’s enough space, to put an additional lower support on the side, so that in addition you get a horizontal bar, see fig. below. In this case, it is preferable to make the entire sports corner, except for the horizontal bar crossbar, from a profile pipe, then the entire structure will be stronger, cheaper and technologically simpler.
- Suspension of a rocking chair for children who already know how to swing is best suited to the rope scheme 2-2 (see below). Then you can, without risking pinching or even breaking your finger with the chain, swing, it will take your breath away. And the right materials and design of the suspension will not allow you to “spin the sun” and dive down from its highest point, or turn into a projectile fired from a sling, unable to group for landing, like acrobats.

Note: When choosing or designing a swing, do not neglect safety precautions! When swinging at full swing, the speed of the rocker at critical points of the trajectory exceeds 50 km/h! Accordingly, the result of falling or falling from a swing will be equivalent to an accident at the same speed.
There are also swings for newborns and infants. There are many benefits from them, but they are medical equipment. It is strongly not recommended to make such a swing yourself, but choose store-bought ones and use them only as prescribed by your pediatrician.
For babies from about six months old, whose eyes are already looking meaningfully (this means that their vision has developed and they see clearly), a children's swing for little ones will be useful, see fig. on right. They cost a lot, but making similar ones yourself is very easy from pipes, PVC or propylene, and cutting plywood, see video:
Video: baby swings for babies
Just don’t forget to cover the ends of the pipes with polystyrene foam: at that age, a finger can fit into a small hole, and you want to stick it there. They swing a child in such a swing, holding the suspension with their hands; in an apartment the same one would be suitable as a cross member plastic pipe, the weight is light.
Note: the swing is most often the basis of a children's corner. What else is needed for it, and how to put it all together, requires a separate description in parts. For example, you can watch the following video:
Video: children's playground with swings in the “Hacienda” program
To adults and everyone, everyone, everyone
Now it’s appropriate to ask: how is a swing designed for the whole family? So that both adults feel comfortable swinging, and children also enjoy it? It is quite possible to find a compromise: the seat should have a double backrest, but not be very massive. The seat is strong enough so that a large child can stand on it. We use a chain suspension, because the rope will stretch under such a load. Its design should ensure fairly easy swinging without outside help, limiting the angle and speed of swinging, and long swinging after it.It is advisable to make a family swing from wood for the reasons stated above: they are more comfortable, and production does not require complex tools or special equipment. It is also highly advisable to get by with 1-2 standard sizes of lumber, and the cheaper one - regular edged boards. For durability, the workpieces are impregnated with biocides (antiseptics) and water repellents (water repellents).
Since the swing is not a residential building and will dry out very quickly in the air, there is no point in spending money on expensive branded products. Spent waste is suitable as a biocide. engine oil(working off), and the water repellent is a water-polymer emulsion or, instead, PVA glue or water-based tile glue, diluted 3-5 times. The pieces cut to size are first impregnated with processing, and after 3-7 days with emulsion.
Drawings of a family swing of this “classic” type are shown in Fig; The length of the legs is given based on their penetration into the ground by 0.5 m:

Their peculiarity is that they are built entirely from boards, without the use of more expensive scaffolding, as can be seen from the material sheet, pos. 2. At pos. Figure 3 shows the method of adjusting the supports before assembly: a crossbar board is used as a slipway. The legs, cut to size and at an angle (see below), are applied to the slipway and spread to the required width (at the same time, the accuracy of the cutting is checked). Then the blank of the lower strut is applied, set parallel to the building stock according to the distance of its ends from it, and marked for cutting in place. The upper ones are made from scraps of the lower spacers.
Note: in Fig. on the right is a method of marking leg blanks based on an angle between them of 30 degrees. Markers on a steel bench square are made from several turns of soft wire with bent ends.

Swings of our own design
You may have a question: how to make a swing completely yourself? Schemes and drawings are good, but if there is already material (let’s say, left over from construction), which is clearly enough for a swing, but in this design doesn't fit? And I don’t want a standard product, I want something of my own. Finally, in Fig. at the beginning it is clear that the most luxurious original swings are obtained from dead wood and waste from garden pruning. How to make a beautiful, comfortable, durable and safe swing from all this? Well, let's get started. Order:
- Dimensions;
- Foundation and method of attachment to the ground;
- Support frame;
- Suspension methods and designs;
- Suspension units;
- Rocking chair, also known as a seat;
- Methods for hanging a rocking chair.
Finally, let’s look at a few more non-trivial designs and special, but built on the basis of ordinary, special-purpose swings.
Dimensions and proportions
The dimensions of the swing are calculated, firstly, based on the width of the park bench seat for 1 person - 60 cm; minimum value– 40 cm. The height of the seat above the ground is taken a little more than the standard chair height of 40 cm, so that, on the one hand, you can swing without touching the ground with your feet and at the same time, stretching your legs, you can slow down; on the other hand, to make it more comfortable to sit down/stand up. Usually they take 50-55 cm, but in general they adjust it to suit themselves by adjusting the height of the suspension, see below.
Note: for paired swings with longitudinal swing, the height of the suspension of the board (boat) is taken to be 0.7 of its length. For boarding and disembarking, a platform is then needed, and for the rocking chair, a smoothly acting brake (in case someone gets sick on it, or he/she gets scared and panics), activated by the operator from the ground. Therefore, paired swings with longitudinal swing are almost never used in everyday life.
A suspended swing consists of a supporting frame (2 support posts + crossbar), a suspension system and a rocking chair, also known as a seat. The distance from the edges of the seat to the side supports is taken at least 150 mm for a chain suspension of type 2sh-4 or 4-4 (see below), for any other chain suspension from 250 mm, for ordinary rope suspensions from 350 mm, and for any suspension with 1 attachment point at the top - at least 0.7 of the total height of the suspension system. These requirements are based on the fact that with any swing, lateral rocking is inevitable, and the rocking chair touching the support is unpleasant and, if the rocking is strong, dangerous. That is, if, for example, we have a 40 cm seat suspended on ropes, then the width of the span between the supports should be at least 35+40+35=110 cm.
The distance from the seat to the crossbar should be no less than the height of the person on the swing, so that, firstly, you can swing while standing, and secondly, so that when you suddenly get up you don’t hit your head. It is taken within the range of 190-220 cm, depending on the available material.
The angle between the legs of the side supports is 30-40 degrees; most often - 30. Then, if you take workpieces half the standard length of 6 m, i.e. 3 m, then taking into account the depth of the legs and the thickness of the workpiece, it will be possible to stand up to your full height on the seat. In addition, the area occupied by the swing is reduced.
Note: the thickness of the material of the load-bearing parts is taken based on a 3-fold overload during swinging. For a high-quality wooden beam it will be from 150 mm in height, and for steel pipes– from 40 mm in diameter or square side.
Ground anchorage
The legs of a wooden swing are either dug into the ground to a depth of 1 m or more, or concreted to a depth of 0.5 m. Then, taking into account a 10 cm gravel cushion, holes for the legs need to be dug with 2 shovels, i.e. 60 cm. In both cases, the ends of the legs, before installation in the pits with a margin of 15-20 cm in length, are either impregnated with bitumen mastic (40% bitumen and 60% white spirit or solvent), or poured with bitumen heated almost to a boil, and, barely cooled down, sprinkle with sand; This method better protects against rotting.
To pour bitumen, bricks are placed under the foot so that the end can also be poured. They pour it in a thin stream, for which it is convenient to heat the bitumen in an unusable tin with a pulled-out spout. Having poured one side, the leg is immediately turned over and the other side is poured, trying to get it onto the end as well. Sand is sprinkled in the same order.

With a metal swing, the situation is more complicated: a thin pipe compared to a log or timber can, over time, either turn out of the ground or break on the concrete itself, because This is where the loads are concentrated during swinging. Therefore, metal outdoor swings for public use must be made with support frames in the form of a solid triangle and concreted into a trench, then the metal beam embedded in it will take on a significant part of the effort and relieve the load on the legs.
The legs of the swing without additional supporting elements, like those shown above from the channel, are concreted to a depth of at least 1.2 m, regardless of the freezing depth in the area, then the channel will be able to transfer part of the loads to the concrete. It is best to tie a regular metal swing at the bottom with an additional supporting frame and attach it to the ground with anchors at least 1 m long, see fig. This, by the way, will allow, if necessary, to return the land to economic use without any problems.
Frame
Country swings are most often made on a frame of 2 A-shaped supports connected by a transverse beam. Sometimes, if the swing is equipped with a rigid awning, the frame is made on 4 posts with a canopy, see below. In hot weather sunny places, where an awning is needed all summer, this provides some savings in material.
IN Lately The frame on λ-shaped supports is becoming increasingly popular, on the left in the figure:

During construction, it saves a whole beam of wood, which is significant given current prices for lumber. But this is a swing only for adults: when swinging at full swing, the supporting beams may not hold up - the wooden ones will break, the metal ones will bend. By the way, you can’t make a λ-frame from ordinary structural steel; it will bend right away. We need very expensive special steel.
Frames with a traverse (in the center in the figure) are known to everyone: a swing on a branch is what it is. Specially traverse frames are made for acrobatic swings with 1 point of suspension of the rocking chair; on them, having mastered the swinging technique properly, you can write intricate pirouettes. In this case, the wood on the frame is double thickness, and the concreted ends of the legs must have firmly attached crossbars.
A type of traverse frame is a metal mobile one. They are made of high-quality steel, loads, moments, center of gravity, etc. mechanical intricacies are accurately calculated. Popular (and very expensive) swing-chaise lounges are made in a similar way, on the right in Fig.
Wooden frames
Log
The most effective and, in many cases, inexpensive swings are made from logs. It is not necessary to take debarked and rounded ones: as already mentioned, pruning waste and dead wood will go. The frame from the latter, if the trunks are still strong and powerful, does not need additional reinforcement, pos. 1 in Fig. Swing frames are made of commercial logs, especially if they are mobile, i.e. not dug in or concreted, needs to be reinforced with struts, pos. 2 and 3. In the latter case, the same amount of material is needed, but the frame covers the sky less. The question arises, why aren’t the frames recessed? In order not to spoil the lawn or paved area, in Fig. it is seen.

If the swing is dug in or concreted, then the most economical and durable frame is like that of a Chinese swing, pos. 4. Although such swings have long been known in Russia; They were often made in birch forests, tying together the tops of trees in pairs. The “Russian-Chinese” swing can also be made non-recessed by providing an additional frame at the bottom. A drawing of such a design is given below. rice: legs - logs or square beams, crossbar - timber 180x80, bottom frame - from boards 150x40.

timber
Regular, non-profiled wooden beam makes it possible to construct swings larger than a log. It is easier and cheaper to make a swing with a permanent canopy for hot countries, pos. 1 in Fig. A conventional frame on A-shaped supports made of timber (item 2) will also be simpler and stronger: under the weight of the rocker, the legs compress the crossbar (item 3) and the more the swing is loaded, the stronger the frame holds. In the frame of the “Russian-Chinese” swing made of timber, at the top you need, as for logs, only 1 fastening unit, pos. 4, and installing a canopy over a swing made of timber on A-shaped supports is also not difficult, pos. 5.

Moreover, a crossbar made of timber can be used in the same way as for the legs, i.e. reduced cross-section (100x100 mm), if you reinforce it at the ends with overlays from the board, and the hanging points of the rocking chair are placed close to them, pos. 6. Then the bending moments of the crossbar will, as it were, flow into the compressive legs, and the tree holds the compression load well.
To enhance this effect, the crossbar is sometimes placed below the tops of the supports, pos. 7, but the gain in strength turns out to be illusory, but the extra fasteners are noticeable and cost money. Using this principle, it is better to cut off the tops of the supports and additionally secure the crossbar on top with overlays, pos. 8. Then it will be possible, if the crossbar is 150x150, and the legs are 200x200, to make the crossbar extensions up to 1.5 m, and hang a children's swing on ropes to them, attach a ladder with a slide, etc. The result will be a family swing and sports corner with a material consumption of only slightly more than for one swing.
And another question: is it possible to replace the timber with a board, say, 150x40? It is possible, as shown in pos. 9, only it is no longer possible to make extensions and the height of the supports will have to be limited to approximately 1.8 m. The swing will be just as strong, but much cheaper than timber swings. Well, it will take more work - marking, cutting, stitching.
Note: The “classic family” swing described above is even more economical, but its legs must be concreted, otherwise the plank frame will be fragile. And those shown in pos. 5, 6 and 9 are mobile, they can simply be placed on the ground or floor.
How to install the frame?
The swing crossbar must be horizontal, otherwise the rocking chair will wobble unpleasantly on any suspension. Setting it up with a bubble level is difficult and troublesome, a hose level is not much easier, and a laser level that builds planes, of course, is not just kept on the farm.

You can set the crossbar of the swing using one of the oldest leveling devices - the Egyptian plumb line, see fig. It fell out of use in ancient times due to low accuracy, but it is enough for a swing. You can use a bucket of sand as the bottom load, and the top weight, in addition to the usual plumb line, can be any piece of iron - a bolt, a nut.
Hangers and Pendants
The suspension of the rocking chair determines the convenience, comfort and safety of the swing. This rather complex node should:
- Prevent swinging as little as possible within safe limits.
- Gently absorb the energy of the rocking chair if the swing speed/angle is outside the permissible limits.
- Ensure rocking without jerking and with as little sideways wobble as possible.
- An acrobatic suspension should provide the same in 2 planes.
Rocking chair suspension schemes are indicated by the formulas type n-m-k, where n is the number of suspension points at the top, m is the number of intermediate suspension points, and k is the number of them on the rocking chair. Somewhat similar to the wheel formulas of steam locomotives, but this is pure coincidence: for a steam locomotive, m cannot be equal to 0, because denotes the number of moving axes, and for a swing - easily.
Some types of rocking chair suspensions are shown in Fig:

Suspension type 1-2 with a soft flexible rocking chair (not shown in the figure) is called a flying trapezoid. Suspensions of types 1-m-k are used in swings on traverses. Garden and country swings are most often hung using methods 2-4 (the simplest), 2-2-4 (prevents it from swinging excessively) and 2sh-4 (also you won’t swing too much and there’s no wobbling).
Of particular note is the 4-4 suspension. It’s actually not a swing: how do you swing on something like that? However, it is sometimes used for original garden benches (on the left in the figure):

Some find a little erratic rocking to be soothing. But most often, swing arbors are hung using the 4-4 method, right there. A matter of taste, some people like it. The eastern rulers of the past, and even the present, they say, simply delight in such people in the company of their concubines.
Chain, rope or traction?

Hanging a swing on a rope is the easiest and, if you know how to tie some sea knots (see below), does not require expensive additional fasteners. But the rope, as you know, stretches, and the spiral weave does not limit the swinging in any way. Therefore, firstly, it is better to hang the simplest children's summer swing on ropes, pos. 1 in Fig. below. Secondly, take a cross lay rope, see fig. on right. It has a lot of internal friction, which is why riggers don’t like it (the efficiency of lifting mechanisms drops), but for a swing this is exactly what is needed so that a foolish child doesn’t do a somersault. The diameter of the nylon cross rope for swings is from 24 mm.

Chain suspension, pos. 2, expensive, but in terms of its totality of characteristics it is optimal in all respects: the chain is strong, its wear is immediately visible, it almost does not slow down small swings, and it dampens excessive swings due to friction in the links. However, due to the latter circumstance, the smallest ones in swings on chains for adults can seriously pinch their fingers; For children's swings, small-gauge chains are used.
The rocking chair on rigid rods (positions 3 and 4) is usually suspended on bearings. It swings very smoothly, without the slightest wobble, and, as they say, even a mosquito will swing on it. But such swings without additional safety measures are dangerous: crashing your head into a stone fence or curb at a speed of 60 km/h is no longer an accident, it’s a tragedy. Therefore, on-site swings with rigid rods for children should, firstly, be equipped with a rocking chair with a fence, as in a swing for children, pos. 3. Secondly, it’s still impossible to let a child on them without adult supervision.

In a public yard swing on bearings there must be a swing limiter - you never know who can get in there and how can they swing? The rocking chair hits against a simple stopper made of a pipe (see figure), which is unpleasant. In good branded models of swings with rigid rods, the bearing suspensions are made with a built-in hydraulic brake, which operates on the principle of a viscous coupling in cars with AWD drive, but such suspension units are expensive.
Sometimes rocking is also limited by connecting the rigid rods of the rocking chair to the frame with lengths of chains, pos. 5. But, generally speaking, this is not the best solution: due to the different mechanical characteristics of the suspension links, even a small and completely safe swing on such a swing occurs with noticeable jerks.
Note: There is also a whole class of luxury swing suspensions based on systems of balanced levers, springs, and hydraulic shock absorbers. It’s clear that it’s expensive and you can’t do it yourself.
Suspension units
The critical points for hanging the swing are the attachment points. They bear very large alternating loads and are subject to abrasion. A small burr on the rubbing surface of the fastening will give very noticeable jerks when rocking. Therefore, the choice of design of fastening units must be approached with all responsibility.
The cheapest, but also the worst option is S-shaped hooks, pos. 1 in Fig. Huge loads are concentrated in their crossbars, the probability of sudden destruction is high, therefore such fastening is only permissible for swing benches suspended no higher than 0.5 m and the design of which allows them to sway barely.

The most reliable fastening is on clamps with carabiners, pos. 2. The main load falls on the top of the crossbar beam, which is absolutely safe. It is only necessary that the carabiners have safety teeth and an anti-friction insert: sliding of the suspension rod in the eye of the carabiner is already an emergency mode in case of excessive swinging.
Reliable clamps still spoil the appearance of the swing, so fastenings are most often made with eye bolts, pos. 3. Indispensable conditions for their maximum reliability - the bolt must pass through the bolt, under the nut, regardless of the material of the crossbar, a steel washer of at least 60 mm in diameter and 4 mm in thickness must be placed, and the nut must be firmly locked. When swinging, spring washers of all types do not prevent the gradual spontaneous unscrewing of a single nut!
The reliability of the eye bolt is absolute - the neck of the eye (ring) is subject to great stress. The slightly more expensive U-hooks and shackles, pos. 4. A blind hole is drilled in the crossbar under the hook bar and it is inserted there tightly. Without being able to straighten out even a little, the hook will withstand an incredible load, because... The destruction of a metal begins with micro-disruptions of the bonds between its crystallites.
The eyebolt, U-hook and, to a slightly lesser extent, the rigging shackle significantly weaken the deadbolt, because the concentrated force applied from above tends to break it just where the beam is weakened by the hole, and the fastening pin, as it swings, “breaks” it. The washer weakens this effect, but does not eliminate it completely. As a result, where it would be possible to get by with a 100x100 mm solid beam, you have to install 150x50 mm, and in anticipation of swinging at full swing, even 200x200 mm.
Conspicuous, but ideal in all respects, are the through fastenings with an overlay and an upper suspension, pos. 5 and 6. The shear forces from them spread freely to the sides along the beam and tend not to tear, but, on the contrary, to compress the hole, as if it does not exist; the beam now becomes equivalent to a solid one. In addition, although such a suspension looks like a 4-4, it is kinematically equivalent to a chain 2-2-4, but it dampens excessive swing even better and more smoothly. If the suspension with overlays is rope, then between the carabiner and the fire (loop) of the cable you need to place a solid ring, pos. 6.
Also, rings connect the branches of the 2-2-4 chain suspension. The upper branch is welded to the ring or soldered with hard solder, and the lower ones slide along it freely, pos. 7. Only then will the 2-2-4 chain suspension acquire the required kinematics.
Rope suspensions are good because they allow you to easily adjust the height of the rocking chair, but, made “chain by chain”, they require quite large quantities expensive fastening, locking and adjusting parts and assemblies, pos. 6,8 and 9. However, all of them, after one, are easily accessible to self-made with the exception of this, they can be replaced with marine nodes for the appropriate purpose. The reliability of maritime knots has been tested over thousands of years of maritime practice, and their complexity exists only in the popular imagination.
You don’t need to know 200-400 knots, like a boatswain of a sailing fleet, or at least 20-40, like a current yachtsman, to build a swing; 7-9 is enough for everything, see fig:

A – anchor knot, or fishing bayonet, for attaching a cable to a carabiner with an anti-friction gasket or an intermediate ring. Up to 5 hoops (turns) can be inserted into the eye. A simple mark is applied to the running (free) end of the cable and it is used to connect the running end to the tensioned one, shown in the red frame. The fastening holds until the cable rots or the eye rusts. The anchor knot is non-tightening, it is not difficult to untie it: just remove or cut the mark that tightens the ends.
B – bed knot, also non-tightening. Suitable for the top suspension of temporary, say, for weekends, children's swings.
B – bayonet with rim, the same as B, but for adults.
G – locking knot, or figure eight. For lower mounting of children's swings through holes in the board.
D, F - sealing the end of the cable with a turnip and a simple disk button. The same as G, but for adults, and the cable tails do not dangle. Although, in general, it is better to fasten a rocking chair on ropes by the bottom without any knots at all, as described below.
Z – net knot, for tying 2 ropes crosswise anywhere without cutting.
And - this is how a loose loop is knitted on a solid rope. You can hang an umbrella, a siphon with soda, attach a shelf or something else.
Note: There are also simple knots for tying 2 ropes, identical or different, for example. weaving knot. However, it is strongly not recommended to assemble a swing rope suspension from pieces.

It remains to solve the issue of adjusting the rocking chair on the ropes. To do this, you need 2 cuttings of a strong hard board from 30 mm (oak, beech, elm, walnut), from which running, or hanging, rope stoppers are made - deadeyes, see fig. on right. Such gizmos were used to regulate the tension of the rigging of ancient sailing ships, and nothing happened - the oceans were crossed, America and India were discovered. Deadeyes are used in conjunction with the rocking chair suspension method described below.
Rocking chair and its fastening
A rocking chair for adults is, in general, a garden bench without legs. They choose it according to their taste and on the back with the fifth point. From below, an adult rocking chair is supported by a pair of cross bars, and eye bolts or U-hooks are inserted through their ends, as in pos. 4 drawings of a “classic family” swing at the beginning. Fastening to any points on the top, as in pos. 1 Fig., extremely unreliable. When rocking, the centrifugal force should compress the rocking chair and press it against the supports, and not stretch and tear it away from them.

Children love to swing on the flying trapeze, pose. 2 in Fig. below. You can make one yourself from tarpaulin, strengthening the ends with wooden strips, inserted into pockets sewn at the bottom and equipped with eyelets. But you can’t install eyelets for curtains, they are weak. If you don’t have sailing eyelets at your disposal, you can sew their substitutes from a steel ring and harsh, properly waxed or resinous thread, pos. 3.
Children's rocking chair made of boards with two-point suspension, pos. 3, it is not recommended to do it by any means, there is a high probability of overturning. If you are going to make a rocking chair on 2 points, then from logs, as in pos. 4, and hang the rocker from the board at 4 points, passing the cable through the holes, pos. 5.
However, the best rope suspension for both children and adults is a loop in the grooves, pos. 6. For adults, the lower support bars of the rocking chair are made wider, with a projection of 100-200 mm. They do not interfere; on the contrary, with a slight rocking, you can put a book on them, put a can of beer, etc. What if there is a lateral swing, they will serve as good bump stops and shock absorbers. The suspension in the grooves is absolutely reliable and can be easily assembled and disassembled. Adjusting the height of intermediate points with deadeyes allows you to change within a fairly wide range not only the height of the rocking chair, but also the kinematics of the suspension.
Tire swing
Perhaps the most favorite swing for children is the one made from tires. The reasons for this are not only psychological or ergonomic; a rocker made from a tire is an excellent shock absorber in emergency situations, and an excellent swing material for an adult craftsman-dad. An unusable tire can simply be hung on a branch, pos. 1 in Fig., by cutting it, a flying trapezoid is obtained without much difficulty: the presence of steel cord in the mass of durable rubber allows you to do without eyelets. A solid tire will go on a rocking nest for collective gatherings of small children, pos. 3. When two or three people swing each in their own way, the trajectory of the rocking-nest on the suspension 1-3 or 1-4 makes even a person who knows mathematics and physics well scratch his head thoughtfully.
Finally, from tires cut and folded in different ways, single rocking chairs are obtained not only for children, but also for adults, pos. 4-6. The popularity of swings made from tires is so great that some sports and toy companies and companies specializing in goods for children produce, especially for swings... square tires, pos. 7! All that remains is to exclaim after the author of “Tartarin of Tarascon”: “Has anyone ever heard of something like this?”
Curiosities, but to the point
Since we are talking about funny swings, let’s touch on some more of them, but they are quite suitable for their intended use. For example, hammock swings, on the left in the figure, although the hammock itself is already a recumbent swing. There is probably something about swaying with additional degrees of freedom that owners like. In any case, there will be no harm.

Children will probably like the device in the center, but it is impossible to name it without sinning against Russian grammar. A swing, not a swing. And the author posted a photo of the one on the right with a note: the easiest way to recycle an old car. The comment was in English, so it is quite possible - in many Western countries, delivering a car to a landfill or selling it for scrap costs a lot of trouble. And here the great inertia of the heavy rocking chair allows you to swing for a very long time, the canopy turns out by itself, and soft sofa will not reduce comfort.
Not those, but the swing
Finally, about swings, direct descendants of children's pendulum swings, but quite adult ones. And not for entertainment, they help cope with arthritis, osteochondrosis, radiculitis without expensive treatment. Reviews from doctors are positive.
Good afternoon, today we will continue to talk about swings. We have already figured out what different (both simple and complex) swings you can make with your own hands for your dacha in our article. And today I decided that this topic is worth continuing, because I found more 15 WAYS to make a garden wooden swing. They are even more luxurious than the ones I already talked about... And now I will show them and explain them to you what is what.
We'll start with the most simple options swings for the garden - and then little by little tinkering is getting cooler and cooler. You yourself will be stunned by the realization that “How damn simple and easy everything turns out to be, I can do it too.”
If mothers are reading us, then don’t rush to run away - here there are options for garden swings that your delicate hands can handle...
Better yet, show this article to the father of the family - believe me, he will there will be something to LIT ON... And in your yard - a GARDEN SWING will very quickly appear ... with interesting architectural gadgets
But I won't get ahead of myself. Let's start from the beginning...
I'll start with a non-standard way...
MODEL ONE – garden swing
from hoop and rope.
For this method even man's hands Not needed. Patient women will do...

What do you need:
- steel hoop for gymnastics...
- foam rubber for wrapping a hard hoop (which was more comfortable and softer) -
- and a rope (a clothesline from a hardware store will do).
What to do I described the whole process of creating a swing and drew everything step by step in the picture (so as not to explain it with fingers - but it was clear).

After when the entire macrame web is made, you can additionally wrap the rim with rope - between the knots - so that the knots do not slide along the hoop and do not bunch up - and cover it with foam rubber on top - so that the hard rim does not dig into the body...
But in the photo below we see weaving from thinner ropes - and in the center our ropes are not randomly intertwined - but threaded in a small metal ring…

You can also buy such garden swings... They are on sale... made using factory equipment. And you don't have to do anything with your own hands.

And here is one photo gave me a wonderful idea…
What if...we found a tub or basin - which would just fit inside our iron hoop - then we don’t need to weave anything from strings. Place a basin inside the hoop and enjoy yourself on the garden swing... And then, when the children grow up and lose interest in this fun, you can create a wonderful, lush garden flower bed in the basin...

MODEL TWO –
garden swing-board on ropes.
Everything is simple here - there is wooden plank+ there is a rope.
And only one task -
HOW TO FIX THE ROPE on this very board.

Method one– we drill holes in the seat board of the wooden swing and thread a rope through them so that it goes into one hole and comes out of the other.
To strengthen this structure (so that the board does not break in place drilled holes) - we also add seats under the board - on both edges - along a small board (also with holes). So that the rope passes through the seat board - and through the backup board pressed to the seat board.
Method two- this is when the seat of a garden swing looks like a wooden frame frame. We tie ropes to the frame (right and left) (as in the left photo below) - and pave the middle part of the frame with planks.
Method three– this is when the seat looks like half a cylindrical log (cut lengthwise). A very durable option (only such a log needs to be well planed and polished so that there are no splinters in the soft place).

Method four— you can screw through metal fasteners to the board... They come in different forms- look in stores or in a shed.
And these are not all the techniques... In my article you will find several more ways to attach a rope to a board... Everything is also there in clear pictures.
MODEL THREE – garden swing
made of canvas on chains
Here, too, everything is simple - there is a chain + there is a metal triangle + there is a piece of thick tarpaulin.

We hang the iron triangles on a chain - we pass a piece of tarpaulin through the triangles - we bend its edge to the bottom and put 2 large rivets. Ready.
If there are no rivets, you can simply thread the bolts through and tighten them with nuts - and to prevent the bolt from breaking through the hole, then lay wide metal spacers on both edges. And with your own hands you quickly and easily made a soft garden swing from fabric.
MODEL FOUR – garden swing made from chairs.
There is three different ways – attach our rope to such a “chair-like” seat.

Method one (blue chair from the photo above) - under the seat of the chair - we place 2 thick metal rods (one under the seat of the chair from the back - the other from the front under the seat). We cut round holes in the corners of the chair - thread ropes into them - and tie the ends of the steel rods with these threaded ropes. Thus, we get a rigid structure of our swing
Method two (yellow swing from the photo above)– we nail 2 boards to the bottom of the chair – we drill holes in them – we thread ropes into the holes and secure them with a fastening knot.
Method three (pink swing chair) – We make a small shield from planks. We drill holes in it. We put it under the seat of the chair. We drill grooves in the seat of the chair (not holes - but grooves, that is, vertical cuts along the edge of the seat) 2 through grooves from the front corners of the seat + 2 grooves from the back side of the seat.
The ropes pass through the front grooves - go under the seat towards the shield - there they enter the front holes on the shield - come out of the back holes on the shield - and pass into the rear grooves of the chair seat - and go up to the support on which they hang.
This grooved design is very durable - remember?.. we already made such grooved fasteners for swings in the article.
MODEL FIFTH –
garden swing for kids.
If your child is still very small (so much so that it would be dangerous to leave him alone even on a stool), then... you can add another one to the classic swing-board protective structure which will prevent your baby from falling out of the swing.
The design of such children's wooden swings is very simple. Look... Let's say you have a swing board...And you want to make them swing-with-protective-barrier. Here's how we do it...
- Need 4 tubes(metal or plastic, or even cardboard paper towel tubes will do just fine, or a piece of hard garden hose).
- And more are needed 4 planks with holes at the ends(the length of the boards should match the width and length of our board - that is, 2 boards equal to the length of the board + 2 boards equal to the width of the seat board. Drill holes in them so that the rope can fit through.
And then everything is simple.
- We thread the rope into the seat board - it comes out of 4 holes in our seat.
- We put a tube on each rope - and then on top of each tube through the rope we put our boards - in the order that is visible in the photo.
Like this - It’s easy and quick to make a children’s garden swing for kids with your own hands.
Or… you can do it like this... I’ll talk about this in detail in the article "Children's swing - do it yourself"

Or you can sew a children's swing like this from fabric and wooden sticks.

I’ll tell you about this too... but separately... I’ll tell you how to sew such a children’s swing step by step yourself in a special article “Children’s SWING – for the little ones SEW YOURSELF” There will be all the sizes and a detailed pattern and sequence of actions. That is, this will be an article for mothers...
And in this moment dads read us…And therefore let's run further... Now comes the most interesting part.
Of course you have already matured question…
QUESTION:
What support can such a swing be hung on?
LET'S LET'S LOOK RIGHT NOW...
A good woman, Olga Klishevskaya (now we met), has dug up a whole lot for you 3 options for support structures for garden swings.
And now I will tell you in detail and show in photos how and what to do, and what is the feature of each such support system.
SUPPORT for garden swing - with crossed beams
X-shaped support
Two beams are placed next to each other in the form of the letter X... a fastener is driven into the place where the beams intersect (piercing through both beams and secured at each end with a Nut with wide round gasket between the nut and the beam (as seen in the photo below)

And another beam is placed on these crossed support pillars - horizontally. It is also fixed with the same fasteners.
And then to this horizontal lying beam we drive fasteners with rings into which we will thread the rope.


and I also have a step-by-step lesson on how to create the EXACT SAME swing with a bench as in the photo below - ARTICLE “How to make a swing - STEP-BY-STEP LESSON with photo.” There, one Korean dad makes just such a hanging bench - step by step.
As you can see in the photo, such a garden wooden swing with a bench can be hung as on the ropes so and on a chain– I have already talked about the methods of fastening the swing and special carabiner holders in great detail.
The same swing models can be made from BENT timber.


QUESTION – what type of seat should such a swing with a bench have?
ANSWER - so that there is somewhere to sit on it and somewhere to lean... And the design is at your discretion...

The variety is great... so great - that I realized ONE thing: I will have to create a separate article for this topic.
I invite everyone who needs a garden swing-bench to go there... to Aida's article... to learn from the experience of foreign craftsmanship
This article was written (and in some places drawn) by a woman.
Because... only a woman can inspire a man to create beauty. What I actually did these five days, for a total of 38 hours.
So go and create (and I’ll go and finally eat...)
And when you succeed (and you definitely will)... and you will be inflamed with a reciprocal feeling of well-deserved gratitude - here are the addresses of my electronic wallets
web money R172889385212
POISON 410012568032614
(I accept even the smallest gifts)))... Motivation is a great thing.
An encouraged author will always find the strength and perseverance to create good and useful articles again and again.
But That's not all…
I decided to continue this topic and tell you about other ways to make a garden swing for your dacha.
- article
- article
- article
-
Olga Klishevskaya, especially for the site
Take care of family heaps... These are your legs and arms.
These are your ears and eyes... and a source of warmth and affection.
Good quality, suitable for general style landscape, a wooden swing on a summer cottage is a joy for children and adults. Purchased publicly available models usually do not differ in quality and variety. It is much more interesting and useful to approach the process yourself and make a country swing, giving your site a unique flavor. After all, there is nothing particularly complicated about it.
Wooden swings are divided into three main types:
- frame, standing on stationary supports ( classic version);
 Frame swing
- suspended on ropes or cables, such as a “bungee”;
 Hanging swings, bungees
- “scales” or balancing swings. This type of swing is for two.
Any model is played out in such a way that all neighbors will envy, and household members will choose their favorite corner of the garden or yard.
Where to place it?
If you choose the classic bungee, hang it on the nearest tree that inspires confidence in terms of strength. When selecting a location for other types of structures, it is reasonable to take into account the following factors:
- sufficient distance from walls, fences, trees, wires, thorny bushes and sharp-pointed objects;
- illumination It is advisable that the sun hits the site until the evening. So wood material insured against dampness;
- It is better to immediately select a smooth surface relief so that you do not have to carry out additional work;
- the place should not be “windswept.” Drafts are fraught with rapid colds.

It’s good if there is sand or soft lawn under the swing. This will help you avoid getting seriously injured on a stone or reinforcement if you fall.
Drawing
You can do without it. But if a serious project is conceived with a claim to long-term service, then it is better to prepare a drawing of a swing for reasons of saving material. Designing a homemade swing is not difficult.
General provisions that reflect the drawings of a garden swing made of logs:
- frame structure;
- sizes. For a swing, this is the height and area of the base;
- places of fastenings and reinforcing elements must be marked;
- number of seats and their type;
- length of suspensions and their type.

An example of a drawing of a wooden swing
Material selection
It is important to focus on the quality of the material from which the swing will be made. High-quality wood will not only ensure the durability of the structure, but also guarantee safety of use.
Species such as cedar, oak and larch will not disappoint expectations. Spruce, pine and birch are also quite durable.
The lumber must be selected dry, without traces of mold or areas of rot. There should be no falling knots, crevices, or holes made by pests. A wooden swing will not require a large volume, so you can check each board and timber.
Tools
To make a wooden swing you will need:
 Strong branch on
- mixture for concrete mortar;
- nails, screws, bolts, angles (in accordance with the project);
- tape measure and plumb line;
- hacksaw;
- hammer;
- antiseptic for processing wooden parts;
- grinder (or drill with attachment);
- screwdriver
This is the main arsenal. When everything is ready (material, drawings and tools), we begin to make a garden swing from logs.
Caring for a wooden swing
- Annual treatment with a special compound or painting will save the product from rotting and pests.
- From the end to the beginning of the season, it is necessary to cover the swing with waterproof material.
- Avoid rust on metal parts.
- Do not give disproportionate loads.
Such swings will delight more than one generation, provided these simple and understandable rules are followed.
And if they fit better into the design of your garden, then it will be more difficult to make them. But they will last you longer.


- Turkey stewed in a slow cooker: spicy, with vegetables, in sour cream, cream and walnuts
- Types of speech: description, narration and reasoning
- Martyrs Tatiana. Moscow Church of St. Martyrs Tatiana Temple of the Martyr Tatiana at Moscow State University schedule
- Milotici: return of the Russian village Moravov Alexander Viktorovich
- Why you shouldn't cry in front of the mirror
- Milotici: return of the Russian village Moravov Alexander Viktorovich
- Why you shouldn't cry in front of the mirror
- Making sounds for children Lessons on making sounds for children
- Actors Spiderman Aunt May Aunt May in Spiderman
- Pink salmon in the oven - delicious and easy recipes for baked fish Pink salmon fillet baked with vegetables
- What does a lizard tattoo mean?
- Deciphering the natal chart of the house
- What does mulberry help with?
- Photo report “Birthday of Samuil Yakovlevich Marshak in the group”
- Breathing at high pressure Breathing correctly at high pressure
- Bryansk State University named after
- Tasks to test spelling and punctuation literacy
- Macroeconomic calendar
- The Forex economic calendar is a reference book for every trader, regardless of trading experience and level of professionalism, and especially...
- Representatives of the arachnid class are creatures that have lived next to humans for many centuries. But this time it turned out...