Do-it-yourself flamingo from a plastic bottle - photo, how to make it. Mk flamingo from plastic bottles DIY pink flamingo
To decorate your garden plot, it is absolutely not necessary to spend money on various garden sculptures. All these swans, herons, storks, eagles and even the exotic flamingo bird can be made from completely unexpected materials with your own hands.
In addition, products made from plastic bottles are now very popular, so your small architectural forms will look modern and original. Therefore, this option is optimal for the garden and dacha, if, of course, you have imagination and skillful hands. You can find out how to do this by watching a video or photo on the Internet, or by reading our master class.
How to make a flamingo - master class
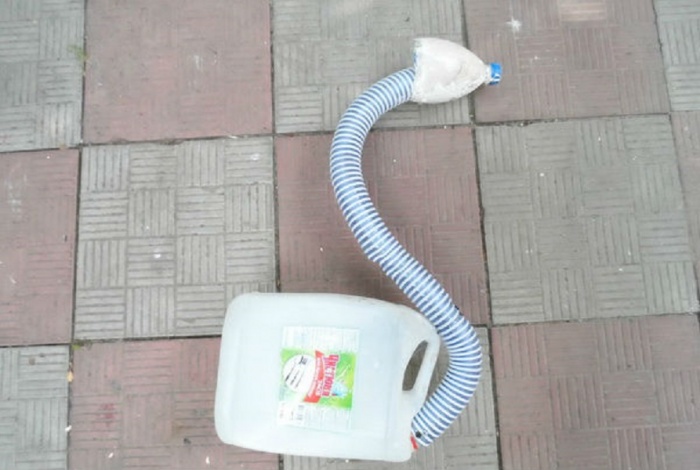
To make a pink flamingo from plastic bottles for your dacha, you first need to create a base. To do this, you will need a five-liter liquid soap canister, a metal-plastic tube (can be bought at any construction supply store), and self-tapping screws.
Step one . The canister is cut (see diagram, red color), its neck remains at the bottom, where the tube for the shape of the neck will pass. Approximately 3 centimeters are left from the edge, this is necessary in order to attach the wings later. We move it back, not reaching 3-5 cm from the edge, and attach it to the canister with self-tapping screws.
Step two . We bend the metal-plastic tube for the legs according to the diagram (black color), and insert it through the top. The bottom picture shows that the legs should fit into the hole that was created between the pulled back wall and the bottom of the canister. We secure it again with self-tapping screws (2 on top, one on each side). The length of flamingo legs is about 62-65 centimeters.
Step three . We also bend the metal-plastic tube for the neck (black color in the diagram), pass it through the neck of the canister, and secure it with two screws along the bottom of the canister. The neck should be approximately 60 centimeters long.
We put a corrugated sleeve around the neck (also sold in hardware stores) and secure it (you can glue it or just insert it into the neck).
Now you can start making feathers. For this you will need plastic bottles with a capacity of 5 liters. We cut them into 8 identical parts; the feathers for the body can be halved. To make it look more beautiful, we try to arrange the feathers in a checkerboard pattern.

1. First we close it from the back, all the way to the legs.
2. Use long feathers to close the open space on the side, then in a circle (here you can use halves). Try to arrange the feathers symmetrically on both sides, leaving the back open.
3. Closing from the front is a little more difficult. You can cut the top of a five-liter bottle in the shape of a chamomile, and start fastening it from the place where the neck meets the canister.
Make sure that the screws are not visible; cover them with feathers.
Now you need to paint the feathers for the body, each separately. Then we cover the body with a bag, and paint the head and neck with a different color. Although you can first fix everything (torso, neck, head) and paint at the same time, it will be easier. It all depends on the imagination of the creator.
The head for the flamingo is made like this:
1. We apply a pattern (10 cm high) to the foam plastic.
2. Using a stationery knife, cut along the contour, form the head and beak, not forgetting that you need to leave a hump.
3. Clean with fine sandpaper.
4. Treat with any putty (can be acrylic), leave to dry for at least a day.
5. Sand again with fine sandpaper to achieve smoothness, coat with PVA glue, and let dry.
A flamingo bird, made with your own hands from plastic bottles, should on average have a height of a little more than a meter (real flamingos are one and a half times larger). If you like products made from plastic bottles, then you can make several of these birds for your garden or dacha, let them “live” on your site in a pair or even a whole flock.
 How to learn to draw portraits?
 Vase from plastic bottle do it yourself - photos, videos how to make
 How to make feeders from plastic bottles with your own hands - photo, video
I would like to introduce you to the process of making this beautiful “Flamingo”. Since this was my first job, there are practically no photographs left, I will try to explain in detail using descriptions and diagrams.
For the preparation, I used a 5 liter liquid soap canister, a metal-plastic tube, which is now sold in any hardware store, self-tapping screws.
1) cut the canister, as shown in the diagram in red, the neck remains at the bottom (where the tube for the neck shape goes). Leave about 3 cm from the edge so that you can attach the wings later. We move it back, not reaching the edge 3-5 cm. Attach it to the canister on the sides with self-tapping screws.
2) Bend the metal-plastic pipe for the legs (shown in black), insert it through the top. The bottom picture shows that the legs fit into the hole created between the bottom of the canister and the pushed back wall. We attach it to the canister using self-tapping screws (2 on the top and one on each side). Leg length approximately 62-65 cm.
3) We bend the metal-plastic pipe for the neck (shown in black), pass it through the neck of the canister and fasten it in two places along the bottom of the canister with self-tapping screws. Neck length approximately 60 cm.

We put a corrugated sleeve (you can also buy it at a hardware store) around your neck and fasten it (you can insert it into the neck or glue it

For feathers, cut 5l. bottles for 8 equal parts. For the body, the feathers can be halved. We try to close it in a checkerboard pattern (it looks prettier this way).
1) close from behind, to the feet
2) close the open space on the side with long feathers, then (you can use halves) close it in a circle. Be careful: the feathers must be laid symmetrically on both sides, leaving the back open!
3) It’s more difficult to close in front. I cut the top from 5l. bottles in the shape of a daisy and began to be attached from the junction of the neck with the canister.
Make sure that the screws are always covered with the next feather.

I painted the feathers for the body separately. Then I covered the body with a bag and painted the head and neck with a different color, but you can attach everything first, and then paint it all together (the body, neck and head - it will be even easier). It depends on your imagination.

Preparing the head:
1) apply the design to the foam plastic (100 mm high) you saw how this is done in MK Filin
2) start cutting (it’s better to use stationery knife), form the head, then the shape of the nose, do not forget to leave a hump.
3) Finish with fine sandpaper
4) Treat with any putty (I use acrylic), dry for at least a day
5) Sand with fine sandpaper until smooth, coat with regular PVA glue and dry.

After drying, we attach it to the neck (we use glue that is water-based, as others corrode the foam) onto a metal-plastic pipe and carefully glue the corrugation on top. You can paint everything (only one pink color for now).
I paint all my products with spray paints, they give a good, even coating.
I drew the head with regular acrylic paints, eyes are sold at any Fabric store.

I painted the feathers for the tail and wings separately because they different color. for the tail the entire length of the bottle, and for the wings about two-thirds. I collected them in a checkerboard pattern, and even folded some of them for pomp.

I made the base for the wings from 5l. bottles (shown in the diagram). I screwed the feathers onto it with wire.
1) close the back
2) wings,
WITH inside also remember to attach the feathers along the edge to cover the visible areas when they are attached
The front of the wings (at the neck) needs to be finished at a bend (inward) to make it beautiful.

We attach the wings with self-tapping screws to the canister, the wings (closer to the back) are also fixed with self-tapping screws so that they do not come off in the wind. We cut out the paws from bottles with a long neck (for example, from 1.5 liter Strelets beer). We paint it separately and put it on the legs (it’s better if you glue them, you can use a glue gun).
I made the stand from a piece of asphalt (the road was being repaired near our house, so I stole it from there).
Coat the finished bird with varnish, I use glossy yacht varnish.
This is such a beautiful bird I got!

Landscape design is fascinating and creative process, allowing the master’s potential to unfold. Starting with small and simple shapes, many craftsmen immerse themselves for a long time in the atmosphere of creating original exhibits for their site. An accessible and irreplaceable assistant most often are improvised materials that have fulfilled their original mission.
A bright representative landscape design will become a flamingo made from plastic bottles, the manufacturing process of which will be described in detail. Exotic bird successfully cope with the role exquisite decor and will give the master the legal right to be proud of his work.

Preparatory activities
Despite the simple source materials, a little preliminary preparation before starting creativity is still required. You should have at hand:
- The main container for the flamingo frame. It is optimal to find a 10 liter plastic canister with a hole on the side. If such containers are not available, a 5 liter plastic bottle will do.
- 5 liter bottles in the amount of 9 pieces. These will form flamingo feathers.
- will perform the function of the legs PVC pipe 2.2 m long.
- The neck is trimmed corrugated pipe about 0.6 m long.
- The head is cut out of foam plastic, the approximate size of the piece is 15x20 cm.
- Self-tapping screws and thin wire for connecting parts.
- Acrylic paint and brushes for finishing decoration.
Comment! It is recommended to wash all plastic bottles thoroughly; to do this, soak the containers in a warm soapy solution for 1-1.5 hours. This will make it easier to remove labels and remaining adhesive solution.

If you do not pay due attention to this stage, bottle flamingos will quickly lose their original attractiveness due to contamination of unwashed areas. A solution of washing powder can also degrease plastic bottles. The procedure will ensure high-quality distribution of paint when decorating flamingos.

Creative process
Creating a flamingo is a job of medium complexity. Compared to other birds made from plastic bottles, there is less hassle with cutting and attaching feathers due to their large sizes. But you still have to work hard.

Flamingo plastic bottles master class:
The formation of a flamingo begins with the body. A hole is cut into the lid to fit the diameter plastic pipe. Holes for the legs are prepared on the sides of the container in the lower part. The result will be a similar blank.
Moving on to the plumage of a flamingo. In addition to five-liter bottles, suitable for these purposes plastic containers 2.5 l each. This will allow you to cut out the feathers different sizes. The neck and bottom of the entire container are removed, after which the cylinder is cut lengthwise. Pre-prepared paper sketches in several variations can speed up the cutting process. The more elements are available, the more spectacular the final result of the flamingo will appear. The blanks are painted before attaching them to the body, because it will not be possible to fully decorate all areas of the parts on the finished bird.
Feathers of different sizes are sorted into bags; this measure will prevent confusion when fixing the elements on the plastic frame. Flamingo plumage is carried out in several ways:
- If a dense canister is used for the body, I cut out the parts with the leg. Then cuts are made on the canister according to the number of feathers, into which the workpiece is then inserted.
- When using a large plastic bottle for the frame, the elements are fastened with wire, and holes are prepared in advance with an awl.
- Alternatively, a furniture stapler will help to fix the parts on the flamingo.
The practicality of a particular method is determined based on the materials and rigidity of the bottles used for the body and feathers.

For the flamingo's neck, a 0.6 m piece is cut from a 2.2 m plastic pipe. Further steps:
- The workpiece is bent in a shape that imitates the throat of an elegant bird.
- The pipe is masked with corrugated material.
- One edge of the plastic pipe is passed into the neck of a plastic bottle, which serves as the body.
- The end is fixed with screws and glue.
- The flamingo's neck also needs to be painted to match the original.

Making the head will require painstaking work. But here too there is an opportunity to show the creativity and skill of a master. Options for forming a flamingo's head:
- The body of a plastic bird can be crowned with a plaster part.
- It’s easier and more affordable to make a blank from foam plastic.
- Those skilled in the art of woodworking are also given the chance to demonstrate their skills.
- Plastic bottle compact sizes, treated with polyurethane foam, can be an excellent basis for cutting out a head.
Comment! If the flamingo part is made of foam plastic, before the next stage of decoration it should be plastered and sanded to form a smooth surface. In principle, any material will require sanding.
Painting with acrylic paints for exterior use is the final touch to decorating the flamingo's head, which is based on a plastic bottle. You can highlight the eyes with paints or glue special blanks.

Let's move on to making flamingo legs for plastic bottles by hand:
- To keep the bird stable, a stand made of a sheet of metal is useful.
- Small pieces of pipe are welded onto it, the diameter of which is slightly larger than the plastic legs of a flamingo.
- The PVC pipe is shaped into a horseshoe; the distance between the edges should correspond to the size of the bottle from which the bird’s body is made.
- A plastic pipe is threaded through the holes in the body and secured in the stand.
When the entire frame is assembled, they move on to attaching the empennage. Work begins from the tail section, the elements are fixed in a checkerboard pattern. In order for the flamingo's outline to match the original, the bird will need wings. To do this, a frame is cut out of the chain-link mesh onto which the feathers are attached. Installation of the frame with plumage on the body is carried out using self-tapping screws.
If you need to wrap a gift, but you don’t want to use boring bows and ribbons to decorate it, then our article is for you. Today we will tell you how to decorate a gift in an original way using a homemade flamingo.

Materials and tools:
- pink yarn
- pink pipe cleaners
- scissors
- cardboard

How to make a flamingo with your own hands
Cut out two identical circles from cardboard. Cut out each circle central part so that they turn into rings.

Place two cardboard donuts together. Take a very long strand of yarn and start winding it into rings, passing the edge of the thread into the center hole after each turn. Wrap the cardboard rings completely.

Insert the tip of the scissors between the cardboard rings and cut the yarn in a circle along the outer edge.


Spread the rings slightly apart and tie a tight knot around the central part of the pieces of yarn. Leave long ends of the thread, they will become the legs of the flamingo.

Make a flamingo neck from a pipe cleaner cut to the required length. Insert a pipe cleaner into the pompom and bend it into the shape of a neck.

Remove the cardboard rings and straighten the pompom into a neat shape. If necessary, trim off any loose pieces of yarn.

The cute flamingo is ready, all that remains is to fix it on the packaging.

Note: Such flamingos can be used not only to decorate gifts, but also to decorate rooms, as Christmas tree decorations.
Original article in English.


. Fill in the missing letters and explain the spelling of the words.")


- Girls and women almost always associate white shoes with a wedding dress, although the white color of shoes has long been no longer required. A...
- Types of speech: description, narration and reasoning
- Martyrs Tatiana. Moscow Church of St. Martyrs Tatiana Temple of the Martyr Tatiana at Moscow State University schedule
- Milotici: return of the Russian village Moravov Alexander Viktorovich
- Why you shouldn't cry in front of the mirror
- Recommendations: what to grease the pies to make them rosy and appetizing
- Actors Spiderman Aunt May Aunt May in Spiderman
- Making sounds for children Lessons on making sounds for children
- Criteria for preparing an act on write-off of motor vehicles
- Pink salmon in the oven - delicious and easy recipes for baked fish Pink salmon fillet baked with vegetables
- What does a lizard tattoo mean?
- Deciphering the natal chart of the house
- What does mulberry help with?
- Photo report “Birthday of Samuil Yakovlevich Marshak in the group”
- Breathing at high pressure Breathing correctly at high pressure
- Bryansk State University named after
- Tasks to test spelling and punctuation literacy
- Application...burning, grow...sti, to...sleep, m...roll, warm...up, sk...roll,...
- The Forex Economic Calendar is a reference book for every trader, regardless of trading experience and level of professionalism, and especially...
- Interesting signs about spiders