DIY brick wall decoration. How to make a spectacular “brick” wall from plaster? What and how to make a solution from
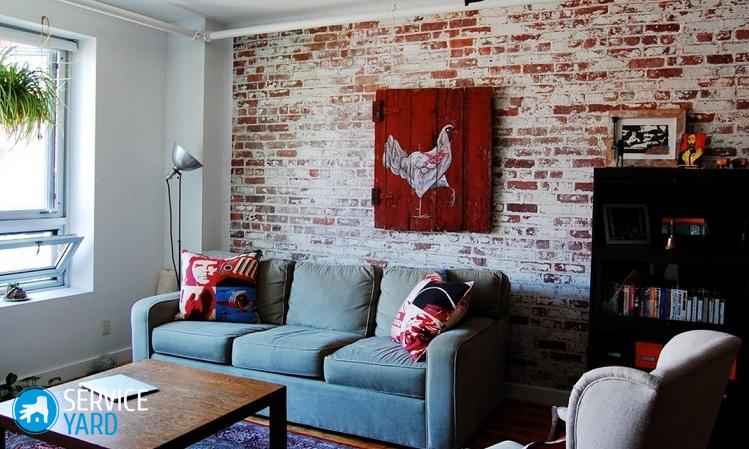
Many people remember Soviet washable paper wallpaper for the corridor with a brick wall print and green sprouts. Many decades have passed since then, but decorative brick on the wall not only has not lost its relevance, but has also smoothly moved into the interiors of living rooms and kitchens, becoming a style-forming element of many modern styles.
Types and features of tiles
Certainly, real brick can rarely be found in the interior. Only the owners of brick city new buildings can afford such a luxury, who, by agreement with the developer, refused plastering works, and owners of private brick houses. In all other cases, to implement this bold idea you will need imitation decorative finishing material.
Flexible
Flexible brick tiles are used quite often for interior decoration. The reason for this is its good decorative qualities and ease of installation. This modern material is made from cement, sand, acrylic polymer and colored pigments. You can find a huge variety on sale color solutions Brick tiles: all shades of brick, white, sand, gray and even black.
This material bends softly at any angle, you can use it to decorate external and internal corners, window and doorways, columns and other curved surfaces. To do this, the finishing element is simply heated with a hair dryer to 50 degrees and glued to a curved surface under pressure. A slightly heated tile will hide any unevenness in the base. You can cut it with a simple knife.
Thanks to combinations different colors different shades of tiles from one collection can be achieved unique design walls. Deviations in shades will further emphasize the naturalness of the masonry. Due to its good performance characteristics (frost resistance, resistance to natural factors), the tiles can also be used in exterior decoration- for example, tiling a loggia.
The following advantages of flexible modern material:
- provides additional heat and sound insulation;
- due to its light weight, it is easy to work with;
- practically waste-free material;
- warm to the touch;
- has a certain resistance to mechanical stress;
- you can put it on a cheap one cement mixture or cement glue.
Plaster
Brick-like gypsum tiles are absolutely environmentally friendly and allow the surface to breathe, which is why they are as popular in finishing as they are flexible. By appearance and in terms of manufacturing technology it is not much different from cement. The facing material is made from gypsum with the addition of plasticizers. It is light in weight, which makes it easy to work with and has a certain range of applications: for example, it can be mounted on drywall. Gypsum tiles painted in the mass do not lose color during long-term use, have soundproofing characteristics, are highly decorative and inexpensive.
However, some of its technical characteristics significantly reduce the range of its application:
- Gypsum tiles absorb from environment moisture, swells and, as a result, becomes colored. Therefore, it is not advisable to use it in rooms with high humidity: bathrooms and kitchens. Or you will have to apply a special varnish to the tiles, which will significantly increase the amount of investment in repairs.
- This is a brittle material that can easily crack from mechanical stress. The fragility also complicates the installation process somewhat.
- Gypsum tiles are an excellent dust collector. The textured surface easily accumulates dust.
Unfortunately, the low heat resistance and fragility of the tile make it impossible to use it in kitchens near stoves, for facing fireplaces, and also for finishing areas near heating elements.
Cement
Cement tiles have excellent performance characteristics and can be used for decorative cladding in rooms operating at any temperature. For example, for finishing walls in seasonal homes. The huge advantage of cement tiles is their inexpensive price and variety of colors and textures.
The basis of cement tiles is mineral chips and best brands Portland cement containing binder silicates, sand and water. Casting or pressing manufacturing technology allows you to imitate the surface with any accuracy. Slightly inferior to clinker in mechanical strength, polymer-cement tiles have less weight, chemical resistance, and a high variety of colors and textures. The coloring pigment is introduced into the solution immediately during mixing, which ensures color fastness and resistance to fading.
Clinker
Clinker tiles are made from the same slate clays as traditional bricks - the differences lie in the manufacturing technology. To make clinker clay, high-temperature firing is used until the components of the mixture are completely sintered. The resulting clinker tiles have minimal porosity, excellent strength, excellent thermal insulation, frost-resistant, moisture-resistant and decorative characteristics. Therefore, clinker is most often used for cladding facades.
The apartment has clinker tiles - perfect solution not only for rooms, but also for decorating kitchens and bathrooms, since its moisture resistance and resistance to temperature changes determine its durability when used in difficult conditions.
Brick panels
Brick-like wall panels made of PVC, MDF, and glass fiber reinforced concrete are also widely used for interior decoration. This material is easy to use, and its protective coating can withstand moderate impacts and friction. Bars and restaurants widely use it to create authentic interiors. It is also convenient for home use. The advantages of panels include:
- Duration of operation - up to 15 years without loss of performance characteristics.
- The ability to hide uneven surfaces or communication systems with minimal time investment.
- The light weight and small thickness of the material allow it to be used even for finishing plasterboard partitions.
- Easy to process the material (cut with a regular knife) and easy to install.
- Impact resistance high level humidity, fungus, mold.
- Various designs, a large number of color shades, varied textures, no need for final painting.
Have wall panels and a small drawback - with a significant mechanical impact they may crack.
Based on the base material, the panels are divided into:
- PVC panels are safe, lightweight decorative panels that are glued to surfaces.
- MDF panels are made from wood chips. Such panels have high performance parameters: resistance to wear, thermal insulation properties and durability.
- Panels made of glass fiber reinforced concrete - a modern material, which is a mixture of quartz sand, white cement and reinforcing fiberglass. This is a modern flexible, lightweight, environmentally friendly, highly frost-resistant, fire-resistant, moisture-resistant, sound-insulating material that is resistant to corrosion and chemical attack. Glass fiber reinforced concrete has high strength under impact, bending, tension and compression.
Advantages and disadvantages
When choosing tiles to create an interior decorative masonry need to read carefully technical characteristics finishing material. For example, to install a kitchen apron, you need to choose a moisture-resistant material with a surface that is easy to clean. The use of gypsum tiles for these purposes will create certain difficulties. The same applies to the use of tiles in the bathroom.
The installation time factor when choosing a material also plays a big role. It’s easier and faster to make brick decor from soft tiles or using wall panels. Working with hard tiles will take much more time. Due to some complexity of installation, in some cases it is better to invite a professional.
The price factor also plays an important role - gypsum or cement tiles would be a more budget-friendly solution, but clinker is a fairly expensive material.
In general, decorative brick tiles allow you to create a durable beautiful interior in modern and classic styles, will look original and noble and will last as long as possible.
DIY tiles
Some craftsmen prefer to make decorative tiles with their own hands, creating their own unique textures. This process is not particularly complicated and does not require the use of high-tech equipment.
Made from polystyrene foam
Foam bricks - easy option transform the interior of your home. To make bricks, fine-grained foam is taken, which is cut to the size of a traditional brick - 25 by 12 cm. If the walls are perfectly aligned, you can glue the bricks directly onto them. If you don’t want to level the walls, you can make a base panel from gypsum plasterboard or plywood.
The bricks are glued using PVA onto a primed wall or base with a gap that imitates natural masonry of 10-15 mm. To imitate naturalness, cracks and gouges are applied with a regular soldering iron or knife (spatula, any sharp object). The base is glued to the wall. After this, you can begin painting the bricks with acrylic paints. You need to paint in several layers, starting with darker shades and ending with lighter ones. It is better to paint using spray cans.
Tiles using a stencil
A brick imitation can be made using a plastic or rubber stencil. To simplify the work, you can purchase a ready-made stencil from the well-known manufacturer of dry plaster and adhesive mixtures, Ceresit. The manufacturer offers a whole line of stencils imitating brickwork London, Boston brickwork, etc. The surface of the stencil repeats the texture of a brick wall.
Work should be carried out on freshly laid plaster that has not yet set. The stencil is lightly moistened with water and applied to the wall with pressure. After you remove the stencil, the imprint of the brick wall will immediately be visible. The stencil is moved along the wall along one straight line. You need to level and correct the imitation masonry with your hands, not with a tool. This creates an imitation of natural texture.
After the mortar has dried, use a scraper to make the borders of the bricks a little clearer. Then use a brush to brush away the debris from the masonry and begin painting.
Made from plaster and silicone molds
To make brick tiles from gypsum, you can, of course, use store-bought silicone or polyurethane molds, but their prices can leave anyone confused. However, if the question is about the design of the brick insert small area, then you can buy one mold, usually for 8 bricks, and make it sequentially required amount bricks.
If you plan to decorate the entire apartment in a loft style, for example, or at least decorate a couple of walls in a brick style, then it will be easier to cast several molds with your own hands and quickly use them to make the required number of bricks.
For the manufacture of silicone mold You will need a large laminated chipboard board with aluminum corner sides to fit the future shape and decorative bricks. The bricks need to be glued onto the board with a shift or evenly, depending on what kind of masonry you want to get in the end, maintaining the evenness of the masonry joints ranging in size from 3 mm to 5 mm. The bricks must be glued tightly, over the entire surface, so that the polyurethane does not flow under them. After this, the entire surface is treated with a release agent.
Polyurethane is mixed in accordance with the manufacturer's instructions. The best hardness polyurethane for these purposes is 40 shore. The first layer of polyurethane is applied with a brush, and after a couple of minutes the polyurethane can be poured onto the surface. The polyurethane should dry for a day, after which you can take it out and put it in for another 5 days to rest. After that, you can start working with it.
The simplest gypsum mixture for making bricks:
- 6 parts plaster;
- 1 part slaked lime;
- water at the rate of 1 to 0.7;
- color.
The ideal option is to have a vibrating table. With its help, air bubbles will be removed from the poured solution. If there is no vibrating table, the plaster in each mold must be pierced with any pin for the same purposes. After 20 minutes, the plaster has already set and can be carefully pulled out of the mold. The bricks need to dry for another day.
This is perhaps the simplest method of creating imitation brickwork and does not require any special investment. To plaster the wall, you can use ready-made dry mixtures by mixing the plaster and adhesive cement mixture in a 1 to 1 ratio. To further increase the plasticity of the solution, you need to add 1 tbsp per 5 kg. detergent Fairy.
For building masonry on the wall, masking tape 14 mm wide is better suited. To simplify the work, the surface of the wall can be pre-drawn with a pencil. The distance between the lines is calculated based on the size of the bricks and the size of the masonry joints. The tape is evenly glued along the drawn lines so that the edges of the horizontal strips extend beyond the boundaries of the wall being decorated, and the vertical strips must be glued on top of the horizontal ones. To prevent pencil marks from being visible on the masonry, it is better to glue the tape above the lines and slightly to the side. The tape needs to be pressed tightly against the wall and checked that it is firmly glued together.
Now the prepared solution is applied to the wall on top of the tape with a spatula in a layer 5-6 mm thick. If you apply a thicker layer, you will then have to spend time on additional grouting. If the mixture is pre-tinted, no coloring will be required. You can walk over the applied solution with a wet rubber glove to create a textured surface.
After the solution has set, but has not yet completely hardened, you can remove the mesh from the tape. Using the ends of the tape, moving from top to bottom, it is removed along with the plaster applied to it. After the plaster has dried a little more, you can use a spatula to smooth out the contours of the bricks. Small dents and scratches will only add naturalness and naturalness to the masonry.
If further painting is planned, then the dried wall will need to be primed. If the tile is already painted in the mass, it will be enough to coat it with varnish to decorative coatings.
Style solutions
Decorative masonry imitating brick not only does not create a large load on the walls, but also allows you to decorate the interior, as in classic ( English style, retro), in rustic (country, Provence) and modern (Scandinavian, loft, industrial) styles. Let's look at some examples.
Loft
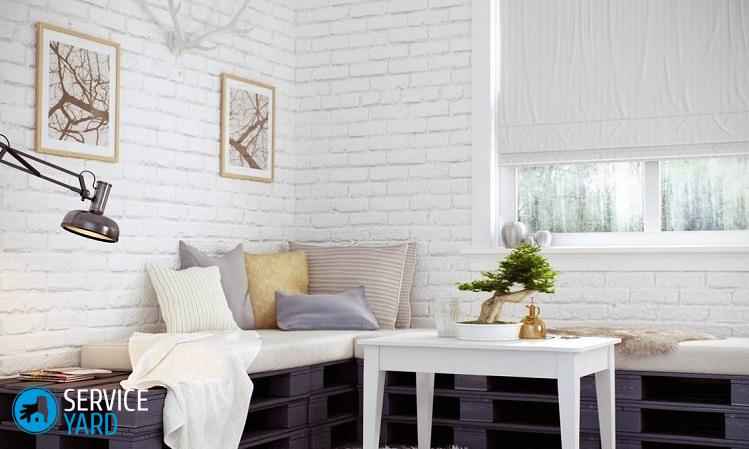
The brutal texture of brick has literally become a calling card modern style Loft. In such an interior, it will look at home in any room - in the living room, bedroom, kitchen and hallway. As a rule, in a loft, one wall is decorated with brickwork - the accent wall. The color of the masonry can correspond to the taste preferences of the owners - light, white, light gray masonry will contribute to the visual expansion of the space, while rich colors - brick, brown and even black are permissible only in spacious apartments.
Loft goes well with modern furniture and with bright colors. Its main companions are metal, wood and glass. For creating stylish interior you can paint the remaining 3 walls White color. As a representative of the minimalist movement, the loft does not accept small, cluttered decor. Windows in this style do not need to be curtained, and blinds will look good on the first floors. Wooden floors will add coziness to the room.
In the kitchen, a kitchen apron made using the brickwork technique will add a zest to the loft style. However, you can also make a working wall with bricks up to the ceiling.
Country
In country style, brick as one background wall will look perfect in the kitchen. Rooms are often decorated with brick inserts - along arches and doorways. The main feature of country style is its lightness, ease and simplicity. And it is very important not to disturb this harmony with a rather heavy brick.

The brickwork gives the room a special homely coziness and warmth. We are not saying that you need to completely forget about plaster and build only brick walls... Just a fragmentary imitation of brickwork in different areas of the room provides unlimited possibilities design flight of your creative imagination.
Using a real wall
If there is a brick wall in the room, you can remove the plaster from it, process it a little and get natural brickwork. Please note - this is a real “authentic” brick wall!
The wall is cleaned of remnants of plaster and sanded with a grinder and a flap sanding disc. Brick joints are additionally corrected with a plastering mixture, hiding visible defects. Finally, the wall is coated with acrylic varnish or wax used for textured plaster. The shiny varnished surface (if desired) is given a certain dullness by local sanding with fine-grained sandpaper.
However! Not always, after removing the plaster, high-quality brickwork will be revealed underneath. Rescue - imitation decorative design! And there is less dust...
Imitation finish options
How to make imitation brickwork? Let's consider options for practical methods that you can implement with your own hands, thanks to a simple technique for their implementation.
Textured wallpaper

Until recently, wallpaper with imitation brickwork represented a rather conventional method of “brick” decor. Today modern technologies printing and obtaining a textured surface of wallpaper make it easy to “deceive” the eye, but still they are far from a realistic surface.
At the same time, the method of decorating with paper, non-woven or vinyl wallpaper has its advantages:
- minimal capital investment;
- speed of installation (pasting);
- Easy to maintain - the flat, washable surface does not hold dust well.
When using the “wallpaper” option, you should pay attention to innovative wallpapers made of foamed polymers on a paper base - they are as realistic as possible.

Here we are talking about ready-made plastic panels, the surface of which already repeats. Using such panels and glue, you can quickly “dress” a wall in brick, both indoors and when finishing facades. Exterior finishing often involves installing such panels on a profile sheathing, which allows for additional insulation of the walls.
Note! In order to properly glue such panels indoors, it is necessary to prepare the surface of the walls!
Stencil embossing

The work is carried out on fresh plaster. A ready-made rubber or polymer flat stencil with a relief pattern of brickwork applied to it is used. The stencil (working side) is moistened with water by dipping into a bath or spraying from a spray bottle. Then it is carefully pressed with force against the plastered wall. Next, the stencil is removed from the wall, on the surface of which traces of the contours of the seams between the bricks remain.
The cycle of actions repeats again. In this case, the stencil is moved to a new place with the horizontal lines of the “masonry” aligned - otherwise it will turn out to be too “surreal”.
The hardened plaster layer is primed or coated with construction wax. The bricks and seams are then painted. You can avoid staining by using a plastering solution that has already been painted in one or more shades. When using “multi-color” plaster, a solution of different colors is applied to the wall one at a time and then smoothed. The result is a realistic brick texture. The seams are additionally painted acrylic paint a different shade.
When choosing paint for decoration, remember that after drying it will darken somewhat!
Tile masonry

This option is interesting because it is already used ready tiles, which is simply glued to the prepared wall surface. This is similar to wall cladding tiles, only it usually has a greater thickness and, when laid, fairly wide (1-1.5 cm) gaps are left between the individual tiles.
The gaps between the tiles are covered with plaster or tile glue mixture. After drying, the seams are primed or immediately varnished. This protects them from chipping.
If you have an old brick, a grinder with a diamond wheel, or even better, a machine for sawing tiles, you can make natural facing tiles yourself.
Decoration tiles can be made from wood, polystyrene foam or gypsum, tile adhesive, extruded polystyrene foam and even... corrugated cardboard. We’ll talk about this in detail, but a little lower…
Painted on plaster

As in the case of working with a stencil for drawing “bricks” on the wall, we will need to freshly plaster it. The solution applied to the wall is smoothed by hand to obtain a random surface relief, reminiscent of the texture of stone or old brick. After the surface of the plaster has slightly hardened, the contours of bricks or stones are drawn on it. This can be done with a ruler, but a more realistic effect can be achieved by drawing the contours by hand.
Using a narrow (1-1.5 cm) scraper, remove the plaster along the drawn lines, forming the contours of the bricks protruding from the wall. We sweep the resulting grooves with a dry narrow brush - this process will remove sharp edges and crumbs of the plaster before it hardens completely.
Further finishing of the plaster “bricks” is carried out in the same way as in the case of a stencil.
Bricks on putty

This method is convenient when you already have a finished plastered wall. A thin layer of putty painted in the color of brick or stone is applied to it. Then proceed as in the previous method, forming the contours and relief of the brickwork on a slightly hardened putty.
By applying putty, it is easier to create a relief using narrow construction tape. The cycle of actions is as follows:
- On a dry plastered wall we make horizontal and vertical markings of the seams of the future surface. In this case, the rectangles of each subsequent row are shifted in relation to the “bricks” of the previous one.
- Paint the marked seams with paint suitable color and wait until it dries completely.
- On top of the dried paint we glue strips of narrow construction tape along the horizontal seam lines, and on top of them we glue short vertical pieces of tape. This sequence of sticking the tape will make it easy to remove it later.
- A thin layer of putty is applied on top of the tape on the wall, the surface of which is smoothed or left uneven depending on the desired texture.
- After the putty has slightly cured, remove the tape by tearing off horizontal stripes. Since the vertical sections were glued on top of the horizontal stripes, they will easily be removed along with them.
- Next is a “technological pause” until the putty completely hardens.
- And then they proceed to the final finishing of the resulting relief surface using the above methods.
Corrugated cardboard
Imitating brickwork using corrugated cardboard is a unique way to perfectly decorate a wall with minimal costs. To complete this design you will need:
- corrugated cardboard - dense boxes made of thick cardboard are suitable for this;
- dense paper napkins– preferably high quality;
- PVA glue in large quantities and a comfortable wide brush;
- hot melt glue and glue gun;
- stationery knife;
- Ruler and pencil;
- varnish and paint - for final finishing.
Sequencing:
- The surface is cleaned of old wallpaper and primed, and the painted surface is cleaned and degreased;
- Corrugated cardboard is cut with a knife into rectangles according to the size of the sides of the brick;
- For ease of gluing “bricks” on the wall, it is advisable to draw basic horizontal lines;
- Each cardboard rectangle is smeared with PVA glue, but its corner parts are left dry. Glue is applied to them from a hot-melt gun. This combination of two adhesive media allows you to instantly fix the “brick” on the wall using drops of hot-melt adhesive, and then securely glue it after the PVA has dried over the entire plane;
- Next is the stage of decorating cardboard rectangles by gluing paper napkins on them - making a kind of decoupage on the wall. The glue is applied with a brush to the rectangles, and paper napkins are applied on top, which are again coated with glue on top;
- When gluing napkins, you need to shape the seams using a round stick of hot-melt glue, a brush or just your finger so that they are recessed into the wall. Napkins smooth out the sharp edges of rectangular “bricks”, creating a realistic effect of a neat “embroidered” wall.
- The next stage of this finishing after the glue has dried is decorative painting and application of protective varnish to the wall. After complete drying, you get an interesting realistic wall decor.
Note! For such work, choose high-quality napkins - otherwise they will simply get wet and roll up in glue. Before gluing, it is advisable to crumple them in your hands to form folds, which will ultimately allow you to more realistically imitate the structure of stone or brick.
After complete drying, you get an interesting realistic wall decor.
Some design nuances
Imitation of brickwork in the interior of a room can both bring zest to it and “crush” it with its bulkiness in case of ill-conceived design. It should be understood that masonry does not have to be on all the walls of the room. It can appear fragmentarily on certain sections of the walls, and can serve as a decorative frame for a painting, photo wallpaper, fresco or other interior element.
Therefore, even at the planning stage, it is important to present a complete image of the renovated room.
Any of the above methods, if performed well, can create a realistic picture. Your imagination can expand the options for wall decor and make your home unique, cozy and beautiful - the main thing is to understand the basic principles of organizing such work.
By the way, you can also use the technologies discussed to achieve the effect of masonry on bottles or vases - they will serve you as additional elements"brick" interior.
Brick is one of the most traditional for our country building materials. Therefore, such a finishing element as brickwork is widely used to decorate the walls of premises. Designers have long appreciated the wide creative possibilities of decorating brick walls: a variety of shapes and colors of such decor help create a very interesting and original interior.
Naturally, such ideas are implemented in different ways, taking into account all the capabilities of the owner, as well as the characteristics of the room being decorated.
Brick wall decor options
Instead of real brick for interior decoration in modern decor Other materials are often used, the structure of which looks very much like a brick surface.
Brick walls can be finished using materials and technologies such as:
- building panels;
- clinker tiles;
- brick wallpaper;
- painting.

The advantage of such materials over real brickwork is that they are much lighter than brick and occupy much less volume.

What type of decor is best to choose to reproduce a brick wall? Let's take a closer look at the most popular options for finishing brick walls. Knowing the features of each of them, you can easily create a unique wall decor at home.
1. Brick-like building panels
Construction panels are a real leader among “bricks”, famous for their strength and water resistance. This finishing material has long conquered the market exterior finishing, and now has found its application in interior spaces.

Such imitation panels are made of plastic. This means that they are not afraid of dust, moisture, mold or rust. In addition, such brick panels are highly resistant to alkalis and acids and are not at all afraid of hot droplets of fat, which is why they are often used in the kitchen.

Advantages:
- ease of fastening;
- light weight;
- perfect appearance;
- minimum prices.

Flaws:
- Some panels require additional sheathing, so this design takes away a certain part usable space.
Brick panels are mounted both horizontally and vertically, so the pattern on them depends on the method of placement. They are mounted on nails, screws or self-tapping screws. Most of these are mounted directly on the wall.

U decorative panels under the brick, each element has its own independent fixation, so it’s random damaged part“bricks” can be replaced in half an hour.
Important: Brick panels are perfect option decor for a balcony, kitchen apron or crowded corridor.
2. Brick tiles
An excellent alternative to brick for wall cladding is clinker tiles. This is an inexpensive and very beautiful analogue, made from raw clay. In terms of its characteristics, laying method and thickness, brick tiles are no different from simple tiles.

4. Decorative brick-like plaster
Imitation of stone brickwork made of plaster looks very impressive and unusual. In addition, it is very easy to do it yourself.

Advantages:
- variety of textures and colors;
- ease of application;
- excellent insulation;
- environmentally friendly material;
- durable and practically maintenance-free.

Flaws:
- may take up useful space;
- low resistance to dirt (attract dust);
- The surface must be very smooth. There should be no noticeable scratches, bumps or depressions.

Decorative brick-like plaster is used to decorate:
- one wall in the room;
- niche or ;
- “bricks” randomly placed on a flat painted wall.

Important: This type of imitation is very popular with creative people, as it provides enormous opportunities for flights of fancy.
5. Painting like brick
A great way to decorate brick walls is by painting. The color for the bricks is selected depending on the style of the room, your mood and individual taste.

Modern interior solutions that use such a “brick wall” most often belong to one of two styles:
- Calm and cozy Country calls for soft pastel shades of “brickwork”;
- “Brickwork” in the Loft style can be done eccentrically and with a special twist using painting.

A great option for “brick” is elastomeric paint. It fills all the cracks formed due to shrinkage of the walls, protects the surface from moisture and strengthens it. For bright and colorful decoration, acrylic and water-based paints. They are applied with brushes of different thicknesses, and if you need to create an additional dust-repellent or water-repellent coating, you can use a wide fur roller.
Flaws:- poor resistance to mechanical damage;
- cracks over time;
- not suitable for uneven walls;
- The color in the jar and on the wall can vary greatly in shade.
Advice: to add realism to a drawing made to look like a brick, you can subtract or add a few millimeters from each brick.
A brick wall is a fashionable element of the interior. It looks impressive both in luxurious apartments and in a modest small apartment. In order to create it, you don’t have to be a professional mason or finisher - in construction stores you will find a lot of materials that allow you to create an effective imitation. Now we will tell you how to make a brick wall in the interior with your own hands.
Use Cases
Before you make a brick wall with your own hands, decide which room you are going to decorate in this way. Brick or a natural stone will look good in almost any room:
- in the kitchen;
- in the living room;
- in the bedroom;
- in the hall;
- in the bathroom.
Important! Perhaps this option is not very suitable for a child’s room, but it all depends on the age. For a baby, a brick wall, of course, is not suitable, but in a teenager’s room this method of decoration may be quite appropriate if the young owner agrees. In some cases, a brick partition is suitable for a preschooler or junior schoolchild. For example, a low border can be used to create a corner for creativity or playing with building materials.
Kitchen
It is not necessary to decorate all the walls with brick, although this option is also possible - for example, for a medieval or ethnic style. But in any case, you will have to combine this material with other, much more modern ones. So it’s better to finish one particular area, focusing on it. It could be:
- dinner Zone;
- apron;
- niche;
- workshop, if you have one.
The materials from which the remaining items will be made must be treated with the utmost care. Brick organically combines:
- with decorative plaster;
- with a tree;
- with natural stone.
Important! A very interesting option is when one wall is brick and the rest are upholstered. wood panels. As for the plumbing equipment, in this case a stone, stone-effect or shiny metal sink is suitable.

Living room
In the living room, brick or natural stone wall decoration will look good next to a real or electric fireplace. You can lay out the entire wall or a separate section in this way. This option is also very suitable for zoning. But you need to carefully consider how you will highlight other zones:
- The brickwork from the window side will look original. It can be supplemented with cast or wooden decorations.
- If your room is made in a medieval or neo-Gothic style, then you can line all the walls with brick. But you need doors and windows that match the style - white double-glazed windows and plastic doors will not look very good; in such a situation, noble wood species are better. As a last resort, you can choose plastic to match the wood.
- A brick partition can provide an interesting option. This is especially true for a studio apartment or a very large living room. It is better to make the partition low; it will simply mark a certain area. You can place figurines or pots with plants on it.
- A niche lined with brick or natural stone always looks great. This is a natural area that can be decorated completely differently from the rest of the room, so in this case the brick wall combines perfectly with almost all finishing materials.
Bedroom
In this room, you should not line all the walls with red brick. There are several reasons for this:
- walls that look as if there is no decoration on them make the room feel colder than it actually is;
- dark walls evoke an anxious and gloomy mood for many.
Important! If you really can’t wait to use just this method, construction stores are at your service, where you will always find “brick-like” wallpaper in a variety of shades. It is better to choose those that are lighter.
Hallway
You can completely decorate this room with white, red, gray or whatever brick you like. An ideal option, regardless of how you achieve the desired result. The main thing is to choose furniture that suits the style. She may be:
- made of wood;
- made of metal;
- with leather upholstery.
Important! Plastic cabinets and shelves are completely unsuitable for such walls. They will stand out from the general style.

Bathroom
A fashionable trend is to leave brick walls in the bathroom unfinished. It's not very good idea, besides, only residents of brick houses can afford it. In all other cases, it is better to choose tiles or wallpaper with the appropriate pattern. If you like brick-look walls in your interior, how can you make sure they don’t look like an eyesore? As in all other rooms, choose the right finishing materials and equipment:
- As in the case of the kitchen, it is preferable to use sanitary equipment imitated in natural stone - marble or granite, for example. Manufacturers now offer a lot of options - you will find bathtubs, toilets, and sinks.
- Wooden or metal cabinets are more suitable, and it is better to integrate appliances. However, you can find on sale washing machines, which will not stand out from the “brick” style.
There are many application options:
- you can finish all the walls, and even make an “apron” over the bathroom from decorative bricks, and not from tiles, as is usually done;
- you can decorate one wall - for example, the one where the mirror hangs (it is better if it is “antique”;
- if the bathroom is combined, you can make a low brick partition between the bathtub and toilet, and in a large room with several sinks - separating the wash area;
- if you choose the Provençal style, you can leave the brick in the corner near the imitation window, or, on the contrary, near the door.
Advantages and disadvantages
Like any material, brick has its undoubted advantages:
- you can save a lot on finishing;
- the material is easy to work with;
- all other objects are very clearly visible;
- brick provides good sound insulation;
- brick is moisture resistant;
- the wall “breathes”.
Important! For finishing, the brick wall does not need to be further leveled. This material perfectly hides minor and even not very minor surface imperfections.
As for the interior itself, against such a background all other objects stand out brightly; it is they, and not the wall, that attract attention. Finishing brick provides excellent sound insulation - however, not all materials that can be used to make a “brick” wall have this quality.
A few disadvantages
Any interesting idea turns out to be not as attractive as it seemed at the very beginning, because any material has its own characteristics and disadvantages. What are the “pitfalls” in the decision to make a brick wall in the interior with your own hands?
- real brick perfectly accumulates dust, which gets stuck in the seams;
- the room seems smaller than it is;
- red brick absorbs a lot of light.
Of course, dust will not accumulate if you use wallpaper rather than natural brick. As for the size of the room and light, the same laws apply here as for others finishing materials: dark walls reduce space and make the room darker, light walls do the opposite. All this must be taken into account when designing the interior.
Understanding styles
A brick wall in an apartment - how to make it look good and not stand out from the interior? Of course, first you need to decide on the style itself. This finishing option is unlikely to be suitable for Classic or Baroque. But in many cases, a brick wall is simply necessary if the room is decorated in the following styles:
- Romanticism;
- Gothic or Neo-Gothic;
- Minimalism;
- Ethno;
- Scandinavian;
- Pop Art.
Romanticism
An interior in a romantic style is characterized by mystery and some kind of reticence, leaving room for imagination. Natural materials, including brick, are most suitable for this.
Important! The brick wall will be complemented ornamental plants in forged flowerpots, ceramic panels, porcelain plates.
Gothic
A Gothic-style room will take you back several centuries. Brick or stone walls are common in this area. They are combined with rough wooden or metal furniture, embroidered panels or carpets made using the tapestry technique.
Important! In general, draperies need to be given special attention in this case. A tapestry on the wall may not be enough. You need heavy curtains and a carpet on the floor. By the way, the floor itself can be finished “like stone”.
Minimalism
A very popular design option right now that doesn’t require much effort. The main thing is that there are as few objects in the room as possible, as well as decorations.
Important! A brick wall can be without any decorative panels, flower pots and hangings. She's good on her own.
Ethno
Natural materials – required element ethnic style:
- In this case, “like a brick,” for example, you can finish the lower part of the wall or even lay a border around the entire perimeter. It is better to make the top look like wood - from natural panels or wallpaper of the appropriate type. It will seem that the house is wooden, but stands on a stone foundation.
- The best furniture is rustic - made from unpainted material without polishing.
- Bedspreads and curtains sewn from scraps, homespun rugs on the floor, folk toys as decorations, ceramic and wooden dishes.
Scandinavian
Laconicism and spaciousness are the motto of the Scandinavian style. This is something between Ethnic and Minimalism, but more modern. It is better to decorate one wall or even part of it with brick, the rest - from almost any materials, plain or with a small, inconspicuous pattern. Furniture should be light and elegant, and as for household appliances, they can be anything.
Pop Art
A rough brick wall with posters or graffiti on it. An original way to solve an interior, now quite popular. The furniture is ultra-modern, as are the decorations. Any household appliances, plastic dishes and abstract paintings and figurines.
Brick wall decoration
There are several ways to make a brick wall in a house. Cement mortar is not always needed. There are four main options:
- brick from which the wall is made;
- decorative brick;
- wallpaper with a matching pattern;
- decorative tiles.
Natural brick
The first method is possible, naturally, only in brick houses. You don’t need any special effort for this; you just need to remove all the trim and clean the wall properly. In a panel house you will have to lay additional layer, that is, to reduce space.
The main drawback is that the brick will be the same color as the house is made of, and surprises may await you when the finishing is removed. For example, there are known cases when part of the wall is made of red brick, and part of it is made of white. This, of course, can be played around.
The processing method will be as follows:
- Using acid-containing solutions (sold in hardware stores), clean the wall of salts and cement residues.
- Wash it with water.
- Sand the surface with sandpaper.
- Seal the seams with putty.
- You can coat the wall with water-based varnish.
Brick wallpaper
The easiest way to make a “white brick” wall in an apartment is to cover the selected surface with wallpaper with a corresponding pattern. By the way, wallpaper can be not only white, but also gray and red. They work with them in the same way as with all other wallpapers.
Clinker tiles
It consists of narrow stripes. They are glued in rows. You can finish the tile joints in an original way - creating a complete imitation of brickwork.
Finishing brick
If you are thinking about how to make a white brick wall in the interior with your own hands, pay attention to the finishing brick. It comes in different colors. In addition, you can find different types of it:
- matte;
- artificially aged;
- glazed.
Important! This brick is much thinner than usual. They put it on special glue.
What tools are needed?
To decorate a wall with decorative bricks, you will need some tools:
- metal square;
- building level;
- roulette;
- putty knife;
- bucket;
- hammer;
- beacons.
Preparing the wall
You need to prepare the wall in the same way as for any other finish:
- Remove any remaining old finish, removing any fragments if possible.
- Fill up any uneven areas - putty is used for this.
- Let the wall dry.
- Sand out any uneven areas.
- Apply a layer of primer - it will provide better adhesion of the finish to the wall.
- Dry the surface.
Facing
Clinker tiles and decorative bricks are glued with special glue. It happens like this:
- Scrub the part that will be adjacent to the wall with a wire brush to ensure better adhesion.
- Apply glue to the same side according to the instructions.
- Glue the strips on the bottom row.
- Check the process with a level.
- Place a long, even block of wood against the row of strips and gently hit it in several places with a hammer.
Gypsum brick
A “brick” wall can be made from gypsum plaster. The wall is prepared in the same way as for other finishing, that is, it is cleaned, defects are repaired and sanded. Next, a layer of soil is applied. After this, the sequence of work will be as follows:
- Marking in progress.
- Beacons are being placed.
- Painting tape is glued to the joints of future “bricks” - first in horizontal and then in overlapping vertical strips.
- A solution is made from tile adhesive and plaster in a 1:1 ratio.
- The solution is applied to the wall in a thick layer (can be done in several stages) - where the tape is glued, there will be seams.
- The tape is removed.
- Using a chisel or spatula, each fragment is given the shape of a brick.
- The wall can be painted or varnished.
Important! You need to get the tape out while the wall is still wet!
Video material
In this article, we offered you several ideas on how to make a brick wall in the interior with your own hands. As you can see, there are a lot of solutions and this trend is in fashion. Which option to choose - now decide for yourself, based on how much time, effort and money you are willing to devote to this. Happy renovation!
Many designers use brickwork as an element of a modern interior. If you want something similar in your apartment, it is not at all necessary to rebuild the walls or knock off the plaster from the existing ones.
Alternatively, you can use special decorative bricks. They are thinner than usual, they can rather be called decorative tiles, and are sold in most construction stores. Since this material is not cheap, to attach these bricks to the wall, it is advisable to use the services of a master. If you decide to furnish your apartment yourself, we would like to offer you the option of simulating brickwork with your own hands - a simple and economical solution.
Helpful information:
Materials
To create a “brick” wall, the following materials are needed:
We imitate a decorative wall “like a brick”
There are quite a large number of brick shapes and sizes, so you need to decide on the size of the rectangles that will fit into your interior. The figure below shows their main varieties, as well as the names of each side of the brick:
- - bed;
- - spoon;
- - poke.
The type of brickwork used depends on which side is the front. The front side can be laid out with a spoon or a bed, or different sides can be combined in masonry.
In our instructions we will do the laying with a spoon. On cardboard we draw rectangles of the sizes we need (228 * 65 mm).
Carefully, along the drawn lines, cut the cardboard. You can do this stationery knife under a ruler (cut lines will be smoother), or with scissors.
We can imitate either a solid wall or “punch a hole in it” into which to place a drawing or part of a photo wallpaper. In our example, we use a photo of a flower from a calendar, which symbolizes closeness to nature. Since our drawing will go under the masonry, we need to mark the place and stick it on the wall.
Let's return to the cut bricks. Some of them must be additionally cut into two equal parts, otherwise we will not be able to lay out the bricks in a checkerboard pattern.
We select glue. If you wish, you can experiment and use the type of glue at your discretion. This can be either regular PVA glue or special glue for vinyl wallpaper. Through trial and error, we found the following option: PVA construction adhesive and “liquid nails.” It is irrational to use them separately from each other: “liquid nails” are quickly consumed, and PVA dries slowly and cannot immediately provide reliable gluing. But together they complement each other. Immediately coat the entire surface, except the corners, with PVA glue. We put droplets in the corners " liquid nails", they will immediately fix the brick in the right place, and after a day the glue will fix the entire surface in place.
Let's start our laying. To attach the first brick, it is most convenient to use the lower left corner of the wall.
The masonry must look believable, so we must repeat every detail. Before you begin gluing the next brick, you need to make an indent to the right to simulate a seam. A distance of 7-10 mm will be sufficient.
When laying out the second row, we retreat the same amount to the bottom. We start laying with half a brick.
Using the same principle, we glue the remaining bricks, leaving a window for the drawing. After completion, the wall should dry. Depending on the type of glue used, this may take different times. In our case, the PVA glue will dry within a day.
After the glue has completely dried, the bricks should stick well to the wall. And we can proceed to the next stage - creating a textured surface. To do this, you can use thick multi-layer paper napkins. They will help us hide the corrugated structure of the cardboard, as well as defects that arise during gluing.
Using a brush or foam sponge, apply a thick layer of PVA construction adhesive to the bricks.
Using your hands, crumple the napkin into a ball and then straighten it back out. We have to greatest number folds
Cover the glue-coated bricks with a napkin and apply PVA again.
Carefully draw the gaps left for the seam with a brush. You can do this while covering with a napkin, row by row.
Using this principle, we cover all the bricks with napkins. Don't forget about the seams between them.
The PVA should dry within a day, after which you can start painting the wall.
Painting a brick wall
The color scheme is selected according to your taste. Since we decided to imitate red brick, we need to create the color we need. To do this, mix orange, white, red and black paints and get the color of natural brick.
We paint our bricks. Real red brick has a slightly porous structure; we can achieve this effect if we apply the paint not with a brush, but with a foam sponge.


. Fill in the missing letters and explain the spelling of the words.")


- Girls and women almost always associate white shoes with a wedding dress, although the white color of shoes has long been no longer required. A...
- New
- Turkey stewed in a slow cooker: spicy, with vegetables, in sour cream, cream and walnuts
- Types of speech: description, narration and reasoning
- Martyrs Tatiana. Moscow Church of St. Martyrs Tatiana Temple of the Martyr Tatiana at Moscow State University schedule
- Milotici: return of the Russian village Moravov Alexander Viktorovich
- Why you shouldn't cry in front of the mirror
- Recommendations: what to grease the pies to make them rosy and appetizing
- Actors Spiderman Aunt May Aunt May in Spiderman
- Making sounds for children Lessons on making sounds for children
- Pink salmon in the oven - delicious and easy recipes for baked fish Pink salmon fillet baked with vegetables
- Deciphering the natal chart of the house
- What does mulberry help with?
- Photo report “Birthday of Samuil Yakovlevich Marshak in the group”
- Breathing at high pressure Breathing correctly at high pressure
- Bryansk State University named after
- Tasks to test spelling and punctuation literacy
- Application...burning, grow...sti, to...sleep, m...roll, warm...up, sk...roll,...
- The Forex Economic Calendar is a reference book for every trader, regardless of trading experience and level of professionalism, and especially...
- Representatives of the arachnid class are creatures that have lived next to humans for many centuries. But this time it turned out...