North American Indians teepee wigwam sweating. Indian dwelling: description and photo
A wigwam, depending on the size you give it, can serve as a tent on a camping trip, a changing room on the beach, a kitchen at a campsite, or a children’s playhouse on the beach. personal plot and in the apartment.
Indian wigwam- one of the simplest tents that has no ropes or pegs. The walls of the tent are supported by four long poles. The sticks are pulled through a lining sewn in the corners of the planes.
 Even for hiking purposes to sew It can be made from ordinary fabric, not necessarily from waterproof material. Water will flow down the sloping walls and the tent will not get wet.
It will be more beautiful if you sew it from colored fabric or decorate it with drawings and appliqués.
Sew the fabric with a linen seam, then cut out four identical planes, each in the shape of a trapezoid 3 (see diagram). The base of the trapezoid is 1200 mm, the side is 1480 mm. All four walls (let's call them parts 1, 2, 3, 4) have the same shape.
Before joining the sides, strengthen the upper part of the walls by sewing doubly folded fabric 5.
Now place the right edge of part 1 on the left edge of part 2 and sew on both sides - this method is shown by arrows in the figure in the circle (with right side drawing). Between the sewn edges you get a long lining into which stick 6 will fit.
We recommend that you first prepare the poles and, according to their thickness, mark the width of the linings.
Manufacturing scheme DIY wigwam:

Sew part 2 with part 3, part 3 with part 4, and part 4 with part 1 in the same way. Now you need to make a “door” to the wigwam, to do this, cut wall 2 in the middle and cover it with strips of thin fabric. Sew ribbons or regular laces on each side - then the “door” can be closed. Stretch the fabric over the sticks and tie the sticks at the top. To prevent the ribbon from slipping, you can sew additional loops. The diameter of the stick should be approximately 14 mm.
If you use the wigwam design to make playhouse for children, make the tent more elegant. Sew appliqué ornaments in the Indian style onto the walls of the wigwam; Collect bright pendants, beads, buttons, and tinted curtain rings on strings and hang them from the top of the wigwam. You can draw patterns on the canopy using a glue gun with colored sticks.
For use outdoors sew a snap-on floor.

To complement the wigwam, sew your own Indian moccasin slippers >>>


A camping version of the wigwam - the area of the wigwam is larger and, accordingly, the number of supporting poles is increased:

And now the most mysterious thing: all the photographs presented above depict, strictly speaking, not a wigwam, but a tipi. Somehow it became a tradition that we call all the dwellings of the Indians wigwams. But between wigwam and tipi there is a significant difference.
We read:
Indian wigwam and tipi
Dwelling of the Indians of North America.
A wigwam is a hut on a frame made of thin trunks, covered with matting, bark or branches. It has domed form, unlike teepees, conical-shaped dwellings.

The American Indian dwelling is a ritual for purification and rebirth and represents the body of the Great Spirit. Its round shape personifies the world as a whole, steam - visible image The Great Spirit, performing cleansing and spiritual transformation. Coming out into the white light from this dark room means leaving behind everything unclean. The chimney provides access to Heaven and an entrance for spiritual power.
Tipi(in the Sioux language - thipi, means any dwelling) - a universally accepted name for the traditional portable dwelling of the nomadic Indians of the Great Plains with a fireplace located inside (in the center). This type of dwelling was also used by the mountain tribes of the Far West.
The teepee has the shape of a straight or slightly backward-sloping cone or pyramid on a frame of poles, with a cover made from cured bison or deer hides. Later, with the development of trade with Europeans, lighter canvas was more often used. There is a smoke hole at the top.
The entrance to the tipi is always located on the eastern side, which has its own poetic explanation. “This is so,” say the Blackfoot Indians, “so that when you leave the tipi in the morning, the first thing you do is thank the sun.”
Men were supposed to be in the northern part of the tipi, women - in the southern. In the tipi, it is customary to move clockwise (with the sun). Guests, especially those who came to the home for the first time, had to be accommodated in the women's section.
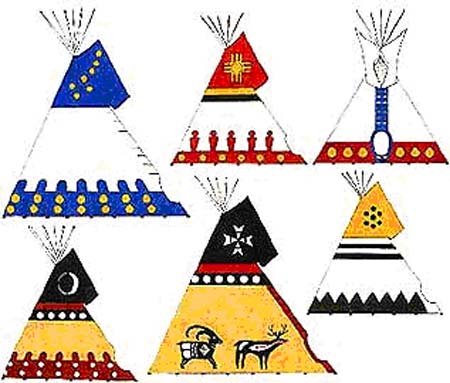
Tipi decor. Most of teepee I didn’t paint it at camp. Colorable teepee were decorated in accordance with the traditional decor of the tribe and often represented a stylized image of natural phenomena and animals.
For example:
The color red symbolized earth and fire. They could depict mountains, a prairie, a steppe fire, and so on.
Yellow- the color of the stone, as well as the lightning, which was often depicted as a line coming from the top.
White color in addition to air, empty space, could mean water.
Black and blue - the sky.
Besides the drawing teepee could be decorated with pendant amulets; medallions made with traditional porcupine quill embroidery; military or hunting trophies; buffalo tails; horns and various crafts.

A teepee is often confused with a wigwam. In fact, a wigwam is quite an ordinary hut. On a wooden frame, covered with hay, straw, branches, etc. Unlike a tipi, a wigwam is round in shape:
wigwams
Housing wigwam among the American Indians it is a ritual for purification and rebirth and represents the body of the Great Spirit. Its round shape personifies the world as a whole, the steam is the visible image of the Great Spirit, performing a cleansing and spiritual transformation. Coming out into the white light from this dark room means leaving behind everything unclean. The chimney provides access to Heaven and an entrance for spiritual power.
Tipi(in the Sioux language - thipi, means any dwelling) - a universally accepted name for the traditional portable dwelling of the nomadic Indians of the Great Plains with a fireplace located inside (in the center). This type of dwelling was also used by the mountain tribes of the Far West.
The teepee has the shape of a straight or slightly backward-sloping cone or pyramid on a frame of poles, with a cover made from cured bison or deer hides. Later, with the development of trade with Europeans, lighter canvas was more often used. There is a smoke hole at the top.
The entrance to the tipi is always located on the eastern side, which has its own poetic explanation. “This is so,” say the Blackfoot Indians, “so that when you leave the tipi in the morning, the first thing you do is thank the sun.”
RULES OF CONDUCT IN THE TYPE.
Men were supposed to be in the northern part of the tipi, women in the southern part. In the tipi, it is customary to move clockwise (with the sun). Guests, especially those who came to the home for the first time, had to be accommodated in the women's section.
It was considered indecent to pass between the central hearth and someone else, since it was believed that in this way a person violated the connection of those present with the hearth. To get to their place, people, if possible, had to walk behind the backs of those sitting (men to the right of the entrance, women to the left, respectively).
It was forbidden to go behind the back of the tipi, which meant going behind the altar; in many tribes it was believed that only the owner of the tipi had the right to go behind the altar. There were no special rituals for leaving the tipi; if a person wanted to leave, he could do it immediately without unnecessary ceremony, but for non-participation in important meetings he could later be punished.

How to set up a Crow tipi
WHAT IS WHERE IN THE TEEPI
The first tipis were made from buffalo skins. They were small, since dogs could not transport large, heavy tent tires during migrations. With the advent of the horse, the size of the tipi increased, but from the second half of the 19th century centuries, the Indians began to use tarpaulins for tires.
The structure of the tipi is perfect and well thought out. Inside the dwelling, a lining was tied to the poles - a wide strip made of leather or fabric that reached to the ground, which protected against drafts on the floor and created draft in the upper part of the tent. In large tipis they had an ozan - a kind of ceiling made of leather or fabric that retained heat. It did not completely block the space above the fire - there was a path for the smoke to escape through the top. Ozan was also used as a mezzanine for storing things.

The entrance was closed from the outside with a “door” - a piece of leather, sometimes stretched over an oval frame made of rods. Inside, the doorway was covered with a kind of curtain. The space in a large tipi was sometimes partitioned with skins, creating the semblance of rooms, or even a small tipi was placed inside, for example, for a young family, since the spouse; according to custom, he should not talk or even see his wife’s parents. The outer cover of the tipi had two flaps at the top that closed or opened depending on the wind. From below, the tire was not pressed tightly to the ground, but was attached with pegs so that there were gaps for traction. IN hot weather the pegs were removed, and the tire was lifted up for better air circulation.
The frame of the tent consisted of 12 or more poles, depending on the size of the tipi, plus two poles for the flaps. The poles were placed on a supporting tripod. The rope that tied the tripod was connected to an anchor peg, which was stuck in the center of the floor. The fireplace was set up slightly away from the center - closer to the entrance, which always faced east. The most place of honor the tipi was opposite the entrance. An altar was built between this place and the hearth. The floor was covered with skins or blankets, beds and chairs were made from small poles and twigs, covered with skins. Pillows were made of leather and stuffed with fur or aromatic grass.
Things and products were stored in rawhide boxes and in parfleches - large leather envelopes.


Layout of the large Assiniboine tipi:
a) hearth; b) altar; c) men; d) male guests; e) children; f) eldest wife; g) grandmother; h) female relatives and guests; i) the owner's wife; j) grandfather or uncle; k) things; m) products; m) dishes; o) meat dryer; n) firewood;
For the fire, the Indians used, in addition to wood, dry bison dung - it burned well and gave a lot of heat.
When camp was set up, the tipi was usually placed in a circle, leaving a passage on the east side. The tipis were assembled and disassembled by women who handled this task very quickly and deftly. The camp could be rolled up and ready for the road in less than an hour.
When migrating, the Indians built unique horse-drawn drags - travois - from tipi poles. Two poles were fastened crosswise on the sides of the horse or on the back. At the bottom, the poles were connected by crossbars made of poles or tied together with strips of leather, and things were placed on this frame or children and the sick were seated.
The entrance to the tipi is in the east, and at the far wall of the tipi, in the west, is the owner's place. South side- this is the side of the housewife and children. North is the male half. Guests of honor are usually located there.
People who are unfamiliar or who come to the tipi for the first time do not go further than the owner’s place and therefore sit down immediately at the entrance (when entering the tipi it is customary to move in the direction of the sun (clockwise), that is, first through the female half).
This division is explained by the fact that in the north there live forces that help men, and in the south there are female forces. People close to the owner, when they come to visit, sit in the north. The owner can give up his place to the most honorable and respected.
This is due to the meaning of the altar, that is, it is undesirable for stranger passed between you and the altar. When you have a lot of guests, the newcomers walk behind the backs of those sitting so as not to disrupt their connection with the hearth.
HIRE and ALTAR

The first thing you do when you set up a tipi is create a fireplace for yourself. To do this, you find, if possible, a dozen or two stones and lay them out in a circle. If you want to make an altar for yourself, then you need to find one large flat stone, which is placed in a circle opposite sleeping place(place of the owner of the tipi).
The hearth should be as spacious as possible (as much as the size of the tipi allows), because then there will be less problems with pouring coals and stones heating up from the fireplace, they will be closer to the sleeping places, which means it will be warmer.

It’s better not to throw cigarette butts, garbage and other trash at him, because he might get offended and very realistically, at a minimum, it will stink up the whole guy. And in general, it’s nice when the fire is clean for many reasons. It’s always a good idea to feed the fireplace, not only with firewood, but he also loves porridge.
In general, if you want to be friends with fire, then you need to share something good with it too. A good sacrifice to fire is a pinch of tobacco, if you smoke, sweet grass, sage or juniper. When you live in a tipi long enough, you begin to treat fire with respect, because it does a lot of good things, both warmth and food...
The stone closest to the entrance is moved aside if necessary so that someone, about whom we usually write in green, can enter (and this is also useful when you are drowning with long poles or logs). In some Indian tipis this stone was always pushed aside.
The hearth is the center of life in the tipi.

ALTAR

It has many meanings. One of them is the place where your gifts to the fire are placed. You can put objects that have meaning to you on it when you go to bed (this phrase caused everyone to laugh). Usually a pipe is kept under the altar. This is a clean place, try to keep the surroundings clean too.
A simple altar for temporary standing is a flat stone that is placed in front of the host's place.
If you expect to live in the tipi for a long time, and therefore communicate with everything that lives in the tipi with you, then you can make yourself a large altar. It is done like this: a pile of sand is poured in front of the large altar stone (sand is cleaner than earth, it can reflect the sun, so it is best suited). Two small wooden spears are stuck at the edges, and a thin stick is placed across it. It can be decorated with scraps of fabric, braid; the Indians preferred the color red and hung bird feathers and porcupine quills on it.
The altar is the gate.
A road runs through them that connects you with invisible forces. They say there are a lot of them around.
The pile of sand symbolizes the earth.
Rogatins are two world trees, and the crossbar above them is the vault of heaven.
The altar stores everything that connects you with invisible forces, so talismans and objects of power are hung on it. From time to time, sage, wormwood, and sweetgrass (sacred herbs of the Indians) are burned on it.
The figure below shows the arrangement of places and objects in the tipi.

This is how the seats in the tipi of the Indians were located. This suggests the location of the rest of your decoration. Firewood usually lies at the entrance on the men's side (before there was no feminism, women were stronger and were involved in preparing fuel, and the firewood lay on the women's side), and the kitchen (supplies, pots and other utensils) is located on the women's side.
Things you rarely use can be put behind the canopy. If you have a kind old lady available, and you are a real Indian, put the old lady in the wood-burning corner (the Indians called it "old lady's corner"). She will be fine there. It is believed that old people suffer from insomnia, and therefore in cold weather your old lady herself will throw wood on the fireplace all night long. It will be warm for both you and the old lady.

Cellophane in a tipukha is inconvenient. To store food, it is better to use fabric bags hung on wooden hooks and crossbars, tied between the poles on which your tipi stands, so that they hang higher above the ground and do not get damp.
If you are a rich Indian, it is more convenient to hang large bags on a wooden tripod (this is if you are a trusting Indian and are not afraid of the invasion of the Iroquois or other hungry tribes (see photo)). If you are the mohawk, use other people's large bags to hang them on your tripod.
To boil water, you need to hang it over a fire. To do this, you can make (or borrow from a neighbor a wooden tripod with a hook.
An option for small teepees where a tripod is inconvenient is a cross pole tied above the fireplace, as shown in the picture below. Try to make the hook suspended from this pole longer so that the rope does not burn out. Choose a rope made from natural materials, otherwise it will flow smoothly into your soup. In a large tipi, such crossbars can be conveniently used as drying racks for blankets, clothes, herbs, berries and mushrooms. By the way, it would also be good to dry the blankets in the morning. Regardless of the weather, inside the tipi you will sweat as you sleep, the blankets will become damp, and you will smell like a Mongol warrior.
Beds. Living in a tipi, sometimes you have to lie down. To protect yourself, your belongings and your children from dampness and rheumatism, you can build beds from dry thin poles. The poles are covered with grass. Some people use spruce branches for this, but they probably don’t feel sorry for the trees at all. It is better to use dry herbs from last year. You can take the grass that grew in the place of the tipi, but it will still be trampled down. In cold and rainy weather, it is very pleasant to place a stone wrapped in a rag and heated in the fireplace at your feet, and a thick, warm squaw at your side (therapeutic set “stone + squaw”). It is inconvenient to make beds in a small teepee - you can separate the sleeping area with a long pole, secured to the ground with pegs and placed along the sleeping area closer to the fireplace. Then you won't be trampling on blankets and sleeping bags.
The bedding that the Indians used is actually difficult to make, but some things can be explained. It was made from thin willow twigs, connecting them as shown in the figure below. Its thin end was hung on a tripod at a convenient height. If necessary, it was taken outside and used as a chair (to admire the sunset). Exists English name"backrest". This device folds up very conveniently and weighs little.
What's around the tipi
It is better if around your tipi there are: forest, river, blue sky, green grass and good neighbors, not cans, bottles and cigarette butts; and certainly not scraps or waste human body or sick minds. In short, it’s clean where they don’t litter.
In the forest not far from the parking lot and closer to animal trails, they chose a place where they took scraps and leftover food. Such places were called "veykan". They did not dig a hole under the weikan, but on the contrary, they made it on a hill so that animals and birds would not be afraid to approach it.

Economic buildings.
Use long poles (you can use the valve poles of your neighbor's teepee) to make your own blanket drying rack. It's just a big tripod with crossbars between the poles.
Fencing structures.
If you don't want to lose anything, do this:
From two thin poles (a neighbor’s tripod for a pot will do), tie a crosspiece and “close” the door from the outside with it. But don't forget to go inside, otherwise your condensed milk will be eaten by your squaw. This type of “lock” is also often used when you are leaving the tipi for a short time. A cross at the door means that the tipi's occupants should not be disturbed. This sign is widely used by those who live in teepees (not just the Indians who invented it).
According to tradition, trees growing near the tipi are decorated with colorful rags. The Indians often hung all sorts of gifts on them in order to appease the forces guarding the place. As long as you live next to trees, you share the earth with them. You will be pleased to return to them and see them beautiful
HOW TO SEW A TIPI.
The basis is a rectangle of fabric measuring, for example, 4.5 x 9 meters. You can sew a larger tipi, the main thing is to maintain the proportions.
Tipi fabric
It is advisable to choose a fabric that is loose, waterproof, lightweight and fire-resistant. This can be all types of tarpaulin, double-thread, glued calico, or tent fabric. Best option- this is, of course, traditional canvas. You can use tent fabric
There is a suspicion that if all this does not burn, it would be nice. It is better if the fabric does not stretch and does not react to heat and moisture. 
It is better to sew with a harsh thread, with elements of synthetics.
If the fabric is narrow, then the rectangle is sewn from strips. In this case, it is advisable to overlap the seams on one side so that when it rains, water can flow down them. For thin fabrics, it is good to use a sail stitch. The seams can be waxed (coated with melted wax).
When the rectangle is already sewn, you can start cutting. It is most convenient to first draw a contour with chalk on a string 4.5 meters long. The end of the rope is fixed in the center of the larger side of the rectangle and a semicircle is drawn with chalk, like a compass (Figure A). If you don’t have enough fabric, you can immediately sew the strips not in a rectangle, but in a semicircle with steps (Figure B).
************
Valve, fastener and inlet size ratio:
This ratio varies among different tribes, but on average it is 1:1:1 if the tipi is not too large (4-4.5 meters)
Eat various options. On pattern of a Sioux tipi, and on - a Blackfoot tipi
valves
To regulate the draft (cover the chimney on the leeward side), the tipi has valves.
In the forest and steppe, tipi valves are attached in different ways - in a forest where there is no wind, the lower edges of the valves can hang freely or be attached with a rope to the tire, as shown in the steppe, so that the wind does not tear the valves, their lower ends are usually tied rope on a free-standing pole
The shape of the tipi as a whole depends on the shape of the valves.
Wu Siu valve one-piece (cut entirely, together with the cover) among the Blackfoot they are sewn to the tipi separately (sew-on valve). A tipi with full flaps has a shorter back wall and therefore it is slightly tilted back and extended upward. A teepee with sewn flaps looks like a smooth cone and has more space.
Here are examples of possible layouts for flaps and flap pockets:
One-piece valves were usually made 20 centimeters longer and narrower. In order to expand a one-piece valve, it is necessary to sew a wedge into it, cutting the valve from the top to approximately half (Figure 5)
A little about valve size ratios. You should try to avoid making the valves too long - when the tipi is standing, rain will drip into the hole between them and blow out the heat. You need to sew a loosely dangling piece of fabric onto the bottom of the valve and strengthen the joint between the lower end of the valve and the fabric with a square (Fig. 6). Again, the width of the top of the flap should be in relation to the size of the tipi itself. For a tipi 4.5 x 9, a width of about a cubit is suitable. The lower part of the flap (the hemmed piece) is two palms wide and suits many people. The distance between the valves (including the tongue) is approximately 70 centimeters.
The saddle between the valves should cover the entire pole harness, but not increase the width of the valve with its size. A tongue is sewn into the middle of it for tying the tire. The saddle may be various shapes, but it is in this place that the greatest tension arises, the tongue is sewn as firmly as possible so that it can support the weight of the entire tire. A rope is attached to it and the tipi is tied to a pole (attachment options in Figure 7). Pockets are sewn no less firmly on the upper corners of the flaps, on their outside. You will insert adjustment poles into them. Attach long ropes to the bottom corners of the valves to tighten the valves. Instead of pockets you can do big holes(as the Blackfeet and Crows did). Then a crossbar is tied to the pole, some distance from its end, and so it is inserted into the hole. The Indians hung scalps on the free end of the pole, and we, after mature reflection, decided that we were law-abiding Indians and would not do that.
Entrance
The entry height should be approximately shoulder level, starting from the edge of the tire. And you need to cut it out by retreating 20 centimeters, which falls on the threshold. The depth of the cutout is about 2 palms. Both halves are turned off with a strip of strong fabric under which a rope is inserted (see Figure 8). When installing the tipi, the ends of the rope are tied to prevent the entrance from being stretched too much. If the tire is made of coarse fabric, such as canvas, one rim, without a rope, will be enough.
The door can be made simple, or it can be more intricate.
An example of a twisted door is Figure 10. It can be made either from a large skin or from a piece of fabric cut approximately to the shape of the skin. This is a trapezoidal door with a long tongue on the top, which is pinned to the cover of one of the wooden “clasp” sticks. It is better to make the tongue as long as possible in order to hang the door higher - this way it will be more convenient to recline. Another example of a convoluted door is the oval-shaped wicker-framed door you see on the right side of Figure 10.
On some tipis there were no doors at all and the edges of the tire were simply folded over one by one.
Clasps.
Usually, two holes for fasteners are made on each side of the tire, so that the holes match, otherwise the fabric will wrinkle. Sometimes they also make two holes on one side and one on the other. This makes it easier to tighten the tire, but the tension weakens. The edge of the fabric with two holes is placed on top (no brainer).
Canopy.
The canopy is a very important thing in a tipukha. This is what basically keeps you warm; the tire only serves to protect you from rain and wind. It is better to make it from thick fabric (if you are not too lazy to carry such a weight). Sometimes the canopy weighs as much as the entire tire. The space between the canopy and the tire is used for storing things.
Canopy straight . (Figure 12) Its height is about 150 cm. For reference, a tipi with a diameter of 4.5 meters requires approximately 12 meters of fabric per canopy. It's easy to make, but it eats up a lot of space inside the tipi. By top edge At equal distances (about a meter), laces are tied for hanging on a rope stretched along the perimeter between the poles.
The canopy is trapezoidal. (Figure 13) Sewn together from wide trapezoids. Therefore, unlike a straight canopy, it can be pulled strictly along the poles. Usually it is made of three sectors (as seen in Figure 14) and in such a way that the middle sector overlaps the two outer ones. For reference, a 5-meter tipi requires about 20 meters, and a 4.5-meter tipi requires about 18..
In any of these cases, the length of the canopy should be enough for you to wrap it at the entrance, and the more margin, the better. Try to find a light-colored fabric for the canopy so that the tipi does not feel dark.
Additional details
Azan - something like a visor that is suspended above the sleeping place so that warm air accumulates under it. Usually this is a piece of fabric in the shape of a semicircle, which, with its rounded part, is tied to a cord on which the canopy hangs. The azan fabric is tied with a margin so that you can tuck it behind the canopy and close the gap - it will be warmer! The radius of the azan should be equal to the radius standing tipi.
Rain triangle.
A small but very useful detail. During heavy rain draft deteriorates, so the valves need to be opened wider, but then rain will pour inside. To ensure that the head is completely dry (sorry, boom-shankar confused), cut out an isosceles triangle from thick waterproof fabric, such a size that it can cover the hearth. The triangle is tied at the top, under the chimney, to three poles.
Staging the tipi.
The tipi is placed on poles. You need between 9 and 20 poles, depending on the size of the tipi. The most common number of poles for tipis with a diameter of 4.5-5 meters is twelve.

When choosing a place for a tipi, make sure that there are fewer trees nearby (after rain, water drips from them onto the tire for a long time), so that the place is level, so that the tipi does not stand in a hollow. You don’t have to pull out the grass, because it will quickly be trampled anyway.
So, you found all the poles and dragged them to the parking lot. Don’t forget to clear them of bark (so that it doesn’t fall on your head) and knots (so that the tire doesn’t tear, however).
First you need to tie the tripod - that's how the Indians did it
|
To do this, spread a tire on a flat place and place three poles on it. The poles are stolen (this is a typo, but if you are too lazy to go into the forest, then this is not a typo)... So, the poles are placed with their thick ends flush with the edge of the tire, and the thin ends are tied together at the level of the tongue ( tongue- see department valves, Figure 7). Keep in mind that if the tipi is of a Siuk cut (that is, the back wall is shorter), then two poles are tied along the height of the back wall and one along the height of the front (Figure 17). Make notches on the poles so that the knot does not move out. By the way, if you are going to tie the entire frame, the free end of the rope should be very long. Now solemnly place the tied tripod (thin ends up)! |
Then, at equal intervals, three poles are placed one after another, starting from the eastern (door) pole, moving against the sun (counterclockwise). Then the next three poles are on the other side of it, moving towards the sun. And the next two are also in the direction of the sun in the remaining gap; they are placed side by side, leaving room for the last pole with a tire (it will stand behind them).
All this time, the poles are tied in parallel for strength. This is done like this: take the tail of the rope with which the tripod is tied, and one of your assistants, running in a circle, grabs the installed poles with the rope. In this case, a full turn is made on every three poles (and on the last two). It is more convenient to do this by slightly tugging the rope, when it covers the rosette of the poles, then it slides with each jerk towards the knot and fits more tightly to it.
Then the tire is tied tightly to the last pole, and so that the lower end of the pole protrudes beyond the edge of the tire by about a palm. All this equipment is raised and the pole is put in its place. If you have a heavy tire, it is better not to do it alone. To do this, it is better to assemble the tire to it with an accordion before lifting the pole and then, when the pole is raised, two people take the edges of the tire and begin to separate, wrapping it around the frame so that the entrance is between the eastern tripod and pole number 4 in Figure 18. The tire is fastened with fasteners. top down. After this, you can move the poles apart so that the fabric stretches and fits tightly around the frame.
Next, strings are tied around the perimeter of the tipi, in the middle between each pair of poles (see Figure 19). Take a small pebble, a cone or something else round, wrap it in tire cloth, stepping back from its edge to the width of your palm, and tie it tightly with a rope as shown in Fig. 19 . Additionally, two ties are tied on both sides of the entrance, near the poles. Now the tire is held to the ground by pegs.
Insert two short, light poles into the valve pockets to control them. Drive a pole for pulling the valves three steps opposite the entrance and tie the ropes from the valves to it.
Canopy.
To begin with, take a very long rope. It is tied to the poles inside the tipi (I wrote this just in case, you never know...) at a height slightly lower than the height of the canopy.
It is better to start from a pole with a tire. A pair of sticks are slipped under each turn of the rope; these are small, but very sacred sticks, and if you do not attach any importance to them, then when it rains, echoing streams of water will flow down the poles, falling with an eerie roar right onto your bed. For tying method, see Figure 20.
Then the canopy is hung, starting from the entrance and covering it with its first sector, so that the edges are drawn back like curtains. The bottom of the canopy is pressed down from the inside by heavy objects (stones, backpacks, tomahawks, guests, etc.)
Hearth
Don't dig a hole for the fireplace, otherwise you'll have a swimming pool. Cover it with large or small stones. It is best to place the fireplace slightly offset from the center of the tipi towards the entrance. Now light the fire, if it smokes, then go back to page 1 and see how to sew a tipi correctly.
Reginald and Gladys Laubin

Tipi coloring page

And now the tipi stands, you live in it and, apparently, you feel good in it. And one day, going out into the street and looking around, you are overcome by a vague languor - you want to do something.
WITH environment, probably nothing can be done, but the tipi tire may become completely different. This thing is quite difficult - keep in mind that most drawings sooner or later become boring if they are made thoughtlessly and without any special meaning.
It seems to us that the theme of the picture on the tire should mean something to you, first of all, it’s okay if others don’t understand it. But in general, of course, this is a personal matter for everyone and their artistic and other tastes. Therefore, we will not burden you with our thoughts on this topic (maybe a little), but will try to provide as many drawings as possible - examples of how others did it.
And yet, there is traditional symbolism, many of the details of the painting meant something else, and if you are interested in learning about this, then we can tell you something. Otherwise, you can easily skip all this.
Along the lower edge of the tire, the tipi inhabitant drew something symbolizing the earth, say a strip of mountains, prairie, stones, in general, what he sees around him. This was usually drawn in red, the color of the earth.
The top, accordingly, meant the sky, often black, bottomless in color. Sitting in such a tipi, you feel like you are in the center of a painted universe, and in most cases this was enough, and the painting of the tipi stopped (such a drawing can hardly get boring, right?). However, sometimes another drawing was applied to the tipi cover, which was an image of something unusual that happened in a person’s life or appeared to him in a dream (which from the Indian’s point of view is the same thing).
The Indians generally attached very important importance to dreams; sometimes a dream a person had could change the course of his life, and therefore it was natural for him to depict such an important event at your home. So if someone painted anything on their tipi, just like that, then somehow they would not understand him.
In a consciousness undistorted by various plastic bells and whistles, there is a very strong connection between the object and its image (the same was with pagan idols and, later, Russian icons), therefore depicting something on the tipi, you are it something attract. It is not for nothing that the frequent subject of drawings on tipi were symbolic images of guardians and helpers who appeared in dreams, usually in the form of animals with which a person previously had a close relationship.

Painted Cheyenne tipi tire
It is better to start painting the tipi before it is set up, this will make it easier to get to its top part. The bottom can be painted when the tipi is already standing. Natural colors look more natural, from which the eyes do not get tired (unless, of course, you are a fan of techno music, then your eyes have not seen such horror...).
The Indians painted tipis with colors that could be obtained from nature, so there are only a few traditional colors. But colors, like everything else, were full of meaning for them, so even when they had the opportunity to buy synthetic paints (oil or acrylic), they still chose a range that made sense to them.
These are: red, yellow, white, blue or light blue and black.
Red and yellow paints can be made from ocher, if it is crushed and mixed with fat, vegetable oil or just with water. If you are lucky, petrified ocher can be found near rivers, wood ocher can be taken from under aspen or pine bark (which is very difficult to do), sometimes earthen ocher is thrown away along with the soil by moles, as fortunately for us happened here in Toksovo.
Blue and white paint You can make it from colored clay in the same way as red, black - from crushed coal, and instead of blue paint you can use blueberries. All these paints, even diluted in water, are perfectly absorbed into the fabric, although the blue color easily fades in the sun.
Red is the color of Earth and Fire. This is the most sacred color, revered not only by the Indians, but also by many other peoples who connected their lives with the earth.
Yellow - this is the color of Stone, as well as Lightning, which, according to many beliefs, has a connection with stones, earth and fire.
White and blue - the color of Water or empty space - Air, transparent like water.
Black blue colors are the Sky, bottomlessness.
Sometimes, in order to show the connection between sky and water, the sky was depicted as white or blue(after all, water falls from the sky). For the same reasons, water was sometimes depicted as black or blue.
Sometimes Blue colour replaced with green (when they appeared oil paints, green paint is difficult to find in nature) due to the fact that ancient peoples did not have a difference between blue and green flowers. Same with navy blue and black.
As for the drawings themselves, the most important thing is to understand one thing: it is best to see the beautiful in the simple. It seems to us that this applies not only to drawings, but also to everything else that we do and think about in our lives (hey, cart!). Don't try to fill the space too much small details, emptiness will only emphasize the meaning of your drawing. We can advise not to fall for a common mistake; when you lay the tipi on the ground and make a drawing, it seems much larger than it actually is, don't be afraid to paint a large area with one color - when the tipi stands up, the perspective will change and everything will look different.
It’s very long and probably not necessary to describe all the details and squiggles that the Indians used, but we can describe several common simple symbols. Most common various triangles- they mean mountains and, accordingly, earth. The small circles combined with them are stones. A widespread symbol that confused Christian missionaries was the cross, meaning the four sacred directions, the four cardinal directions, or the celestial bodies. Of course, all these are generalized things, there were much more symbols and their different interpretations, so don’t be surprised if you come across other information in other sources (we are the source? Wow, cool!).
If you use some traditional Native American elements in the coloring of your teepee, you will also help this culture survive in its natural way.
Friends, if you remember, Sharik from the cartoon “Winter in Prostokvashino” drew on the stove, as he himself said, “an Indian national folk hut” - (in his mouth it sounded like “figvam,” but it meant a wigwam):
So, Sharik drew this very “wigwam” and thereby misled millions of innocent children, unwittingly distorting the bright image of an Indian home in their minds. After all, in fact, he depicted teepee- also a traditional Indian, but differing from a wigwam in its cone-shaped housing. Unlike Sharik, Karl Bodmer, a Swiss artist, used predominantly watercolors rather than charcoal, so from his drawing made in 1833 while traveling around North America, you can get a better idea of the tipi:
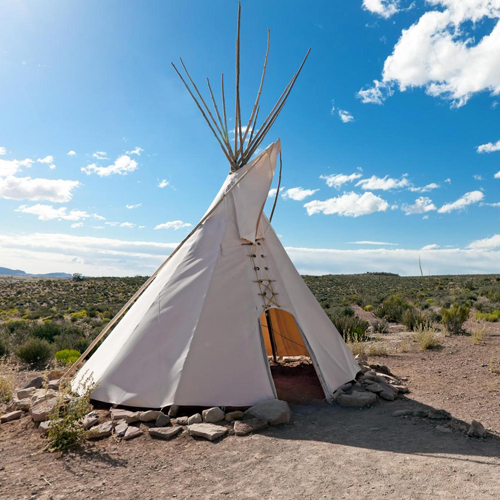
Well, now we invite you to look and forever remember what a real wigwam actually looks like. The first one shown in the picture is located near Fort Apache in the northeast of the US state of Arizona. Its structure fully corresponds to the dwelling that the Indians, leading a nomadic lifestyle, had for many centuries. It was intended mainly for sleeping, since all other tasks, such as cooking, were done outside.

So, we see that the wigwam, unlike the tipi, has a dome shape. At its core, this is a frame dwelling, that is, a hut on a frame, which is made of thin long trunks (poles) and is entirely covered with “ground material” - tree bark, branches or a reed mat. And although, as we have already said, it was not customary to cook food in the wigwam, it still had a hearth for heating, so a small chimney hole was left in the center of the “ceiling”.


What is a wigwam? This is a typical structure made of twigs and birch bark, used, among others, by the Indian tribes of the northeastern cultural group, as a house or shelter.
What is a wigwam?
The concept itself comes from a word used by the Abenaki tribe and means home. It was a form of shelter used by various tribes of Indians, especially those who lived in the northeastern forest. What is a wigwam? This is a house that was usually a dome-shaped building.

It reached, as a rule, 2.5-3 meters in height and about 12 meters in diameter. First produced wooden frame, which was then covered with other available materials, such as animal skins. The joints of the structure were firmly secured with ropes. Beginning in the late 1700s, cloth was sometimes used to cover tepees.

Native American Homes
What is a wigwam? This word was once used to describe everyone regardless of structure, location or cultural group. In fact, the term serves to describe the semi-permanent types of shelters used by a cultural group of the northeastern forest area. The word Wetu translates to "house" in the Wampanoag tribe. The term "birch house" is also used as an alternative name for wigwam. The word "wikip" is used to describe such primitive dwellings, but is common among tribes in the southwestern United States.

What is the difference between a wigwam and a teepee?
The difference between a tepee and a tipi is that the tepee was used by the tribes of the Northeastern Woodland cultural group, while the tipi was used by the nomadic tribes of the Great Plains. The first was a semi-permanent structure, the second was completely portable. Forest tribes had access to forests and used birch bark as coverings for their shelters.

The tribes hunted buffalo and used buffalo hides as coverings for their homes. A wigwam took more time to build, while a tipi was quick and easy to construct. Some were dome-shaped, while others were shaped like pyramid-shaped tents.

Who lived in the wigwam?
Typically, the wigwam was used as a dwelling by the native Indian tribes (Wampanoag, Shawnee, Abenaki, Sauk, Fox, Pequot, Narragansett, Kickapoo, Ojibwe, and Otoe) who lived around the Great Lakes and the East Coast and had access to birch bark from the forests of their territories. These designs were convenient for tribes who stayed in one place for several months. Algonquin tribes of northeastern Indians who used wigwams lived in villages during the growing season, growing corn, pumpkins, squash, beans, and tobacco.

During the hunting season, small family groups moved to hunting camps. When a family moved to a new place, the Indian wigwam was dismantled in such a way that the frame of the twigs remained intact, and the Indians took all the covering with them. Upon returning, the house was covered again necessary materials. And if the frame was no longer available, it was erected again.

Indian lifestyle
Each tribe chooses the type of housing according to its lifestyle, climate, environment and natural resources that are available to them. The wigwam (photos of similar structures are in the article) was chosen as the most suitable type of housing and house style, since it corresponded to the lifestyle of the tribes inhabiting forest areas.

Is it possible to build a wigwam yourself?
How to make a wigwam? In fact, it is not that difficult; you will need a minimum of equipment. The main materials used to create an authentic wigwam are branches of flexible trees or saplings. To begin with, a circle is drawn on the ground, which is about 12 meters in diameter. Then 16 holes are made evenly around the circumference to a depth of about 20-30 cm. The trunks, bent into an improvised arch, are firmly fixed in the holes, thus forming the domed shape of the wigwam.

Horizontal hoops are attached to the rest of the frame using hard fibers of tree bark. The entire structure is then covered with birch bark sheets to form the roof and walls. Sometimes, for additional protection of the home, a layer of straw or dried grass is placed on the birch bark. The wigwam was also covered with woven mats, skins, canvases and blankets, if these things were available to the owners. They were held in place with ropes. The space left for the doorway represents the entrance valve that allows people to enter the wigwam. And the smoke hole made on top serves as a kind of chimney for removing smoke from the fire outside and circulating air.

The sizes of wigwams were very different; in the largest structures up to 30 fellow tribesmen could live simultaneously. Nowadays, these structures are often used as a place for traditional rituals. Analogs of wigwams can be found among some African peoples, the Chukchi, Evenks and Soyts.


. Fill in the missing letters and explain the spelling of the words.")


- Turkey stewed in a slow cooker: spicy, with vegetables, in sour cream, cream and walnuts
- Types of speech: description, narration and reasoning
- Girls and women almost always associate white shoes with a wedding dress, although the white color of shoes has long been no longer required. A...
- New
- Why you shouldn't cry in front of the mirror
- Martyrs Tatiana. Moscow Church of St. Martyrs Tatiana Temple of the Martyr Tatiana at Moscow State University schedule
- Milotici: return of the Russian village Moravov Alexander Viktorovich
- Making sounds for children Lessons on making sounds for children
- Recommendations: what to grease the pies to make them rosy and appetizing
- Actors Spiderman Aunt May Aunt May in Spiderman
- What does a lizard tattoo mean?
- Deciphering the natal chart of the house
- What does mulberry help with?
- Photo report “Birthday of Samuil Yakovlevich Marshak in the group”
- Breathing at high pressure Breathing correctly at high pressure
- Bryansk State University named after
- Tasks to test spelling and punctuation literacy
- Application...burning, grow...sti, to...sleep, m...roll, warm...up, sk...roll,...
- The Forex Economic Calendar is a reference book for every trader, regardless of trading experience and level of professionalism, and especially...
- Interesting signs about spiders