DIY wooden shelves for the home. Wall shelves whose photos are amazing: a review of the best models of shelves and racks in the interior
To organize the space in the room and give the interior a complete look, you can use wall shelves. Along with clocks, paintings, embroidery and other decorative elements, places for storing objects on the walls really refresh the room, make it more habitable, residential, since on the shelves you can place things that will say a lot about the owners of the interior: about their book preferences, about travel - and will also become a branch of the family album.
In furniture and interior stores, the choice of shelves is large, and often choosing the item that suits you is not difficult. But a shelf made by yourself will make the interior unique and special, and besides, making it will bring a lot of positive emotions.
In this article we will tell you about the main stages of making wooden shelves with your own hands, about their types and options for interior solutions.
Choosing material for the shelf
IN modern interiors There are no longer restrictions on the use of this or that material, and everything is used: glass, plastic, iron, wood and other options.
Glass in the room looks fresh and visually expands the space, but among the disadvantages of such shelves is the difficulty of caring for them and the risk of injury, which is extremely important if there are small children in the house.
The material for such shelves is tempered glass or triplex.
Plastic shelves are practical, inexpensive, but collect a lot of dust, and their main drawback is that, even taking into account their rich color palette, they may not fit well into every interior. In addition, such shelves are more suitable for a bathroom or bedroom, but they are not suitable for creating a single ensemble with living room furniture.
Metal shelves can be so original that they will highlight any room design, and you can choose such shelves to suit any style. But not every wall can cope with their fastening. Also, metal products are subject to transformation over time, corrosion may occur, and they will lose their original elegant appearance.
Wood remains a universal choice for creating a shelf. Thanks to its texture, wood gives the living room a warm and very cozy atmosphere.
Pros and cons of wooden shelves
Wood is the leader in environmental friendliness among all materials. Of course, wooden details in the interior refresh it and bring it closer to nature.
The main advantages of wooden shelves:

Using texture, color, decor and individual layout, you can create a magnificent room interior
- Natural wood, even treated with varnishes and special products, collects much less dust than a product made from any other material.
- Wood is a breathable material that does not emit harmful substances into the atmosphere.
- Wooden parts can be easily processed using tools that can be found in any, even small workshop.
- Wood is a classic material, familiar to the human eye and relatively inexpensive (unless, of course, you use the most expensive and rare varieties wood).
- The availability of wood still surpasses all other materials for making shelves.
But for all its advantages, wood also has a number of disadvantages:
- Noble types of wood are quite expensive.
- During production, a lot of waste is generated: shavings, sawdust, bark, etc.
- If poorly treated or not specially treated, wood can leave splinters on a person’s skin when using the shelf.
It is, of course, up to the owners to make a choice about the use of this or that material, but in this article we will look at several options for making wooden shelves with our own hands.
Types of shelves
If you have already decided on the material from which you will make the shelf, then it’s time to choose the design that your product will represent.
If we talk about wooden shelves, then they are:

Handmade decorative items attract our attention
- Traditional wall-mounted; located on the walls, attached to them special devices, brackets on dowels or screws.
- Hanging; fastened by hanging on belts, chains, pieces of fabric, etc. By the way, an ancient but modern way of placing hanging shelves remains mounting on macrame (a special weave made of nylon or other similar threads).
- Floor-standing; as the name suggests, they stand on the floor; they can occupy the entire space of the wall or only part of it, or they can be located outside the support. In the meantime, such structures can serve to zone space in a room, for example, to separate the working area of the head of the family and common territory for guests and everyone present in the living room.
The type and even material of the shelf should also be chosen based on what exactly you are going to store on it. For example, it is better to store heavy books on shelves mounted on the wall or on the floor, due to the fact that “sources of knowledge” can be quite heavy. (Read about how to make a bookshelf on the wall with your own hands.
If you want to place a shelf outside of any support (hanging), then you should not place fragile souvenirs from travel and other pleasant little things, as well as vases with flowers, on it, since any accident can move such a shelf.
Fresh flowers in pots should not be placed on wooden shelves, as when watering some of the water may fall on the surface of the tree and gradually damage it.
So, a seemingly simple task becomes an entire art.
Making a corner wooden shelf for books
It’s easy to make such a wooden shelf for storing several books or souvenirs. For this you will need:
- ruler and pencil for marking;
- jigsaw or saw for making parts;
- wood glue (for joining elements);
- boards of suitable width;
- level;
- elements for attaching the shelf to the wall.

This shelf is suitable for small spaces
Before starting work, you need to imagine the future product; it is best to make a drawing. Using a ruler and pencil, mark the wooden piece and cut out the parts. They need to be connected taking into account the verified vertical, using a building level.
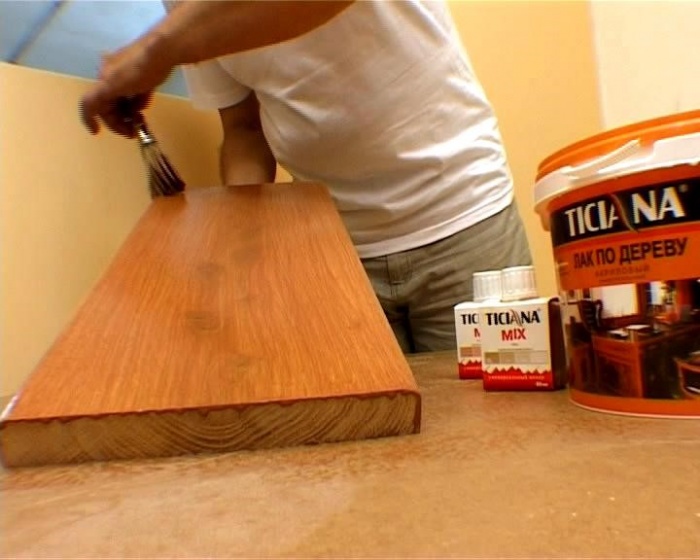
Note: Before joining, the parts need to be sanded, but the structure needs to be varnished after the parts have fallen into place.
Once the shelf is ready, you just need to attach it to the wall in the chosen location.
Shelf made of wooden planks, suspended on straps
To make such a shelf, you only need a few belts of the same length and as many wooden planks as you plan to have tiers of the shelf.

Choose leather and durable belts with metal buckles.
In addition, prepare:
- knife for cutting belts;
- drill for making holes in the wall;
- dowels, screws, nails.
First of all, make sure that the straps are exactly the same length and width: this is necessary for the stability of the shelf.
If you have several tiers, then attach the boards of the selected size to the straps using nails. Level the shelves so that the shelves are strictly horizontal.
Now you can attach the straps to the wall.
Which tree to choose
Which tree to choose depends only on your personal preferences and ability to pay. Mahogany, rosewood, cedar, beech or ebony are certainly very expensive. But if you use varieties that grow in your area, for example, pine, birch, then you can create quite a budget option interior design in the form of a shelf. Of all the above types of wood, pine is the one that is most amenable to processing, so it is preferable to use it for making wooden shelves.

Larch and oak are practically resistant to rotting and are also more durable than pine
Expert advice: Before starting processing, it is better to keep any tree for several days in the room where the shelf is planned to be used, so that it “gets used” to the microclimate, humidity and other parameters of the room. After this, you can process the wood as usual.
In case if natural wood too expensive for you, you can use its substitutes: chipboard and similar materials. They are made from wood shavings or sawdust using an adhesive composition, and are covered on top with a laminated layer imitating a wood pattern. And, although they are inferior in durability to natural material, they are similar in ease of use. Just like wooden products, chipboard shelves fit well into any classic interior.
So, if you put in a little effort and imagination, you will get unique option furniture for storing books, flowers or small items, including travel souvenirs and photographs. With proper care, this shelf will serve you well. for a long time, and when the interior changes, it can be repainted, coated with a different varnish or redesigned, because natural wood, although a renewable resource, is still much more valuable than any shelf made of plastic or other material.
From this video You will learn how to make a multi-cell shelf from solid pine with your own hands.
One of the ways to decorate a room is to use shelves. But they are not only an object for decoration. Much more often they are functional. Shelves are hung on the wall, placed on the floor, some are hung from the ceiling or beams. But the best thing is that they are easy to make yourself, with your own hands.
Types of shelves in the house
Depending on the installation location, shelves can be wall-mounted, floor-mounted or hanging. If the floor shelf has greater height- from a meter and above it is often called a rack. A few words about pendants: usually this is decorative designs, which hang on a pipe or a specially driven bracket. This option is popular in rooms where heating pipes run under the ceiling: they just beg to have something hung on them. Shelves are hung on the pipe in the kitchen and bathroom: it’s convenient there.
They are made of wood, fiberboard, and have glass shelves. The same materials are used as stands, but they are also made from metal, plastic and other absolutely incredible things - for example, pipes or bottles.
In living rooms, it is not so important what material the shelf is made of. It is important that its design is in the same style as the interior. Even functionality is not always important: some play a purely decorative role. If they have anything on them, it’s only one or two items. Their role is to give the interior of the home a special style and flavor.
A laconic style of apartment design and the same laconic shelves in a contrasting color. In this interior they are the main element. The free space above the sofa is organically filled with shelves to match the walls
If we talk about shelves in technical rooms - the kitchen and bathroom, in particular, then in addition to aesthetic considerations, practicality requirements are almost universally added. Even decorative shelves in the kitchen should be washed well. For bathroom shelves, the requirements are generally high: periodically there is very high humidity and materials are required that can withstand it without any harm. There aren't many of them. It's plastic and stainless steel. They also make bathroom shelves from MDF, but they can be used normally if they are in good condition.
Shelves on the wall
In any room there are places on the wall where you just need to hang something. After all, the majority modern furniture occupies only the lower part - sofas, tables, couches. The upper part remains empty and dissonance arises: the lower part of the room is overloaded and the upper part is half empty or completely empty. These voids on the walls are organically filled with shelves.

The whole system, and the most “dead” space is used - the corner
Structurally, most shelves consist of the actual shelves and lintels. But these components are combined into so many options that it is impossible to count. A simple design is good: you can make any shelves with your own hands. Moreover, these products may be the first self-made things. It's really simple.
How and what to attach it to
It’s not for nothing that we start with fasteners. The design of a wall shelf largely depends on the type of mounting. Or maybe it’s the other way around. It depends on what to dance from...
Traditional hinges

Eat traditional way- on the hinges. It is suitable for wood and fiberboard, any other material that is thick enough to attach. Screwed onto the sides with self-tapping screws. Then the distance between the centers of the loop holes is measured and marked on the wall (make sure it is horizontal). At the marked points, holes are drilled for the dowel, the dowel is inserted and a dowel-nail with a small head is screwed into it, which fits into a loop or bracket (a pin slightly bent upward). Then a shelf is hung on them.
Not all materials can be drilled. For example, glass shelves. You definitely can't screw anything into them. Fastenings for glass shelves are special: they consist of two parts, between which glass is inserted. Often elastic pads are installed between the holders. The bottom mount usually has a small clamping screw to secure it in place.
Fasteners for glass shelves
The most popular mount for glass shelves is called “pelican” - for its unique shape. He looks good himself, there is different colors. The thickness of glass that it can hold is from 8 to 34 mm. You can insert not only glass into it, but also any other material of such thickness. It just looks stylish with glass.
It’s easy to make glass shelves on the wall with it: you buy a mount, order it from a glass workshop the right size and shape pieces of glass with processed edges (or cut them yourself if you know how). All that remains is the assembly itself:
- Attach the pelicans to the wall. Two dowels each. The case is collapsible - the decorative trim is removed, and there are two holes in the mounting plate. One is higher in the body, the second is lower. We secured it and put the decorative trim in place.
- Glass was installed.
- Tightened the screw. All.

There are other forms of similar fasteners. The photo below shows a few of them.

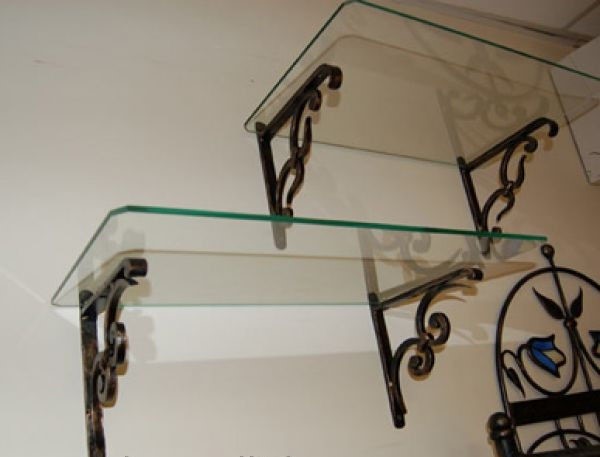
Decorative brackets
Another type of fastening is brackets. They are reliable, some are decorative, so much so that they themselves are decorations.

Concealed installation - shelves without support
And the most amazing device for hidden installation. It makes it possible to hide the fasteners. A seat for the pin and the holder body is cut out at the end, and the shelf is simply put on it.

As you can see, even simple board or a piece of glass on such mounts is already quite good. But there is still a sea of all sorts of ideas.
Bookshelves
There are strength requirements for bookshelves: they can hold significant weight. Therefore, the fastening, materials and design must be reliable. Traditionally, bookshelves are made of wood, laminated or veneered fiberboard. And then fiberboard with a long span (more than 90 cm) sag over the years.
When planning shelves for books on the walls according to your own dimensions, keep in mind that the distance between the supports should not be more than 90 cm. Then even when fully loaded it will not bend. There are two types and varieties of shelves: wall-mounted and floor-mounted. Both of them can be angular.
In the simplest case, it is a board secured in one of the following ways. Some options, especially when presented correctly, look very good.

And with imagination, several planks turn into a very interesting thing, which can even be the main element of decor. Ideas for self-made collected in the photo gallery.
And this is a serious way to expand the space due to the angles between two windows. Nonlinearity - they are always interesting, and on such a shelf you can put books of different heights
Floor-standing bookshelves can be loaded more seriously. Here the forms are different: there are racks to which shelves are attached. The highlight can be a broken or unusual line of shelves, as well as interesting racks.
This is more like a bookcase or even a cabinet, but the essence does not change - the original color and interesting small shelves in the central part and the structure looks interesting  A very interesting idea - non-linear shelves and lintels made of thick glass
On the manufacture of fountains (both small indoor ones and more substantial ones for country houses, gardens or garden plot) read.
Hanging
Not very numerous, but an original type. The most important thing is that it can be done easily: a few planks, four ropes or two belts and you can get to work.
This is a complex system of blocks...and the shelves can be located at any level. Two planks, four ropes and half an hour of time are all that is needed to make this shelf. How to make a hanging shelf - graphic step-by-step instructions
To the nursery
While the child is very small, I want functional shelves, but with children's drawings. But where can you get these? Do it yourself. Any shelf of the configuration you like can be covered with non-woven wallpaper or thick wrapping paper (glued with PVA). After drying, coat twice with water-based varnish. Such shelves can be washed, but what’s most interesting is that the shelf can change with the child. You tear it off old decor, glue a new one. The idea is simple, it works perfectly.

For children, the shelves are not very different in design. If we talk about floor or shelving, then they must be strong, taking into account the fact that older children will definitely want to climb on them. Therefore, often even those shelves that stand on the floor are additionally attached to the wall: so that they do not collapse and crush young climbers. Based on these considerations, they are not made tall: even if they fall, it’s not scary.
The shelves in the children's room also differ in color - they are brighter, can be made in the form of letters, and boxes for toys can be installed in them: this makes it easier to keep them in order. In general, functionality and security must be combined.
 System with drawers - cleaning will be quick Combination of open and closed shelves - convenient for preschoolers
Shelves and shelves for the kitchen
Say what you like, but in the kitchen the main thing is functionality. There is not much free space even on the walls: cabinets take up large territory. Therefore, one of the tasks is to make the most of free space. There are interesting ideas for small or even very small gaps between the wall and the refrigerator or other household appliances. Strictly in size, you can make a pook on wheels, which moves out and is completely hidden there. It is wide and narrow (see photo).

It’s easy to make such a retractable shelf-rack on wheels for different jars. Everything you need is at hand and out of the way
Is there some more interesting ideas about saving space. If the sink or station is located near the window, you can take the sides. There is an interesting hanging option - a grid on chains to which all sorts of utensils are attached. But such a shelf is possible if the desktop is not against the wall. Another option for saving space is if the kitchen-dining room is zoned with a counter, you can also make a shelf above it, which will be partially hanging. One part of it rests on the wall, the second on the counter or “hangs” on the ceiling.

Covering the entire wall above your desk with cabinets is not the best solution. They look heavy. The problem can be solved by using glass doors, but not everyone likes this. The solution is to make open shelves between the cabinets. They will add more lightness to the interior and work zone will not put so much pressure on the rest of the space.
Glass and open shelves will “lighten” the interior The style is different - the idea is the same Closed and open shelves in one system - convenient and non-standard
Decorative and original
Often, shelves on the wall play a purely decorative role. They are designed to attract attention and this goal is achieved by an unusual shape, contrasting with the walls and color. You can’t bet much on it: one or two things, but how interesting they are.
Another option for “square” shelves. Two identical sets arranged differently If traditional square shelves are decorated around the edges with curly frames, the style turns out to be completely different
Another one interesting topic- glass shelves. Just one glass is not very interesting. Its combination with wood and steel is more attractive. The effects are sometimes unexpected. Glass is assembled on guides: the material is fragile and heavy, and it needs to be held. Steel can do this.

In fact, these systems are intended for creating store interiors, but also in apartments modern style or look stylish.

Also suitable for vintage style
What are shelves made of? Even from pipes. Metal and plastic. Do you have any samples left from the renovation? Use it and get it designer item, interestingly, collected from trash.
This is an interesting variation of a bookshelf made of pipes
If you need a shelf made of wood, you can make it with your own hands quite easily and quickly. We will tell you how to do this in our review.
Preparatory stage
In order to work on the fabrication task, you will need to prepare a cordless screwdriver. It is necessary to choose a tool with a self-clamping chuck, the caliber of which is 10 mm or more. In addition, you will also need a jigsaw. In order to get smooth edges, you need to purchase woodworking saws. It’s also worth buying a miter box, which can cost around $30. A hammer drill and a set of drills for woodworking will also come in handy. To make the shelf aesthetically pleasing and even, you will need a tape measure and a marker. The process will not be possible without a spatula and brushes. You can make not just hanging shelves, but a prefabricated structure, which involves the presence of hidden fastenings.
Blanks

A do-it-yourself wooden flower shelf can be made using a wooden block with a cross-section of 40x40 mm. The final length will be determined by the number and parameters of the shelves. Prepare plywood, the thickness of which is 5 mm. Europlywood is the most acceptable option, since it is free from all kinds of base defects. Stock up on regular platband, which should have a width of 50 mm and be made of wood. As a final result, the shelves will have to be coated with paint, and if the products have defects beforehand, then you can get rid of them by applying putty. Almost no accessories are needed.
Defining parameters

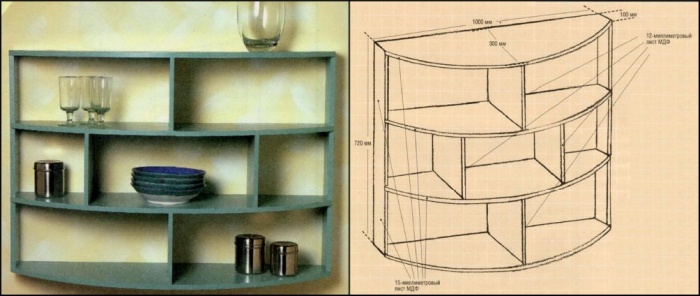
A self-made wooden shelf can have any size, but in this example we will consider dimensions equal to 800x300 mm. The thickness of the material will be 50 mm. Initially, it is necessary to prepare the elements for the described shelf. For this, two pieces of wood (720 mm) will be useful; a couple more bars (300 mm), as well as plywood in the same quantity (800x300 mm).
Build process

If you make a wooden shelf with your own hands, then you should not assume that it will be just a board attached to the wall using corners, since the structure, as mentioned above, will be prefabricated. Using a pair of short and one long block, the last of which will be the front, you need to assemble the frame. To do this, it is permissible to twist it using self-tapping screws. You can take black ones, 4x80. The main condition is the need to try to make an even pairing.
As soon as the wooden shelf is turned into a U-shaped frame with your own hands, you can attach plywood to it on both sides using staplers. If there is a desire to make the structure as durable as possible, then the surfaces to be fastened in advance should be coated with PVA glue. If the adhesive composition is not used, then additional screws will have to be used.

Now the miter box comes into play. It will allow you to saw down the platband; ultimately, you should get an angle of 45 0. This will allow you to decorate unsightly ends. It also needs to be coated with glue and further strengthened with staples. Instead of such mechanical fasteners, “invisible” nails can be used; this will eliminate the need to putty the surface for a long time.
Shelf surface treatment

After the shelf has been made from wood with your own hands, you can proceed to work on its improvement. To do this, all irregularities are covered with putty, and after drying they are treated with fine sandpaper. If the painting job involves using gloss paint, primer and sanding must be done with extreme care until a perfect surface is achieved. It is recommended to carry out such manipulations 2 times. This must be done before installing the shelf on the wall surface, since after such work it will be very difficult to carry out.
Mounting a shelf on a wall
After you have made and painted a wooden shelf with your own hands, it should be left until the composition has completely dried, only then can you begin subsequent work. The shelf, made according to the above recommendations, is a kind of hollow box, which is open only on one side. The remaining block, which is similar to the one located in front, will complete the structure, as well as fasteners. Its fixation to the wall surface must be done using or another similar tool, since you have to ensure perfect horizontality. When working with a hammer drill, accidental damage should never be allowed to occur. electrical wiring, you should definitely remember that there may be water supply pipes in the wall, so you need to work very carefully.

A wooden mantelpiece can be made using the same principle. In order to mount it to the wall, it is necessary to fix the rear beam to the surface. It should fit perfectly into the empty shelf space. In order to ensure this, it is necessary to reduce it somewhat. This will make the installation process much easier. At the next stage, the shelf is put on the beam and strengthened through the plywood located on top. This must be done using self-tapping screws. The location of the fastener in this place will not be noticeable, since there will be something standing on the shelf.
If you make one yourself from wood, then you can put various objects on it, the total weight of which is 10 kg, but no more. The dimensions can be chosen independently, which will be influenced by the needs of the owners.
Making a shoe rack
For manufacturing with dimensions of 900x350x524 mm, laminated chipboard will be used. The entire structure will consist of a cover whose dimensions are 900x350x16 mm; walls in the amount of a couple of pieces 508x350x16 mm; stiffeners 868x508x16 mm; plinth 868x80x16 mm; bottom shelf 868x334x16 mm; drawer bottoms 868x313x16 mm; shelves in the middle 868x279x16 mm; drawer divider 313x80x16 mm and drawer wall, which will be attached to the front, its dimensions are 868x96x16 mm. The assembly will be carried out on confirmations.
Once the cutting has been completed, you can proceed to drilling holes for confirmations, dowels and shelf holders. Now it’s time to glue the edges. And at the end you can start assembling.

Initially, the side walls and stiffener are fixed. The next step is to add a plinth and a reinforced shelf underneath. Now you can install the drawers into the shelf system. Next comes the top cover, which is installed on the back wall.
The final stage
When you make a shoe rack with your own hands from wood, a photo of the manufacturing process of which is presented in the article (see above), the top cover should be fixed using door hinges. Shelf supports can be installed and a middle shelf can be installed. Holes for shelf supports can be located at different levels, this will allow you to create distances for different shoes, for example, for shoes and slippers. At this point we can assume that the homemade shoe rack is ready. But that’s not all, its surface needs to be refined, for which you can use the same processing method that was described in the case of the bookshelves above. made of wood with dimensions suited to its function, it is relatively easy to make. You can use this technique during the work process. And if you want it to be even more comfortable during use, then its top cover can be covered with foam rubber and then upholstered with thick fabric.
Good day to all!
In order to organize the space in the room and improve appearance interior - nothing better shelves. They are comfortable and multifunctional, and have original shapes, and also help us conveniently place a large number of of things. It’s not at all difficult to make shelves for the wall with your own hands, all you need to do is have some the right tool, and the desire to do something. This article will describe one of the methods for making a corner shelf with your own hands; unnecessary chipboard scraps will be used as the material; for a clear understanding, the author attaches a photo report.
In order to make a shelf we need the following:
Tools:
Screwdriver;
- screwdriver;
- a set of wood drills;
- hex key 4 mm;
- mounting knife with replaceable blades;
- pencil;
- roulette;
- corner ruler.


Materials:
Edge tape of the appropriate color - at least 10 m;
- confirmations - 16 pcs.;
- screws - 8 pcs.;
- plugs - 16 pcs.;
- hanging loops - 4 pcs.
As in the manufacture of any furniture, first a sketch is drawn, and then detailed detailing.
Sketch and detailing of the product.
Shelf with a radius of 190x900 mm - 2 pcs.;
- shelf with a radius of 190x1100 mm - 2 pcs.;
- stand 600x265 mm - 2 pcs.;
- stand 440x265 mm - 2 pcs.

The radii and chords of the bends are shown.


We begin to make the sides of the shelf.
To do this, we take a sheet of chipboard that we have, on which we apply markings of the curly parts.

The author uses an improvised tool - a pencil and thread, with which he draws the necessary curves.

The first bend should start from a flat area at a distance of 30-100 mm from the beginning, since if you start drawing from an arc, there is a possibility that you will end up with an unpleasant joint when gluing the edge.

The first blank can be used as a template; using its principle, we make a second identical part. As cutting tool We use an electric jigsaw.

The inner stand will be slightly shorter than the outer one, since it does not have an internal protrusion.

After using a jigsaw, irregularities and chips often appear on the edge of the product.

We remove them using a sanding machine equipped with an sanding belt with a K80 or K100 grit.

The result should be a smooth and leveled surface.

When all the parts are ready, you can perform edging, for this we take a tape and, using a heated iron and a small piece of fabric, fix it.

When gluing the edge there are several important points to consider:
1 – you need to choose the right temperature, it is best to set it in the interval between the first and second stages of the thermostat;
2 – you need to place a cotton cloth under the iron, this is so that there are no traces of the iron left on the edge and there is no strong overheating;
3 – when going along the inner curves, the iron should be pressed with the nose. At the same time, you need to try to make fewer unnecessary movements.
We cut off the excess edge tape using a mounting knife.

It should look like this.

After the edge is glued, we sand the corners of the product with fine-grained sandpaper; it will remove the white glue that has formed.

For the crossbar we take rectangular pieces of chipboard, they should be the same length. Their width should correspond to the width of the vertical posts.

To make the design original, the author made two additional slots in the inner rack.

The shelf board will be inserted into them and fixed.

We set the lower and upper posts at the correct angle, for this we use a corner ruler, and additionally fix them with clamps. Then, with the help of confirmations, they will be attached to each other.

For confirmations, we make holes, they are located at a distance of 8 mm from the edge, we use a specialized drill.

When the holes are ready, we fix the parts with confirmation; for this we use a special hex key.

Let's move on to the next stage.
We fasten the internal vertical post at the required distance.

Then install the top shelf. First you need to attach it to the external rack.

We drill a hole and fix it with confirmations.

It is worth noting that while drilling, the drill must be kept as level as possible to the surface of the workpiece.
Wall shelves can harmoniously complement the design of a room. The range of their purposes is very wide. Depending on the location and application options, the material for their manufacture is chosen and the design is thought through. Let’s take a closer look at what features should be taken into account before you start creating a wall shelf with your own hands, and what are the main stages of the process.
Variety of wall designs
The main purpose of a wall shelf is to place many small items, while organically combining the functions of storage and interior decoration. Depending on this, the installation option for the furniture structure is determined. There may be several of them:
- The most common placement method is to make a wall-mounted form, when the product is attached to the wall, below which other pieces of furniture (sofa, bed or table) are often located.
- A do-it-yourself hanging shelf can be a unique highlight among wall structures. Key Difference lies in the method of fastening: instead of traditional brackets and loops, ropes, chains and belts are used.
- Depending on the organization of the living space, from time to time there is a need to make a corner shelf. Moreover, in addition to the common way of using internal space, sometimes they harmoniously use external corner rooms.


With a little imagination, you can make a wall shelf structure with your own hands in various variations. The following models are widely used:
- What makes it easy to make with your own hands is a console - a shelf attached perpendicular to the wall.
- If desired, the structure is supplemented with side walls and the back is covered.
- To create a unique rack with your own hands, it is enough to combine several single consoles together.
- Recently, combined specimens with an unusual arrangement of horizontal and vertical walls have gained wide popularity.
- Numerous decorative models of wall shelves are distinguished by their originality. Their main function is to create an exclusive design element in accordance with the chosen style.

Occasionally, the façade of a do-it-yourself structure is supplemented with glass. This is practical when storing items that do not have a decorative function. A small part of the designs of wall shelves that you can design with your own hands is presented in the drawings below:


Nuances of choosing material when designing
No construction work is complete without a preliminary plan.
Note! Before you start designing a shelf with your own hands, you need to decide on the material for the base.
When choosing it, take into account the place where the furniture structure will be installed and its main functions. The scope of application of wall shelves is as follows:
- Book lovers and students will definitely find bookshelves based on wood and its derivatives useful.
- To store jars of spices or decorative items in the kitchen (which are original plates or exclusive mugs), narrow shelves equipped with low sides are used. In this case, it is most appropriate to use wood for manufacturing, although depending on the chosen design, glass specimens can also look harmonious.
- The arrangement of a bathroom is not complete without installing glass shelves, complemented by chrome elements. This is due to the basic requirement for the material - it must have high level moisture resistance.
- Universal shelves allow you to be creative with the choice of material when making your own. They are intended for setting flowers or various souvenirs, and the base is selected taking into account the overall design of the room. It can be classic wood, durable metal, complemented by forged elements, or glass, creating the effect of lightness.

Mounting options
The type of fastening plays an important role when designing a wall shelf structure. By exploring the fixation options, it will be easier for you to determine the most suitable method.
Classic hinges
The traditional way to fasten wall shelves is to use hinges. They are optimally suited for products made of wood and its derivatives. Important condition– the material must be of sufficient thickness. The whole process takes place in several stages:
- The hinges are fixed to the side of the furniture structure with self-tapping screws.
- After measuring the distance between the holes, the required length is marked on the wall.
Attention ! Maintaining a horizontal line is important point when fixing a wall shelf.
- At the designated point, holes of the required diameter are drilled for inserting a dowel.
- A self-tapping screw with a neat head is screwed into the hammered dowel, onto which the shelf is hung.

Fastening glass shelves
The use of loops is not suitable for all materials. Installation of wall glass shelves is carried out using special fasteners for fragile products. The fasteners are made of two parts and are often supplemented with elastic gaskets; the glass shelf is inserted between them. The lower part of the device for reliable fixation wall structure is equipped with a clamping screw.
A common model of fastening for a glass shelf is a specimen called pelican, capable of holding a wall structure with a thickness of 8 to 34 mm. In addition to glass, it can be used to fasten other materials with similar dimensions.

Concealed mounting and decorative brackets
The hidden installation of a wall shelf is distinguished by its simplicity and originality. In this case, the fasteners are completely disguised. The essence of this method is as follows:
- at the end wooden structure a recess is prepared for the pin and the body of the fastener;
- The mensolo holder is fixed to the wall, after which the shelf is put on it.


Wall shelves with decorative brackets allow you to create an individual room design. They can be made in a production way or refer to exclusive copies. Photos of wall shelves decorated with do-it-yourself brackets are presented below:


Manufacturing process
Depending on the chosen design and material, the process of making a wall shelf yourself has its own characteristics.
Tree
If you want to make an original wooden wall shelf with your own hands, you will need:
- Base material. In addition to natural wood, you can take MDF, chipboard or gypsum fiber board, this will greatly facilitate the surface treatment process.
- A jigsaw that can replace a hacksaw.
- Drill and grinder.
- Ruler with pencil.
- Building level.
- Wood glue or liquid nails.
- Varnish or stain.
- Brackets, dowels and screws.
The entire process of making a wall shelf with your own hands is simple. After drawing up a plan or taking as a basis finished project, the dimensions of the structure are transferred to the material. Saw wooden base It’s better to use a jigsaw, which provides a perfectly even cut.

All elements of the wooden shelf are thoroughly sanded; if there are significant defects, I use wood putty. On initial stage will be needed sandpaper No. 40, sanding paper No. 80 and 120 will allow you to get a perfectly smooth surface.

Connect the parts of the wall structure liquid nails or wood glue.
Marks are made on the shelf and wall for fastening. The brackets are connected to the shelf, and a recess is made in the wall using a drill, after which the dowels are inserted.

At the final stage, screws are screwed in and the wall shelf is hung.


Glass
Premises with small area It is better to equip it with glass wall shelves, which create an atmosphere of lightness and visually increase the space. If you don’t have enough experience working with glass, it is better to contact specialists who, while cutting the fragile material, will perform high-quality processing of the sections. The following steps for installing a wall shelf can be done by anyone capable of holding a tool in their hands, and are similar to the procedure for attaching a wooden structure:
- Using a level, mark the mounting points on the wall.
- The Pelican design requires two dowels.
- After removing the decorative trim, you will find holes where you need to screw in fasteners.
- The decorative trim is put in place and the glass is inserted.
- At the final stage, tighten the screw.
This completes the installation of the glass wall structure.

Conclusion
A competent combination of a wall shelf with other furnishings will create harmonious design rooms with individuality.


. Fill in the missing letters and explain the spelling of the words.")


- Turkey stewed in a slow cooker: spicy, with vegetables, in sour cream, cream and walnuts
- Types of speech: description, narration and reasoning
- Girls and women almost always associate white shoes with a wedding dress, although the white color of shoes has long been no longer required. A...
- New
- Why you shouldn't cry in front of the mirror
- Martyrs Tatiana. Moscow Church of St. Martyrs Tatiana Temple of the Martyr Tatiana at Moscow State University schedule
- Milotici: return of the Russian village Moravov Alexander Viktorovich
- Making sounds for children Lessons on making sounds for children
- Recommendations: what to grease the pies to make them rosy and appetizing
- Actors Spiderman Aunt May Aunt May in Spiderman
- What does a lizard tattoo mean?
- Deciphering the natal chart of the house
- What does mulberry help with?
- Photo report “Birthday of Samuil Yakovlevich Marshak in the group”
- Breathing at high pressure Breathing correctly at high pressure
- Bryansk State University named after
- Tasks to test spelling and punctuation literacy
- Application...burning, grow...sti, to...sleep, m...roll, warm...up, sk...roll,...
- The Forex economic calendar is a reference book for every trader, regardless of trading experience and level of professionalism, and especially...
- Interesting signs about spiders