Vase, flower pot and fruit stand made from a plastic bottle. Vases from glass bottles: master classes and photos How to make a vase from a plastic bottle
Nowadays it is fashionable to make various crafts from plastic.
I offer options for vases made from plastic bottles (there is a MK for the first two vases).


First MK


Here is a video about this vase:
Second MK
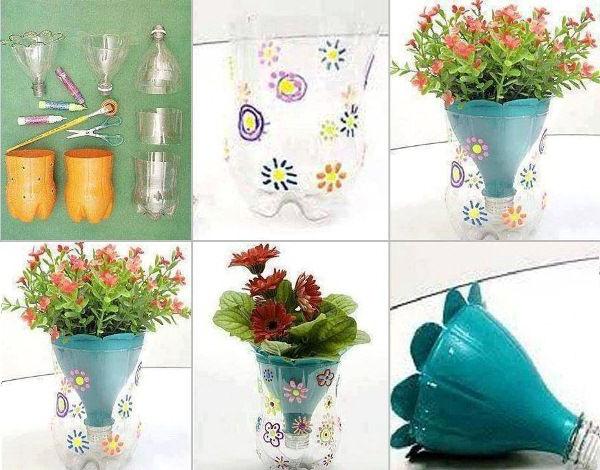
Elena Khorolskaya prepared a master class on how to make a vase from plastic bottle. Everything is very simple, from scrap materials, practically “from garbage”.
It's no secret that flowers in the house are a pleasure to the eye. But for those people who suffer from allergies, it is not possible to constantly use living bouquets. At the same time, you can make a vase with artificial flowers with your own hands from scrap materials.
To make it you will need a green plastic bottle of any shape and size, a plastic backing from confectionery and scissors (it is better to use regular and manicure ones).
Carefully cut off the top and neck of the bottle. We won't need it.

Next, cut the body of the bottle from top to bottom into strips about 0.5-1.0 cm thick.
The thinner the strips, the more of them you will get. It is very important that these future “stems” are straight. The ends of the strips must be sharpened. To do this, very carefully cut the corners with scissors, holding them with your hand.


The vase is ready. Now you should think about what available material you can make flowers from? Can be made from regular colored paper. And we suggest cutting flowers from foam substrates from confectionery products.
Cut the substrates with ordinary scissors into small squares with a side length of 3-4 cm. Next we will use thin nail scissors. In each square, carefully cut the corners in a semicircle - you get circles. These are preparations for future flowers.
Using sharp scissors, cut out triangles in circles in four, five, six places. We get flowers that look a little like snowflakes with rough petals.


Now on each such petal you just need to cut off a corner with sharp scissors. This will make the flower petals a little softer.
When cutting flowers from foam plastic substrates, it is very important to use your imagination a little, then each flower will be unique, and you will get a very beautiful bouquet from flowers, made independently, with your own hands.
Now you need to carefully put each cut out flower on a stem, piercing the center of the flower with the sharp edge of a green strip.


So attach all the prepared flowers. That's all, an artificial vase with flowers will delight you at any time of the year.
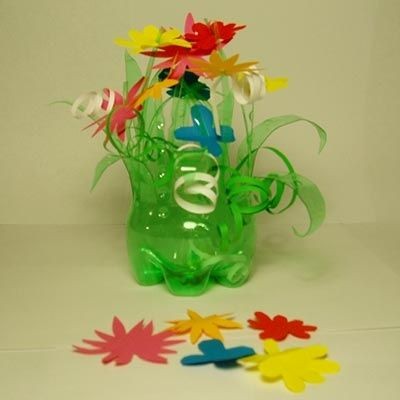
And another video. Crazy hands. Vase made of plastic bottles (03/14/2004)
Nowadays everything original is in fashion, including vases. If you do not want to receive a stamped item from mass production, you should contact the craftsmen who will accept your order and take into account all your wishes. If there is no suitable artist or you don’t want to spend money, try making a vase with your own hands. To do this, you don’t have to go to master classes or clubs - just read the step-by-step instructions and have the mindset for success.
Peculiarities
In a vase made from plastic bottle, a lot of advantages.
- Availability. All kinds of bottles remain after food and household liquids, which are constantly running out. And if suddenly you need to urgently place flowers, you can take any of the available ones or pour the leftovers into another container.
- Low cost. The cost of such a product mainly depends on how you decorate it. To create your own simple option without coverage you will only need time. More complex options They will help out if there is a need to decorate a room temporarily, for example, when moving to a country house, a rented apartment, etc.
- An opportunity to show your talents. Even creating a small vase requires patience and some work skills. In addition, in the process of creativity, completely unusual abilities. In any case, something made with your own hands is a reason to be proud.
- Ease of processing. Plastic is easier to work with than harder, thicker materials. Even a child can do a simple craft. Naturally, you need to handle cutting tools with care.
- Environmentally friendly. By reusing materials, you help reduce landfills.


Among the shortcomings, many note that homemade items look too simple and rough. Yes, if you just fill a bottle with water, it will look primitive. It all depends on your desire and skill. Even if something doesn’t work out, there is an opportunity to do better next time by turning a random craft into a hobby.
What materials will be needed?
The most affordable are plastic bottles. They are usually made from two types of plastics.
- PET– they sell drinks, sauces, butter. As a rule, the walls of such containers are quite thin and easily wrinkled. The contents can easily outweigh them, so they are more suitable for dried compositions, pencils and other small items.
- PE HD– polyethylene of higher strength, so dairy products, shampoos and other cosmetics are poured into it, household chemicals. Such containers will be more stable. You can safely pour water into it and place flowers.
Almost any type of plastic that we can find in a grocery store cannot be reused in food due to the emissions it emits. harmful substances. They can be used in everyday life under certain conditions: they cannot be heated or exposed to direct sun rays. If you want to make sure the material is safe, pay attention to the markings on the bottom.

Before choosing a blank for a future vase, you need to understand how you will use it. Depending on this, it can be:
- high or low;
- round, square or oval;
- smooth or threaded;
- with straight or curved walls;
- transparent or colored.

Think about where it will be placed. Floor models are larger, while the vase is on dinner table should be as low as possible. After you decide, rinse the bottle thoroughly, remove the label and the adhesive layer under it, and dry well.
How to do it?
In fact, before choosing one of the options, stocking up on materials and tools, you need to soberly assess your own strengths. This does not mean that if you have never done anything with your own hands or have already had a bad experience, you should not start. No and no again! In this case, it is necessary to start with a model that does not require a lot of effort and time, so that there is no temptation to give up everything halfway. Start with simple things and move towards more complex ones, then you will be proud not only of the result, but also of the knowledge, experience, and skills gained in the creation process.


Painted vase
To make it several steps must be performed sequentially.
- Measure the required height. Use a knife to remove the top.
- Sand down any uneven surfaces with fine sand. sandpaper. To be secure, cover the top edge with tape or colored adhesive tape.
- You can start painting. To do this, take measures to ensure that the paint does not get on your surroundings, hands or clothing. Give preference to aerosols: they are applied more evenly than with a brush. If the bottle is very smooth, apply primer first, wait until it dries, and start painting.
- If there are patterns or drawings on the vase, wait until it dries completely.


Despite its apparent simplicity, it is important to take into account several nuances.
- To ensure that the paint applies evenly and does not peel off prematurely, thoroughly clean and dry the prepared dishes.
- White or transparent bottles are ideal for coloring. The brighter their color, the more coats of paint may be needed. Additionally, layers of paint affect the intensity of the color.
- For stability, you can place any material at the bottom that, when hardened, will not be dissolved by water, as well as pebbles, decorative balls, etc.

On a stand
In this case, both the upper and lower parts are used.
- Separate the lower part up to five centimeters high.
- Cut a hole in the bottom equal to the diameter of the bottle neck. Remove any rough edges.
- Insert the neck (without the cap) into the hole. This way you will get a kind of flowerpot on a leg with a stand.


For stability, instead of a support, you can take a piece of plastic or wood and give it any shape. The width of such a stand should not be less than the diameter of the bottle. It is also possible to increase the height of the stem using a suitable tube. You can connect the components using glue.
Wall-mounted
With it you can revive a wall, turning the room into blooming garden.You can use ropes for this.
- Cut off the top of the workpiece.
- Make two or four marks 1cm from the edge opposite each other.
- Heat a nail, awl or screwdriver over a fire and pierce it in the marked places.
- Now all that remains is to thread the strings or laces and hang them on the wall. To prevent them from falling out, tie knots at the ends.


You can do without laces. For example, a nail in a wall can be inserted directly into the hole itself, then it will not be visible.
For this method of placement, it is more convenient to use square or oval bottles. Depending on the decoration method, holes are made before or after. Also, the necessary parts of the bottles can be glued to wooden base and already attach it to the wall.
Openwork or carved
Sometimes, in order to radically change the look, you can decorate only the edge. Even a schoolchild can cope with this task. In fact, the top line can not only be smooth - depending on your imagination, it can easily become asymmetrical, wavy or jagged. To make it look beautiful and not have to redo or trim anything, apply markings in advance and cut along them. To do this, you can use either scissors or a stationery knife.


More in a complicated way decoration in this case can be a fringe, and it can be bent as if inner side, and out. This can be done with all the elements, or you can do it through one, or lay them on top of each other in the form of weaving.

If only dry compositions will stand in the vase, then all sorts of slits and holes can be made along its entire length. They can be repeated to form a lace pattern. To perform them, the pattern can be applied directly to the plastic. You can also print the design on paper, fasten it in several places and cut through it. This will significantly reduce the time, but you must constantly ensure that it does not move.
To create patterns, you can use knives, a soldering iron, or heated metal tools with appropriate tips. The choice of tools depends on your skill level and dexterity.


The above options, of course, are not the only ones, but you can take them as a basis, change the technology and get completely new ones. For example, you can go over a plain layer with a sponge or brush with paint of a contrasting color. The resulting effect looks voluminous and bright.

To hide the polyethylene base, it can be covered with threads, fabric, lace, ribbons, rhinestones or any other material at hand decorative material. One of the most popular techniques is also decoupage. It is important that the decor matches each other. To avoid overdoing it, use no more than two materials, colors or textures. And then your vase will become a worthy exhibit of your apartment.
The second life of empty PET bottles varies. Some people cut them for seedling pots, while others like to make them out of plastic containers“pie” molds for a children’s sandbox. Some make convenient scoops for bulk products from plastic bottles, while others manage to create real works of decorative and applied art from unnecessary plastic cylinders - figured flower pots and original flower pots. A homemade vase made from a plastic bottle can amaze with the splendor of its artistic performance. And you can make such beauty with your own hands.
However, let’s not get ahead of ourselves, even though you are already eager to cut out vases from plastic bottles using our inspiring illustrated patterns. First, prepare necessary materials and simple equipment: a couple of multi-colored PET flasks, convenient scissors, acrylic paints, colored aerosols or markers on plastic, sticks and stickers, any decorative additions (beads, buttons, ribbons, etc.) according to your design. To apply ornaments to openwork vases made from plastic bottles, you will need a soldering iron. Ready to get started? Then we begin our exciting master class.
Vase with figured border
To begin with, let's step by step master a simple diagram - Fig. 1. This interesting craft it could be, for example, a tabletop candy dish, and if you take an empty five-liter bottle to complete it, you will get a real floor vase. So:

- Cut off the top conical part of the bottle; you won't need it in this design;
- Then cut uniform strips with scissors. End each slot at the same level;
- Bend each strip outward and press, giving the structure the shape of a sun from children's drawings;
- Now bend the strips inward at an angle, fixing their ends in adjacent slots (as shown in Fig. 1).
Additional decoration depends only on your imagination. You can simply tie a scarlet ribbon around the craft or cover it with bright stickers. An unusual fruit bowl is ready.
Was the floor vase easy for you? Then you can make a pot from a plastic bottle without much difficulty. Rice will help you get inspired. 2. Let's look at it in more detail:

- Cut off the top of the bottle, considering that this is the future bowl of a flower pot - plan its size;
- Make a hole in the plug through which excess water from irrigation will flow into the stand;
- Insert the top of the bottle, cork side down, into the remaining base of the same bottle. The pot with drainage is ready.
You have just assembled a pot from an ordinary plastic bottle with your own hands, and now decorate it and fill it with soil. Plant seeds or cuttings of your favorite flowers and wait for abundant shoots to appear.
Funny pots for herbalists
We already know how to make a vase from a plastic bottle. And simple flower pots are no longer a problem either. But flower pot may not only be the same as we discussed above. Let's now make some funny grasshoppers using the cut-off bottom of a plastic bottle? So:


- Cut off the bottom part with the “bunch” from the PET bottle in order to be able to give the pot the desired shape;
- Give the little grass a “face” by gluing eyes and a nose from colored stickers (see Fig. 3 and 4);
- Set the shape of the pot. It could be a cat or a bunny - cut out the ears to the desired length;
- Or you can give the grasshopper the look of a funny gnome by using caps from PET bottles as his nose and eyes.
Fill the pot with soil and sow the seeds in it lawn grass. Very soon your grasshopper will have an original green hairstyle. Just don’t forget to water the garden troll’s hair from time to time.
Decorative vases
Look how easy it is to be born original craft from empty plastic containers! Simply cut the walls of the bottle into thin strips of different lengths and put white foam balls, foam rubber or cardboard inflorescence blanks or corrugated paper roses on them - you will get a luxurious decorative composition for decorating home interiors. An unfading original bouquet.

Openwork vases
What can you say about the luxurious openwork vases, looking at the picture. 5? Are you ready to create such a masterpiece? Maybe not, but it's worth a try right now!

- Cut the top of the bottle where the neck narrows, setting the desired size of the neck of the future vase;
- Using a soldering iron or burner, create an original ornament on the body of the craft. The bottom can be left untouched so that the vase holds water and is practically useful.

An almost finished bottle vase with its ornaments will be almost invisible if you do not paint the transparent craft with a colored aerosol. Having done this, you will see how vividly the slot patterns on the unique designer vase will play. There’s no shame in even giving this as a gift; your loved ones will certainly appreciate your original handmade item.

Beautiful vases with flowers serve as decoration for the interior of the room, adding bright colors and zest to it. A suitable vase can be purchased at a store in finished form, or you can use all your creative potential and make a vase from a glass bottle yourself, guided by the ideas in this article. Handmade crafts are always especially precious and memorable. They will not only serve as an excellent element of interior decor, but also give warm positive emotions to the whole family every day. We have already written about crafts made from plastic bottles, now let’s see what can be made from glass bottles.


In order to make beautiful vase, you can use a glass bottle of any shape and color. For example, here is a master class “painting bottles from the inside,” with which you can make such bright vases as in the third photo above. The vase can be made with a narrow neck, intended for one small flower, or at the stage of preparing the bottle, first cut off the neck. How to do this at home using improvised means will be discussed below.
How to cut the neck of a bottle at home
In order to carefully get rid of a bottleneck, you need to prepare the following materials and items:
Thick wool thread;
Solvent (you can also use acetone, kerosene, alcohol, gasoline);
Gloves and glasses for safety reasons;
Matches;
Basin with water;
Sandpaper or stone for sharpening knives.
Next, you need to mark a cut line on the bottle. The woolen thread is unwound to such a length that it is enough to wrap the bottle three times around its axis. Then you need to moisten the thread in a solvent, quickly wrap it around the bottle three times in the place where the cut is intended, set it on fire and wait until it burns out. The bottle should be held so that it is parallel to the ground. Next, the bottle is quickly lowered into a basin with cold water. Due to a sharp drop in temperature, the neck itself will break off in the intended place. The last stage is processing the sharp edge with sandpaper or a stone for sharpening knives. The second option is best done in water.

How to make an original silver vase from a glass bottle
First, you should remove the neck from the bottle in the manner described above and prepare everything you need: a can of silver paint, woolen thread, paper napkins, PVA glue, rhinestones and beads, scissors, cotton swabs, transparent moment glue, ribbon for decoration.
The napkins should be cut into 4 parts, apply PVA glue to the future vase and carefully glue all the napkins in turn, while on each napkin it is necessary to create special recesses where beads and rhinestones will subsequently be glued. This is done with a cotton swab. It must be placed in the center of the napkin and scrolled around its axis. When the bottle is completely covered in this way, it must be left to dry for 4 hours. Then you need to glue patterns from pieces of woolen thread using PVA glue. After drying, the vase is ready to apply paint from a can of the appropriate color. Finally, after 45 minutes, you can decorate the vase with rhinestones, beads and ribbon using Moment transparent glue.


Vases made of glass bottles with a knitted cover
This option will especially appeal to those who know how to knit beautifully. To implement this method, you need to knit a beautiful cover for the future vase that matches the style and interior design of the room. Such vases create a feeling of warmth and comfort in the home.

However, if you don't know how to knit, don't despair. You can create amazing vases using multi-colored knitting threads by winding from the base of the bottle to the neck. To create an even more beautiful effect, you can also attach a variety of beads to the threads.


How to make a glass bottle vase using crepe paper
In this case, you need to cut multi-colored corrugated paper into pieces and stick it on a transparent glass bottle, using PVA glue with water in proportions 1:1. The pieces are glued in several layers, the glue will not be noticeable after drying. The finished vase can be decorated with other elements to taste and varnished.

Vases made of glass bottles, decorated with fabric and lace
If you have beautiful pieces of fabric with unusual patterns, original lace and glass bottles themselves, then you shouldn’t throw them away. All this can be put to good use in creating truly amazing handmade masterpieces. It will be enough to carefully glue them onto the bottle with PVA glue.

Whatever the method of creating such a craft, the main thing in this matter is the desire and creativity. Be sure to think in advance which option is the least difficult for you in terms of implementation. This is where you should start your first experiments. The main thing is that the result of the work looks beautiful and is in harmony with the interior of your home.
Vase with Flowers will easily improve your mood even on the saddest day. Almost everyone in their apartment has one or several vases. But remember, you can’t have too many vases – it’s nice to change and decorate them sometimes. An excellent solution The current supplies will be replenished with a vase made with your own hands from plastic bottles.
Plastic utensils have their advantages - at least they are safe because they do not break, which means you don’t have to worry if they are knocked to the floor by a child running past or a naughty cat. Homemade vases for sweets, fruits or flowers, you can make them step by step from bottles using master classes, decorate them to your taste and get an exclusive decorative item.
List of the main advantages of such a vase:
- Inexpensive material.
- The ease of creating such a craft.
- Such a vase will never break, which means it can last forever.
- If you get tired of the vase, you can make a new vase and throw away the previous one without any problems.
Now we will analyze several master classes on creating a vase at home. You can follow the advice completely, or you can add your own details and flair.
Vase painted with spray can master class
 To create this vase we will need:
- Plastic bottles.
- Primer.
- Spray can with paint of any color.
- Sharp scissors.
- Scotch.
Step-by-step description of the work:
- Step 1 - Preparing the product.
We select clean bottles and cut off the top of the product.
Paste over cut edge with tape so that when using a vase, the top does not cut off the flowers. Check if it fits securely on the bottle.
- Step 2 - Primer.
We prepare the product for painting by first applying a layer of primer to it. This way the paint will adhere well and last much longer.
- Step 3 - Painting.
Spray the product with paint from a can and leave until completely dry. We do this procedure outside or at home, after covering the floor with paper so as not to stain anything.
Important advice.
If you want to make a vase using several colors of paint, then first, apply one of the colors, let it dry completely, and then stick tape over the place where you want to add the second color and spray, after it has completely dried, remove the tape. Be sure to wait for the first paint to dry completely, otherwise the tape will ruin everything and then they will rip together.
Gallery: vase made from a plastic bottle (25 photos)


Vase in decoupage style master class
 Another method for plastic bottle decoration– use napkins for decoupage. They make it possible to create a huge range of designs. You can also make a hanging vase.
- Napkins.
- Fastenings for napkins (brushes, special glue).
- Sharp scissors.
- Special braid for decoration.
- Hole puncher.
- Glue gun.
Step-by-step description of the work:
- Step 1 - Trimming.
We cut off and throw away the top of the bottle, leaving only the bottom part.
Using materials for working with decoupage attach the napkin you took on the bottom of the product.
- Step 2 - Attaching the rope.
To make it easier to hang the vase, you need to attach a rope.
First, use a hole punch to create two holes near the top edge, they should be specifically opposite each other.
Take a rope of a certain length and tie it to both holes.
- Step 3 - Braid for decoration.
Using a glue gun, we attach our braid with pompoms to the edge of the top of the vase. Your handmade craft is ready!
DIY vase made from a bottle and threads
 This method is suitable for creating vases for dried flowers, flower pots or ordinary baskets. It turns out very original and very beautiful.
Materials required for work:
- Large plastic bottle.
- Threads.
Step-by-step work process:
- Step 1 - Trimming
Cut the craft in half, leaving only the bottom part. Cut the sides of the half from the bottom into an even number of strips of equal size. We will weave a couple of layers of yarn onto them.
- Step 2 - Create a weave.
It is better to take thick yarn, and it looks prettier and weaves twice as fast. Braid the strips one at a time: the first in front, the next in back. We continue working until we reach the top. You can take one color, melange thread, or alternate several different shades.
- Step 3 - Finish the edge on top.
It is necessary to attach a strip of material on top so that the edge does not prick and the threads do not fall. To do this, first, wrap the end of the thread in the middle of the vase under a layer of woven threads, and then sew a strip of fabric onto the edge of the craft with large stitches. That's all, the craft is ready.
Do-it-yourself master class set of vases
 From small square plastic products you can make a whole set of vases. Materials that will be required for work.


. Fill in the missing letters and explain the spelling of the words.")


- Turkey stewed in a slow cooker: spicy, with vegetables, in sour cream, cream and walnuts
- Types of speech: description, narration and reasoning
- Girls and women almost always associate white shoes with a wedding dress, although the white color of shoes has long been no longer required. A...
- New
- Why you shouldn't cry in front of the mirror
- Martyrs Tatiana. Moscow Church of St. Martyrs Tatiana Temple of the Martyr Tatiana at Moscow State University schedule
- Milotici: return of the Russian village Moravov Alexander Viktorovich
- Making sounds for children Lessons on making sounds for children
- Recommendations: what to grease the pies to make them rosy and appetizing
- Actors Spiderman Aunt May Aunt May in Spiderman
- What does a lizard tattoo mean?
- Deciphering the natal chart of the house
- What does mulberry help with?
- Photo report “Birthday of Samuil Yakovlevich Marshak in the group”
- Breathing at high pressure Breathing correctly at high pressure
- Bryansk State University named after
- Tasks to test spelling and punctuation literacy
- Application...burning, grow...sti, to...sleep, m...roll, warm...up, sk...roll,...
- The Forex Economic Calendar is a reference book for every trader, regardless of trading experience and level of professionalism, and especially...
- Interesting signs about spiders