How to make the roof your own. We build a roof with our own hands
The last stage of building a house is arranging the roof. Traditionally, a gable roof is erected for any residential building, and a single-pitch roof is erected for outbuildings. Technological processes works on installation, fastening and arrangement of the roof with a truss structure in gable version roofs have been perfected for centuries, and these operations do not change depending on the type of roofing materials (clay tiles, corrugated sheets, metal tiles, asbestos slate, metal or plastic).
Types of gable roof
People say: “a roof like a house,” that is, they mean not only the shape, but also the reliability of the structure, which has a long list of advantages:
- A variety of roofing scheme options and architectural roof shapes;
- Simple calculations and cost-effectiveness of the roof;
- Natural runoff of precipitation;
- Simple geometric shapes roofs provide a low likelihood of water accumulation and roof leaks;
- Large usable attic area, it is possible to make an attic;
- Good maintainability, high strength, durability and wear resistance of a roof made of two slopes.
Three most common options gable roof:
- Symmetrical gable roof: This is the most popular solution due to its absolute reliability and ease of execution. Symmetrical slopes evenly distribute all loads on the mauerlat and walls of the house. The choice of roofing material does not depend on the type and thickness of the thermal insulation layer. The load-bearing load can be easily increased by making the rafter system from thicker timber; the jibs and spacers can be attached anywhere. Negative factor– a full-fledged attic will not work in such an attic – either there will be low sloping walls with many “dead” zones, or a small but rectangular room;
- Asymmetrical roof of two slopes: Different slope angles reduce usable area attic, but on one side you can make a full-fledged living space. Due to different roof slope angles, the load on the load-bearing walls and foundation of the house is distributed unevenly, which requires recalculating the load-bearing capacity of the base and load-bearing walls of the house, recalculating the types of materials and their quantities, as well as changing the methods of insulation, waterproofing and finishing;
- Asymmetrical gable roof with internal or external bend: Allows you to design living spaces without regard to the roof structure. The disadvantages are the same as in the paragraph above.

Preparing to build a house roof
The shape of the roof and its design can be selected based on the size of the building, the material of the load-bearing walls, and the geographic location of the site. These and other parameters specified in the project determine what loads a gable roof can withstand during operation.

The slope angle of the slopes has a certain optimal range, in which weather conditions have the least influence on the formation of maximum loads on the roof. If the slope angle is ≤ 400, then this limits the possibilities of equipping an attic or a full-fledged room in the attic, and a slope angle ≤ 100 increases the load on the roof from rain, wind or snow. If you definitely want to have an attic or a room in the attic space, it is better to use the option of a sloping asymmetrical roof, and if the walls of the house are more than 6 meters long, then the rafter system must be strengthened with additional purlins. 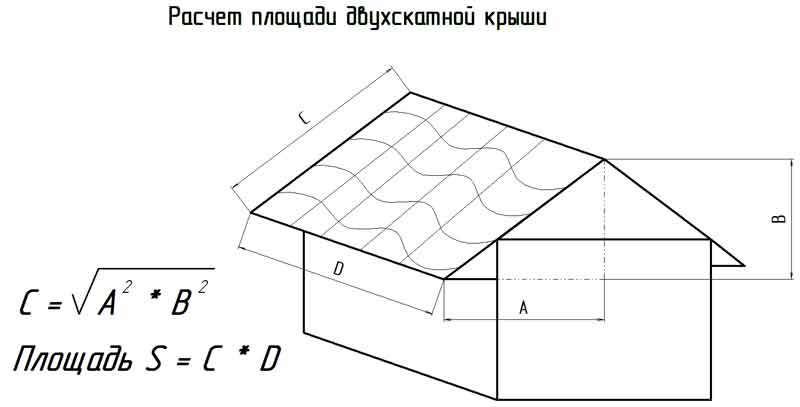
When calculating building materials For gable roof it is necessary to proceed from the axiom that the weight of roofing materials should be as small as possible so as not to load the walls and foundation of the house. Wooden elements will be stronger not only by increasing their cross-section, but also by using suitable types of wood. The main parameter when calculating materials is total area roofs, and a symmetrical design in this regard is easier to calculate than others - it is enough to know the perimeter of one slope, double its area, and get an accurate result.
The main load from the weight of the roof is borne by the long walls of the house, so the rafter system is built on the principle of distributing the load along the system. Not for home large sizes(≤ 6 m) it is more practical to use a system of hanging rafters (without supports); when building a larger house, a system of layered rafters with a more complex configuration is used. 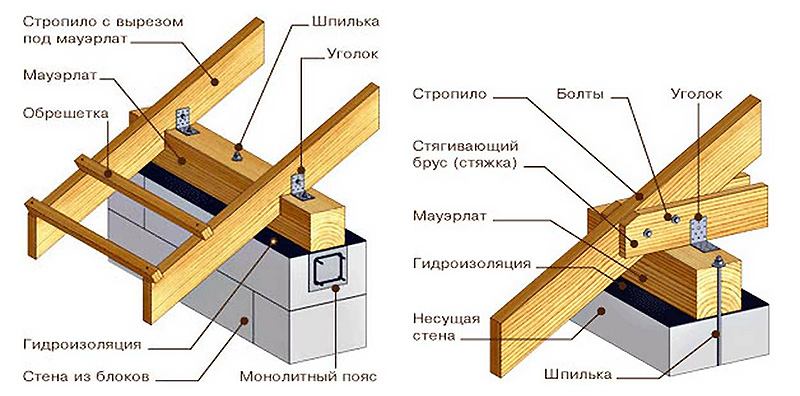
Ready gable roof for a private house consists of the following elements and units:
- Mauerlat is a wooden (sometimes metal, if the roof will be covered with rolled metal) beam or log that is attached to the surface of the external walls to support the rafters on it;
- A rafter system, the design of which is selected based on the design of the house;
- Struts (diagonal fastening of rafters to each other) and ridges (beams along the roof ridge for fastening the slopes);
- Lathing – used for installation of roofing and hydro-noise insulation elements;
- Insulation and moisture protection;
- Roofing covering.
How to mount the Mauerlat
The Mauerlat along the walls of the house holds the weight of the roof, evenly distributing it over the walls and base of the house. The width of the timber for the mauerlat should be equal to the width of the wall. The timber is impregnated with an antiseptic and substances that increase the fire resistance of the wood. The outer border of the Mauerlat should not protrude beyond the outer edges of the walls. 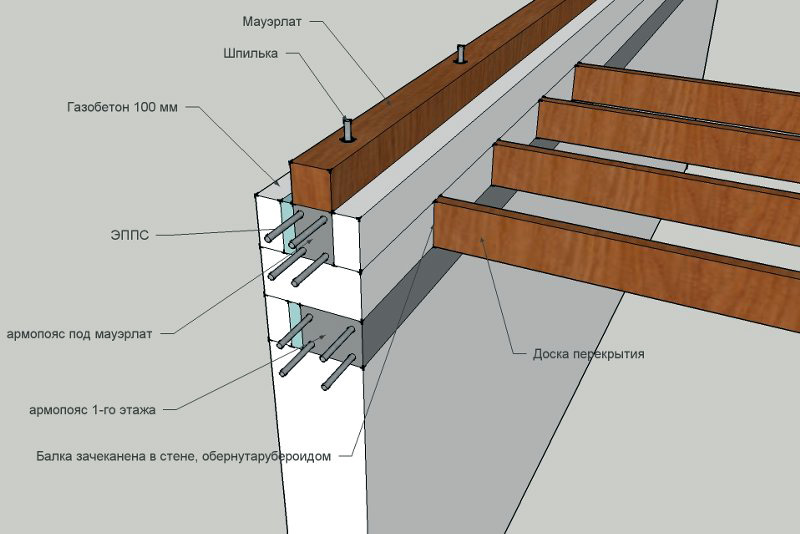
The Mauerlat is attached in different ways. Steel wire Ø 8-12 mm is laid in the brick wall, holes for the wire are drilled in the wood, and through them the timber is tied to the wall. The timber can also be secured with staples, threaded rods of one or two teeth, metal plates, wooden pegs or anchors through the same holes in the Mauerlat. The gables and lower edges of the sheathing are attached either directly to the mauerlat, or to a beam of smaller cross-section, which is nailed (screwed) to the top frame.
Floor beams
When arranging beam floors for the roof of a private house, you must use wooden beam cross section 200 x 100 mm. The larger the area of the house, the larger the section of the supporting beam should be. Begin the installation of beams by attaching the outermost elements along the long wall of the house. Then the points where the remaining floor beams will be attached are marked. 
The lathing is mounted on longitudinal beams, which are located at a distance of 50-60 cm, and attached to the mauerlat with nails 200 mm long or any of the above methods. The beams are carried beyond the edges of the walls to a distance that determines the width of the cornice - from 30 to 50 cm. The cornice will be nailed (screwed) from below to these beams. Since a pediment will be installed at the ends of the roof, to attach the cornice and pediment, an insert is made into a groove on the transverse beam of the mauerlat. During construction sloping roof for the attic, the pediment will have a fairly large area, so it is necessary to ensure the design of the ebb and gable overhang. 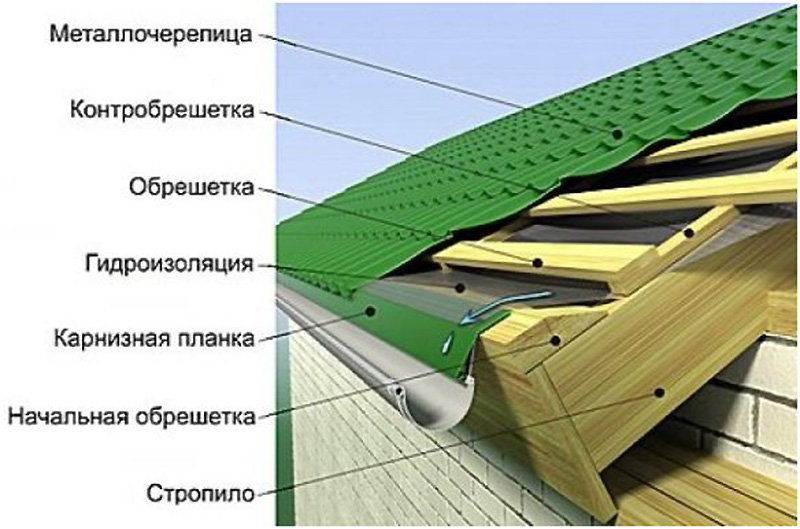
The rafters of a gable roof are several identical wooden beams same length and section. After installing the floor beams, a ridge beam is attached, for which beams with a cross section of 100 x 50 mm are secured along the central longitudinal axis of the house with spacers. Rack height in standard scheme gable roof is equal to the distance from the floor to the upper surface of the Mauerlat. Instead of timber for the ridge, you can use boards 50 mm thick.
Before installing the rafter system, it is recommended to make a scale template. For this board from truss structure you need to attach one end to the beam, the other to the ridge, and mark its length. This will be the standard length of the rafters. 
The rafter system is also installed according to the template, observing the sequence of processes. After installation and fastening from the lower end of one rafter beam, you must immediately fasten the opposite rafter and connect the beams with their upper ends to each other through the ridge. The rafters are nailed to the ridge beam, and to the floor beam - with steel brackets or angles, self-tapping screws or anchors. For a roof of any shape with two symmetrical or asymmetrical slopes, boards are fastened lengthwise and crosswise under the rafters to give rigidity to the system.
Pediment and cornice
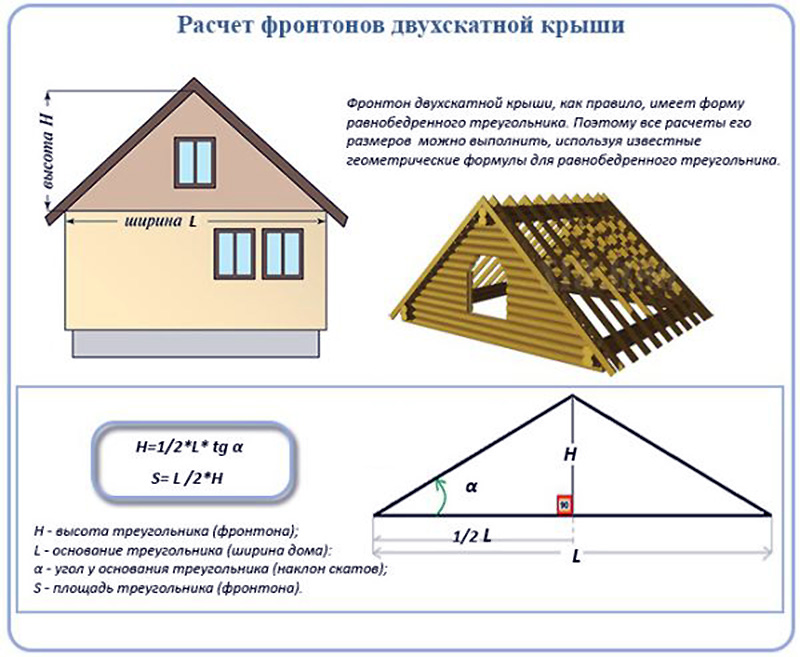
The pediment is sewn up after the construction of the rafter structure is completed. Modern materials are increasingly replacing traditional wood when sheathing gables, and are now using lining, siding, corrugated board, and other durable decorative Decoration Materials. Any cladding material is attached to a frame, which is mounted in advance. Regardless of whether or not there is a room or attic in the attic, it is necessary to leave a window opening in the gable - for ventilation and minimal natural light space. 
The cornice must be installed around the entire perimeter of the house - it is necessary for moisture and wind protection of the truss structure, the walls of the house and the foundation. Since every self-respecting owner always makes drainage around the perimeter of the house, they are also attached to the eaves, and drain pipes- to the walls. The plastic drainage system is mounted on plastic clamps. The bottom of the cornice boards or cornice frame is painted, sheathed with siding, clapboard or corrugated sheeting - in unison with the finishing of the pediment. 
The roof is mounted on the sheathing, and, based on the type of roofing materials, the sheathing is first done with vapor barrier, hydro- and heat-insulating materials. For roofing you can use ondulin, metal tiles, ceramic materials, soft tiles, etc.
- Self-tapping screws for roof construction must have the manufacturer’s mark and EPDM gaskets ≥ 2 mm thick, otherwise roof leakage cannot be avoided;
- Poor-quality protective coating of fittings will quickly deteriorate under the influence of weather conditions, which will lead to leakage at fastening points and an unsightly appearance in the form of rusty or dirty spots;
- The absence of a snow retention system means the possibility of unexpected snow falling off the slopes, which can lead to failure of the roofing and drainage systems;
- Poor ventilation leads to the formation of condensation in the under-roof space.
What makes four faceless, cold walls a cozy home for a person? This difficult question was answered long ago by our ancestors, who spoke of their home as “a roof over their head.” When people built houses with my own hands, they knew not from experience that neither a hut, nor a barn, nor even a cattle shed could be built without this structure. The roof of the house protects from wind, cold and rain, harsh nature, which inhospitably tests a person’s strength. Even now, when construction is carried out by professional craftsmen, the creation reliable roof counts a daunting task, the implementation of which affects the comfort and ease of use of housing.
Roof functions
The roof is an integral element of the structure of the house; this term refers to the upper part of the structure, installed on the walls of the upper floor, to protect it from precipitation, wind and cold. Roofs perform the following functions:
- Waterproofing. The main task of each roof is to protect the interior of the house from the penetration of rain, snow and melt water. Therefore, materials that do not allow liquid to pass through are used for the arrangement. To guarantee reliable waterproofing, they create a “roofing pie”, a complex of moisture-proof layers that complement and enhance each other’s qualities.
- Thermal insulation. The roof acts as a barrier between the interior of the house and the cold air outside. The structure is built in such a way as to retain heat inside. To maintain livable temperature regime houses use fibrous roofs during the construction process thermal insulation materials. IN summer time, during periods of solar activity, all types of roofs create shade, protecting from harmful ultraviolet radiation.
- Aesthetic. The roof is an integral element of home design. Architects use different types of roofs to create a unique appearance for a building, giving it a recognizable style and charm. The wrong choice of roof turns a representative cottage into a squat shack, so more often than not this decision is made together with an experienced builder or designer.


Important! Appearance and the shapes of the roofs are closely intertwined with the national architectural tradition. This can easily be explained by the fact that the structures were given a geometry suitable for climatic conditions habitat region.
Eg, distinguishing feature residential buildings middle zone Russia has a steep triangular roof, from the slopes of which snow layers easily slide off. For Scandinavia with little snowy winters, chateaus with flat roofs framed by a wide overhang are common. In Pomeranian cities, blown through by winds, pitched and hipped roofs are common, the design of which has less of a sailing effect.
Roof types
Types of house roofs were born in different historical eras and different countries. The appearance and design were modified and improved, moving along the path of constant complication. IN open world With the high speed of spread of information and technology, roofing is no longer a clearly zoned standard, but is built according to taste preferences and practical tasks. Therefore, in private construction all types of roofs are used:

Important! Two gable roofs with different slopes and slope areas, roofing material, overhang width, different placement dormer windows, “cuckoos”, bay windows have a distinctive, incomparable appearance. Working with an experienced architect and using the capabilities of modern roofing materials, developers are erecting amazing structures with semicircular, multi-level, fantasy roofs. Yes, it is expensive and difficult, but there will always be people willing to pay for style and originality.
Creating a Project
During the construction of the roof there is no unimportant work; all stages of construction affect the strength and durability of the future structure. However, designing and creating a project is crucial moment, requiring certain experience and knowledge. Typically this process is performed in the following order:


Important! All stages of ventilation must be performed by a competent architect, whose services are not cheap. If we are talking about a simple single or double slope attic roof, for calculations they use special calculator programs that take over the calculations, simplifying the task of builders. You can also use ready-made standard projects, which thousands of homeowners have tried before you and were satisfied with.
The process of building a roof with your own hands
The beginning of the construction of a roof is a joyful moment for every homeowner, as it means that the construction of their own home is approaching its logical conclusion, with housewarming. Indeed, most often after finishing roofing works, all that remains is to connect the communications and finish interior decoration. But, without getting ahead of ourselves, let’s describe the process of arranging the roof from the beginning:

Construction of a roof is a responsible, difficult and long process, on which the microclimate and comfort of living in the house depend. Naturally, more than 90% entrust this task to experienced, proven craftsmen. But you should not avoid participating in the creation of the roof of the house, letting the process take its course. You need to actively participate in the discussion possible options and decision making. To ensure that your vote is thoughtful and you don’t have to regret it, our website will provide you with useful and relevant information that will facilitate communication with builders.
1.
2.
3.
4.
5.
Often, the developer is faced with a very pressing question related to how to properly build the roof of a house, and to do it in such a way that no problems arise during operation, and the roof itself is reliable and durable.
Next we will talk about how to properly build a roof with your own hands, what structure this roof has important element home, as well as what stages of work should be addressed directly during the installation process. Of course, it is impossible to mention all possible types of roof construction at once, since there are a lot of design options. Therefore, we can take as a basis the structure of the roof of a gable-type house, which is one of the most popular among all types of structures. Let's figure out how to build a roof for a house of this type.
It should be noted that it is recommended to begin arranging the roof immediately after the construction of the main frame of the house, that is, its walls, otherwise there is a possibility that the building without a covering will collapse from the inside.
Since creating a roof from scratch is a very difficult process, it is imperative to create the desired project using the services of a specialist. Here you should consider the future shape of the roof structure, taking into account the parameters of the entire building as a whole, and also choose the roofing material.
Purpose of the Mauerlat
To understand how to build a roof, you need to know what functions it carries. The Mauerlat is a support beam made of wood and measuring approximately 150x150 millimeters. It is laid around the perimeter of the entire area of the building on the tops of the walls, that is, in those places where the rafter legs will be attached. It is important to understand. Installing a Mauerlat is extremely important, since it is thanks to this element that the entire load on the walls will be distributed evenly. The beam must be firmly secured. This can be done using wire, but this option will do only for roofs with low windage.

Provided that the roof area is more than 250 m², then fixing the Mauerlat requires installing a stud with a thread equal to 12 millimeters into the wall to a depth of at least two bricks (read also: " "). The step with which they should be located is 2 meters. A stud is an object onto which a timber is placed and secured with a nut having a wide washer. As a rule, the Mauerlat is closed with outside masonry walls.
It is extremely important to remember that all structural elements consisting of wood must be treated with an antiseptic to prevent their possible rotting, and those places where the wood comes into contact with concrete or brick must be equipped with waterproofing.
Installation of the rafter system
When thinking about how to properly build a roof, you need to know that the most important load-bearing element of the roof frame is the rafter. It is a beam measuring 150x70 millimeters. However, the parameters may differ depending on how much weight the roof has, as well as the spacing of the rafter legs.

It is very important to correctly fasten the rafters to the mauerlat. To do this, having made the necessary cut in advance, you need to rest the rafter leg against the support beam. Next, the corners are fastened together using a metal corner (more details: "").
You can also secure the rafters by driving in three nails.
This is done as follows:
- One nail is driven in at an angle to the left.
- One nail is driven in at an angle to the right.
- One nail is driven in for tightening.
This method of strengthening can protect the entire structure from unexpected displacement under the influence of loads. Another important point: the wood used for the frame must have a moisture content not exceeding 20%.

Construction of a combined roof, watch the video:
Roof ridge installation
It must be remembered that when touching on the issue of how to properly build a roof, one cannot fail to mention its such an important element, located at the very top, as the ridge. The structure of the skate directly depends on design features roofs.
Thus, it is customary to distinguish the following methods for constructing a skate:
- End-to-end fastening using the butt-end principle. The upper sections of the rafter legs should be cut so that they are firmly connected to each other. You need to drive a nail from each end, and additionally apply a fastening plate that is bolted to each side of the rafters.
- Installation of rafters on the ridge beam. This design is most applicable for those structures where it is possible to provide support for the ridge beam. The advantage of this method is that each rafter leg can be strengthened separately. This option is much less common on small roofs.
- The joint is based on the overlap principle. This version of the device is considered the simplest and is usually used on small-sized roofs, since such a system is not capable of carrying a large load. The rafter legs in the junction area are fastened with bolts equipped with wide washers and tightened tightly.
Installation of sheathing

Parameters such as the lathing pitch or the size of the board used directly depend on what type of roof is being installed and what indicator the angle of inclination of the roof is. When laying soft roof the sheathing should be mounted closely, and for sheet roofing the step should be from 40 to 60 centimeters. Often there is a double lathing, the essence of which is to stuff bars onto the rafters, observing a certain step (counter-lattling), and then directly to the lathing. This type of device is typical for soft roofing.
Laying roofing
Very often today, the roofing material is the popular metal tile, since its cost is quite affordable, in addition, it is easy to install and has a long service life, and thanks to the wide range of color shades, you can realize any design solution. In this case, the use of waterproofing under the roof is mandatory; it is also necessary to equip the roof with insulation, which is placed under the waterproofing, and a vapor barrier, laid directly above the living space.

It is important to provide ventilation holes along the entire length of the roof so that moisture can escape unhindered.
One way or another, if questions arise regarding the structure of the roof, information from detailed photos and installation videos can always be found on the Internet, but you should also not neglect the help of specialists in order to avoid further problems during operation.
One of the simplest roofing structures a gable roof is rightfully considered, besides, it perfectly protects from snowfalls, heavy rains and sharp gusts of wind. You can make such a gable roof yourself.
Building a gable roof doesn't require any special skills from you, but there are a few key points to consider. Recommendations for the materials used are given in the tables below. 
So, what do you need to know in order to build reliable design gable roof yourself? Naturally, you need to start with a support on which the entire structure will rest.
Mauerlat
Mauerlat is a wooden beam, most often square shape, securely fixed to the load-bearing wall. It is this that is the foundation of the roof and the rafters already rest on it. 
Rafters
For the ridge, it is recommended to choose timber made of durable wood, because it connects the structure into a single whole and affects its reliability. In order for water to reduce the harmful effects of precipitation on the walls of the house, the rafters are made longer using additional segments, creating an overhang. This makes it possible to avoid problems such as severe wetting of the walls.
The tilt angle of the gable roof is recommended to be 30 degrees. This slope simultaneously reduces the likelihood of snow accumulation on the roof and reliably protects against strong gusts of wind. 
Sill
Another way to fasten parts to each other is to fix them using metal plates and corners. Its disadvantage is that the screws tend to come out of the base under angular loads, thereby depriving the roof structure of reliability and stability. 
Roof installation is a complex multi-step process. To independently assemble and install a rafter system, you need to carefully study the methods of connecting elements, calculate the length of the rafters and the slope angle, and select the appropriate materials. If you don’t have the necessary experience, you shouldn’t take on complex designs. The best option for a residential building small sizes– do-it-yourself gable roof.

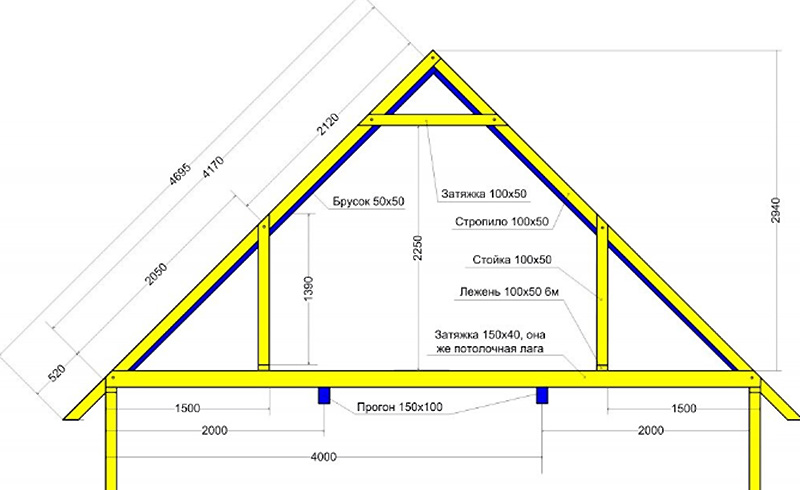
A standard roof of this type consists of the following elements:

Mauerlat is a timber laid on top of the walls along the perimeter of the building. It is secured using threaded steel rods embedded in the wall or anchor bolts. The timber must be made of coniferous wood and have square section 100x100 mm or 150x150 mm. The Mauerlat takes on the load from the rafters and transfers it to the external walls.

Rafter legs- these are long boards with a cross section of 50x150 mm or 100x150 mm. They are attached to each other at an angle and give the roof a triangular shape. The structure of their two rafter legs is called a truss. The number of trusses depends on the length of the house and the type roofing covering. Minimum distance between them is 60 cm, the maximum is 120 cm. When calculating the pitch of the rafter legs, you should take into account not only the weight of the covering, but also the wind load, as well as the amount of snow in winter.

It is located at the highest point of the roof and most often represents a longitudinal beam connecting both slopes. The beam is supported from below by vertical posts, and the ends of the rafters are attached to the sides. Sometimes the ridge consists of two boards that are nailed to the top of the rafters on both sides and connected at a certain angle.

Racks are vertical beams with a cross section of 100x100 mm, located inside each truss and used to transfer the load from the ridge run to the load-bearing walls inside the house.
The struts are made from scraps of timber and installed at an angle between the posts and rafters. The side edges of the truss are strengthened with struts and the load-bearing capacity of the structure is increased.
Tie - a beam connecting the lower parts of the rafters, the base of the truss triangle. Together with the struts, such a beam serves to strengthen the truss and increase its resistance to loads.
A log is a long beam with a cross section of 100x100 mm, laid along the central load-bearing wall, on which the vertical posts rest. Lezhen is used when installing layered rafters when the run between the outer walls is more than 10 m.
The sheathing consists of boards or timber placed on the rafters. The sheathing can be continuous or with gaps, depending on the type of roof. It is always attached perpendicular to the direction of the rafters, most often horizontally.
If there is no more than 10 m between the external walls and there is no load-bearing wall in the middle, arrange hanging rafter system. With this system, the upper ends of adjacent rafters are sawn at an angle and connected to each other using nails, excluding the installation of racks and ridge beams. The lower ends of the rafter legs rest on the external walls. Due to the absence of racks, the attic space can be used for arranging an attic. Very often, the function of tightening is performed by floor beams. To strengthen the structure, it is recommended to install the top tie at a distance of 50 cm from the ridge.

If there is a central supporting wall, the arrangement is more justified layered rafter system. A bench is laid on the wall, support posts are attached to it, and a ridge beam is nailed to the posts. This installation method is quite economical and easier to implement. If the ceilings are interior spaces are designed at different levels, racks are replaced brick wall, dividing the attic into two halves.

The roof installation process includes several stages: attaching the Mauerlat to the walls, assembling the trusses, installing the rafters on the floors, installing the ridge, and attaching the sheathing. All wooden elements Before assembly begins, they are thoroughly treated with any antiseptic composition and dried in air.
To work you will need:
- timber 100x10 mm and 150x150 mm;
- boards 50x150 mm;
- boards 30 mm thick for lathing;
- roofing felt;
- metal studs;
- jigsaw and hacksaw;
- hammer;
- nails and screws;
- square and building level.

IN wooden houses The functions of the mauerlat are performed by the logs of the last row, which significantly simplifies the work process. To install the rafters, just cut inside log grooves of the appropriate size.

In brick houses or buildings made of blocks, installation of the Mauerlat occurs as follows:

The mauerlat bars must form a regular rectangle and be in the same horizontal plane. This will facilitate further installation of the roof and provide the structure with the necessary stability. Finally, markings are made on the beams for the rafters and grooves are cut along the thickness of the beam.

When choosing a hanging rafter system, it is necessary to assemble the trusses on the ground and then install them above the floors. First you need to draw up a drawing and calculate the length of the rafter legs and the angle of their connection. Typically, the roof slope is 35-40 degrees, but in open, heavily blown areas it is reduced to 15-20 degrees. To find out at what angle to connect the rafters, you should multiply the angle of the roof by 2.

Knowing the length of the purlin between the external walls and the angle of connection of the rafters, you can calculate the length of the rafter legs. Most often it is 4-6 m, taking into account the eaves overhang 50-60 cm wide.

The upper ends of the rafters can be fastened in several ways: overlapping, end-to-end and “into the paw”, that is, with grooves cut out. Metal plates or bolts are used for fixation. Next, the lower and upper ties are installed, and then the finished trusses are lifted up and installed above the floors.

The outer trusses are attached first: using a plumb line, the rafters are aligned vertically, the length of the overhang is adjusted and attached to the mauerlat with bolts or steel plates. To prevent the truss from moving during installation, it is reinforced with temporary beams made of timber. After installing the outer rafters, the rest are set, keeping the same distance between them. When all the trusses are secured, take a board with a cross-section of 50x150 mm, the length of which is 20-30 cm longer than the length of the cornice, and nail it along the upper edge of the slope. The same is done on the other side of the roof.


The first option: a rectangular groove is cut out on the rafter leg at the point where it touches the mauerlat, 1/3 of the width of the beam. Stepping back 15 cm from the top of the box, a steel spike is driven into the wall. The rafter is leveled, the grooves are aligned, then a wire clamp is placed on top and the beam is pulled close to the wall. The ends of the wire are securely fastened to the crutch. The lower edges of the rafters are carefully cut with a circular saw, leaving an overhang of 50 cm.

Second option: the upper rows of walls are laid out with a stepped cornice of bricks, and the mauerlat is placed flush with inner surface walls and cut a groove in it for the rafter. edge rafter leg cut to the level of the upper corner of the cornice. This method is simpler than others, but the overhang is too narrow.

Third option: ceiling beams extend beyond the edge outer wall by 40-50 cm, and roof trusses installed on beams. The ends of the rafter legs are cut at an angle and rest against the beams, secured with metal plates and bolts. This method allows you to slightly increase the width of the attic space.
Installation of layered rafters

Figure 1 shows the cutting of rafter struts into a beam laid on intermediate supports, and Fig. 2 - resting the rafter leg on the mauerlat
The procedure for installing a layered rafter system:

When the main elements are fixed, the surface of the rafters is treated with fire retardants. Now you can start making the sheathing.

For the sheathing, timber 50x50 mm is suitable, as well as boards 3-4 cm thick and 12 cm wide. Waterproofing material is usually laid under the sheathing to protect the rafter system from getting wet. The waterproofing film is laid in horizontal strips from the eaves to the roof ridge. The material is spread with an overlap of 10-15 cm, after which the joints are secured with tape. The lower edges of the film should completely cover the ends of the rafters.

It is necessary to leave between the boards and the film ventilation gap, so first wooden slats 3-4 cm thick are stuffed onto the film, placing them along the rafters.

The next stage is covering the rafter system with boards; they are stuffed perpendicular to the slats, starting from the roof eaves. The pitch of the sheathing is influenced not only by the type of roofing, but also by the angle of inclination of the slopes: the greater the angle, the longer distance between the boards.

After completing the installation of the sheathing, they begin cladding the gables and overhangs. You can cover the gables with boards, plastic panels, clapboard, waterproof plywood or corrugated sheeting - it all depends on financial capabilities and personal preferences. The sheathing is attached to the side of the rafters; nails or screws are used as fasteners. Overhangs are also hemmed various materials– from wood to siding.
Video - DIY gable roof


. Fill in the missing letters and explain the spelling of the words.")


- Turkey stewed in a slow cooker: spicy, with vegetables, in sour cream, cream and walnuts
- Types of speech: description, narration and reasoning
- Martyrs Tatiana. Moscow Church of St. Martyrs Tatiana Temple of the Martyr Tatiana at Moscow State University schedule
- Milotici: return of the Russian village Moravov Alexander Viktorovich
- Why you shouldn't cry in front of the mirror
- Recommendations: what to grease the pies to make them rosy and appetizing
- Actors Spiderman Aunt May Aunt May in Spiderman
- Making sounds for children Lessons on making sounds for children
- Criteria for preparing an act on write-off of motor vehicles
- Pink salmon in the oven - delicious and easy recipes for baked fish Pink salmon fillet baked with vegetables
- What does a lizard tattoo mean?
- Deciphering the natal chart of the house
- What does mulberry help with?
- Photo report “Birthday of Samuil Yakovlevich Marshak in the group”
- Breathing at high pressure Breathing correctly at high pressure
- Bryansk State University named after
- Tasks to test spelling and punctuation literacy
- Application...burning, grow...sti, to...sleep, m...roll, warm...up, sk...roll,...
- Interesting signs about spiders
- Why do you dream of wedding shoes? Why do you dream of wedding shoes with heels?