How to make a garden swing from wood? Do-it-yourself garden swing (45 photos): choosing a location on the site, material and type of construction Make your own garden swing from wood.
Building a swing with your own hands will allow you to create a universal relaxation tool and provide complete relaxation in the countryside or in country house.
Availability of free space at the dacha or personal plot provides a lot of benefits. Some people prefer to plant a vegetable garden in its place and enjoy the beneficial properties of vegetables grown with their own hands. Others prefer to equip it as a recreation area by building a garden shed and landscaping it. All of these options have their advantages and are successfully used to fill the site. In turn, creating a comfortable and practical place to relax on outdoors allows not only to optimize the territory, but also allows a person to isolate himself from the bustle of everyday life.
Varieties of swings
Garden or country swings create additional coziness on the site. Moreover, such a device will appeal to absolutely everyone, from small children to adults. For children it is entertainment that can brighten up their leisure time. In turn, they bring relaxation and comfort to adults, which is extremely important in today’s fast and always rushing world. 
Similar products can be purchased at finished form in almost any construction supermarket or order them online. Having made a purchase in this way, all that remains is to install the structure, and even then some organizations offer to do this themselves. This solution makes it possible to get a full-fledged outdoor swing in as soon as possible, but it also requires large material costs, which is not always relevant in modern realities.
An alternative to a similar solution is to build a swing with your own hands, which allows you not only to save a significant part of the material resources, but also gives you the opportunity to independently choose the shape and design of the future building. As a rule, such systems are made from two types of materials, which are inevitably available on a personal plot or summer cottage. These means are wood, metal or a combination of both. In most cases, it is with the help of these materials that garden swings are built. 
It should be taken into account that modern swings for your own garden can have very different shapes and sizes, since the main criterion for creating them is your own imagination. This gives scope for experimentation and sometimes leads to the formation of completely unprecedented forms. Just look at the sofa swings, which are rapidly gaining popularity these days. In general, the following options for country swings are in greatest demand in the modern world:
- traditional;
- swing nest;
- cocoon swing.
At the same time, the most popular is still the traditional option, the creation of which with my own hands we'll look at it further. 
DIY swing: stages of work
As mentioned above, most often do-it-yourself swings are made using wood or metal, since these materials are the most accessible and inexpensive. In addition, they guarantee an optimal product that will be characterized by increased durability and comfort. To impart these qualities to the future design, one should take the development of the project and its subsequent implementation with great responsibility. In general, do-it-yourself hanging swings should be done on the basis of the following diagram, which most fully and in detail describes the entire procedure for carrying out the work. It consists of the following stages:
- preparatory work;
- drawing up a basic plan;
- collecting tools;
- installation of racks and crossbars;
- creating a seat;
- final assembly of the structure.
Building a swing in your own garden based on the above plan makes it possible to significantly save work time and get an excellent result. At the same time, creating similar structures with your own hands will be impossible without skills in working with tools and a clear understanding of the purpose of each process. It follows that before starting the construction of a swing, it is necessary to decide on its final design and application. This is the only way to be sure of the reliability of the future product and its practicality. 
Preparatory work
How to make a swing in the garden? Initially, before carrying out the work itself, it is necessary to prepare. It is necessary to select the place where the structure will be installed and create optimal conditions for its construction. In this case, determining the location of the construction of the building plays a role huge role, allowing you to obtain additional comfort characteristics on the site. Thus, building away from the recreation area is unlikely to create the best balance of comfort and practicality on the site. Therefore, the swing platform should be located in close proximity to the canopy or even installed directly under it. After determining the location, it is necessary to prepare the area for work, which requires the following actions - cleaning the area, leveling the surface and eliminating its defects.
Once this stage is completed, you can move on to the next stage, which is to display the basic construction plan. It can be based either on drawing up a detailed visual model of the system or representing an ordinary planogram. In general, it’s quite easy to create drawings with your own hands. Their main criterion is the choice of the correct aspect ratio and dimensions of the main parts. This stage also includes the choice of material for constructing the structure, which can be timber or metal pipes. In our case, the optimal solution would be to use wood, so we will focus on it. 
Wooden swings and their creation require the use of a fairly wide range of tools.
This aspect is due to different types of work and big amount processes to be done. So, to build a swing with our own hands we will need the following set of tools:
- shovel;
- Master OK;
- bucket;
- hacksaw;
- roulette;
- pencil;
- hammer;
- screwdriver;
- drill;
- a set of keys;
- plumb line;
- level.
As you can see, the above list is quite large, which determines the complexity of the upcoming work. At the same time, collecting all the necessary equipment makes it possible to significantly reduce total time construction of the facility, making construction faster and more productive. 
Installing support posts and creating a seat
Having completed the preparatory part, you can build a swing from timber. To do this, it is necessary to dig four holes into which support posts will subsequently be installed to ensure the stability of the system. There should be at least four of them - two on each side. In this case, the distance between them is determined by the height of the support and the overall size of the log swing. The same applies to the number of supporting elements. Thus, large and massive structures that imply the creation of several places for skating require additional reinforcement, which is carried out by installing auxiliary supporting elements. As a rule, they are installed between the seats to provide optimal conditions for its movement. 
In the process of creating a swing from timber, the wooden posts are filled with concrete in the shape of the letter “L”, which provides them with additional reliability and stability. In addition, several transverse strips are fixed between them, providing a binding function. As a rule, they are fixed in two or three places on the surface of the racks. In this case, the poured supports must stand for several days so that the solution dries completely and becomes monolithic. It should also be noted that in hot weather it must be periodically watered to prevent cracks and chips from appearing on it. 
While the supports are hardening, you can move on to creating the seat itself. Do-it-yourself wooden swings for a summer residence may involve the use of a variety of seat models. IN Lately Varieties such as cocoon or nest have become especially popular, allowing you to get a lot of positive emotions from the swinging process. However, their use is not as universal as using a traditional seat, which is suitable for absolutely everyone, from the smallest to the elderly. 
Therefore, our wooden swing will be equipped with a similar kind of seat. To create it, you can use many available materials: old pallets or boxes. If such materials are not at hand, then the seat itself must be made independently. In its structure, it resembles an ordinary box, in which one side is missing, and such a model is assembled quite simply - using self-tapping screws and wooden planks.
Assembly and processing of the structure
When the supporting parts are fully established and the seat is ready, you can begin the last stage of building a swing in the country. It consists of the final assembly of all elements and the formation of a monolithic structure. You should begin assembling a wooden swing by installing a longitudinal beam, which at its ends rests on the posts, resulting in the formation of a crossbar. It is on this that the seat itself will be attached. For greater reliability, the beam itself is fixed with fasteners, ensuring its immobility and strength. 
- rope;
- chains;
- pipes.
Most often, garden swings made of wood are created with your own hands on ropes, cables or chains. At the same time, it is the chains that have good performance, since they are the most durable and reliable products. Based on this, it is best to attach a swing in the garden using metal chains. To do this, they must be fixed on one side to the surface of the crossbar, and on the other directly to the seat. Typically, for maximum safety and practicality, the seat is secured in four places using separate parts of the chain. Each of them is screwed to the wooden base of the seat with metal bolts, and its ends are assembled in twos and also fixed, but on the surface of the crossbar. 
In this version, the swing is completely ready and can be used for its intended purpose. However appearance this design leaves much to be desired, so they need to be decorated. To solve this problem, you can use a variety of varnishes and paints, which will not only make the swing more colorful, but also significantly increase its service life. Thanks to such fairly simple manipulations, she will be able to bring joy to all people relaxing at their dacha or garden plot.
Photo gallery
We bring to your attention original photo ideas for designing a garden swing.


DIY garden swing at the dacha can be made from scrap materials using photo or diagrams from the Internet. Construction will require time and skills from the master, but the result will delight children, family and guests. In addition, a ready-made factory swing will cost three times more. When starting to choose a model for a future design, listen to the wishes of your household and involve them in the creation process.
Where to start?
Builders advise starting the construction of a structure by choosing its location. At the dacha, it is installed in a resting place, so that it does not interfere and has enough space for swinging. In the case where there is not enough space for installation on a summer cottage, landscaping of the street area is considered. If you plan to install stationary structure, then for installation you will need concrete foundation. If the rocking chair is portable, you will need reliable fasteners. They use pins that are driven into the ground and the legs are attached to them. Mobile swings can be mounted on hanging hooks, in which case they can be easily transported from home to garden by securing them to a suitable support.

How to determine size?
Its size depends on the category for which the structure is intended. Depending on your preferences and family conditions, the swing may be for adults. They are made in the form of a comfortable bench or rocking sofa, equipped with a canopy, and decorated with soft pillows. Guests of the older generation, swaying slightly on a comfortable sofa, will be happy to have a conversation over a cup of tea.
Children's swings are made small and reinforced with straps, providing for a large swing amplitude. In this option, the main thing is safety. Therefore, during construction, sharp corners are removed and the surface is made as smooth as possible. For children's model important element is the color scheme and seating comfort. It is painted in different colors, involving the child in this activity.

The structure for the whole family is large in size. It is designed for mom, baby and dad to ride at the same time. Its weight is calculated at 250 kg and above. The supports are made solid, dug into the ground and filled with concrete. The structure is intended for year-round use, so it is painted, equipped with a roof and not decorated with textile elements. Small pillows or blankets are laid down immediately before use.
On a note. The canopy not only protects riders from rain or scorching sun, but also protects the structure from fading and corrosion.
Common types of country swings
You can adapt materials for skating that have already been used, but are still quite durable. For example, a car tire, construction pallets, canvas fabric, old skateboard or wooden box. They buy chains and fasteners, carabiners or hooks and hang them in the garden on a strong branch. Using building and available materials, the following types of swings are made:
Singles consist of a seat and suspensions that are attached to a support. Their weight and size are designed for children.

Hammocks belong to portable types. They are a comfortable hammock that can be hung with one or two hangers from any crossbar. It is in the spirit of those who like to read it in the fresh air. For production, strong fabrics and strong ropes, as well as carabiners, are selected. The durable hammock can support the weight of an adult man.
Sun loungers- These are frame models, shaped like a lounger floating in the air. Used as supports metal carcass. This model is complex in execution; it is easier to buy it in a store and assemble it on site.

Hanging come in different modifications, widths and lengths. The common feature is a seat with chains attached to the side.
Advice. For a homemade country swing it is not necessary to build strong supports. Most often they are hung on a suitable branch garden tree. But it is safer to install poles with a fixed crossbar.
Step-by-step instructions for creating a hanging wooden model
To make a swing for a large company, use the design diagram in the form of a hanging bench with a backrest. The main material is high-quality inexpensive wood. To create the model, boards and beams are purchased from a hardware store; they also buy bolts, hooks and chains for attaching the bench to the support. The master selects the dimensions at his discretion, choosing a comfortable backrest height, seat width, and bench length.

Required Tools
A standard set of woodworking tools will be useful for the job:
- jigsaw and circular saw for sawing boards;
- drill for preparing holes at the joints of parts;
- screwdriver for tightening fasteners;
- plane and sander to remove uneven surfaces of wood;
- marker (a slate pencil will do);
- construction corner or long ruler;
- building level for level installation of supports.
Basic materials
Main construction material- soft but durable wood. For example, spruce or pine. Birch lumber has excellent quality characteristics; it is durable and inexpensive. For construction you will need 15 beams 2.5 m long (25 mm by 100 mm), 1 crossbar 2.5 m long (50 mm by 150 mm), glued slats 1.5 - 2 m long.

Additional materials:
- Galvanized screws (with rings for fastenings) 2 pairs;
- Wood screws No. 3.5 and No. 5 – 200 pcs;
- Chain from 5 m (length selected according to the dimensions of the structure)
- Fastening carabiners – 6 pcs;
- Varnish, wax, stain for applying a protective layer 3 l;
- Flat brushes for painting – 2 pcs.
Sequencing
First, make a bench for sitting. Having determined its length (from one and a half meters), boards are prepared the right size and drill holes in them for fastenings. According to the diagram, the frame is assembled and the slats are attached to it, equipping the back and seat. If you have sufficient carpentry skills, make a seat with a shaped back by cutting out the parts according to a template. Armrests are attached to the finished seat (one side to the back, the other to the seat). All parts are cut exactly to size, given a shaped shape and polished. The finished rocking chair is varnished in several layers, allowing each layer to dry. Then screws with rings are attached to the lower side of the armrest on the left and right and chains with carabiners at the ends are inserted into them. A cozy bench for friends is ready. It is hung from a strong tree and rolled around.

Instructions for creating a metal model
The metal construction is durable and reliable. To create it, you will need special skills in welding, cutting metal, and mixing concrete. The metal model has a long service life, meets safety requirements and can withstand weight up to 250 kg. In order to assemble it you will need the following materials:
- hollow metal pipe with a diameter of 50m total length 12.5 m;
- rod reinforcement with a diameter of 18 mm and a length of 8 m;
- pine board 5 m (50 mm by 20 mm);
- metal screws, bolts, nuts,
- concrete (water, cement, sand and crushed stone);
- enamel paint 3 l and flat brushes.

To cut, weld and strengthen pipes you will need the following tools:
- Bulgarian;
- file and sandpaper;
- welding machine;
- bath for mixing concrete mixture;
- shovel and bayonet.
Procedure
Metal swings are made stationary. Therefore, a place for them is carefully selected. Having cut the pipes for support according to the selected drawing (for example, side posts and a crossbar of 2 m each and pipes for the base of a suitable size), they are welded and the joints are ground.

The finished structure is dug into the ground at least 70 cm. To do this, dig 4 holes, place the swing legs there and fill them with concrete. To make it, mix cement and sand one to two, adding one part of crushed stone. Having stirred the mixture well, pour water into it and knead the mixture to the thickness of sour cream. Pouring the homogeneous mixture into the pits, it is allowed to harden for 7 days. When the support becomes stable, hooks are welded to the crossbar to which the seat will be attached. It is assembled from reinforcement. Weld a frame for a base of convenient sizes, attaching two handrails to it. Their ends are bent into the shape of rings and hung on hooks at the top of the beam. For seating, prepare boards according to the size of the base and attach them with self-tapping screws.
Note: the edges of the boards must be free of knots and torn edges. They are sanded and coated protective layer varnish or paint.
Conclusion
When installing a swing at a summer cottage, a convenient and safe place is selected for it. There should be no debris, broken glass, or wire protruding from the ground nearby. The structure itself and the area under it are made comfortable for riding, and take into account the possibility of falling. That is, if a child jumps carelessly, he will rest his feet on green lawn or sand, not in concrete screed. The safety of the child comes first and decorative look facilities and its sports and gaming area on the second. If you have free space at your summer cottage to place play or sports equipment, install it next to the swing. It is also made by hand and painted in bright colors.

Swings for adults are equipped with an approach path and a equipped area. Often a barbecue is placed next to them for a pleasant time with friends. In this case, consider lighting the site in the evening.
48 photos of garden swing ideas:

DIY wooden swing: This is exactly what will be discussed in this article on the website ““. A shady garden in your backyard or summer cottage will be a great place for a family holiday, especially if you make a little effort and make it comfortable with the help of various accessories and small structures, for example, etc. Make it with your own hands and place it on the site swing made of wood: photos and drawings, dimensions and the main parameters for construction can be found in this article.
Swing- this is a great way to diversify your leisure time while relaxing in the country
Features of creating a wooden swing for a summer residence: characteristics and types of structures
For creating garden swing There are three main materials most commonly used. This list includes wood, plastic and metal. Undoubtedly, each of these materials has its own advantages and disadvantages. But when it comes to do-it-yourself garden swing drawings, you will not find a more practical and convenient raw material than wood.
U wooden swing There is only one drawback, which concerns the operation of any products made from wood. Such structures without the use of appropriate protective measures can be severely damaged by the influence of negative environmental factors.

Original swing round shape with soft mattress
These factors include the impact of:
- rain;
- snow;
- direct sun rays;
- fungi and mold;
- insects;
- sudden temperature changes;
- decay processes.

With your own hands you can make a variety of swing and turn your own ideas into reality
Benefits of making a wooden swing with your own hands
Wood has excellent technical and performance characteristics. Thanks to the properties of this material, you can create a truly comfortable and beautiful design.

Photo: wicker swings in the form of spheres are quite roomy and comfortable
Features of do-it-yourself wood creations:
- environmental friendliness. Since wood is a natural material, products made from it are completely safe for human health;
- external aesthetics. The structures can fit into any environment, since the main part of the environment consists of natural materials (stone, wood) and vegetation. Compared with metal products, wooden structures benefit significantly from an aesthetic point of view and can support the exterior of any country house;

Pillows and blankets will be made swing softer and more comfortable
- safety. Due to its softness, wood is convenient to work with and use, and can reduce the number of injuries. This advantage is most beneficial if you intend to design a children's swing;
- simple installation system. Anyone with basic skills in construction and handling wood can start building a swing;

Canopy over swing protects from the scorching rays of the sun in the summer
- versatility. This type of material lends itself quite easily to various types of processing (grinding, cutting, cutting). Thanks to this, any of the wooden garden gardens, the photo of which you like the most, can be made by you yourself without involving specialists in this process. Wood allows the construction of single-seat structures or swings with large capacity, made in the form of sofas.

Adults also don’t mind relaxing and unwinding, swinging imposingly on a swing
Note! The cost of purchasing material is not high. In addition to this, by creating products yourself, you save on the services of craftsmen.
Do-it-yourself garden swing made of wood: photos and drawings, sizes and modifications
If you have decided to take up creating a swing at your summer cottage on your own, first of all you should decide on the type of structure you want to install and determine a suitable place to place it. To make the design and preparation phase easier and faster, use photo of a do-it-yourself swing for a summer house made of wood, drawings of which there are many on the Internet.

Drawing of a wooden swing optimal size for one person
Varieties of wooden swings
Classification of garden swings quite extensive. In this case, the main types of structures are presented:
- family - have high capacity. The design is based on a long bench, which acts as a large seat that can simultaneously accommodate up to 5 people. In most cases, swings of this type are equipped with their own canopy, protecting from sunlight and bad weather;

On swing family type can comfortably accommodate 3-5 people
- children's designs can have a significant number of modifications. Most often, the main components of such a product are supports, a small seat and fasteners. It is important to ensure a full level of safety for the child. For these purposes, the design must include protective elements that will prevent the baby from falling. Such elements include a comfortable backrest, handrails on the sides, a partition located in front, seat belts that secure the child inside the seat;

Original made of wood in the shape of a horse
- portable – products with compact size and light weight. These characteristics allow you not only to move the swing around the site, but also to put it in a car for transportation to another place during your vacation. As a rule, such products are secured to a tree branch or to a pre-made support.

Portable swing can be moved to any location on the site, depending on weather conditions
Choosing a place to place a children's swing
Any type of construction that is carried out on the territory of a suburban land plot begins with the design stage and selection of the appropriate location.
Note! The principle according to which the site for construction is selected applies not only to children's swings made of wood. These requirements also apply to other design options.

Simple children's swing made using wooden plank and rope
Whenever possible, you should select a plot of land with flat surface. It is advisable that this area be sheltered from the sun and precipitation. Ideal place for s swing building- an area under a tree where a thick shadow falls. Installation on a porch protected by a canopy is allowed.
All these conditions directly affect the level of operating comfort, since sitting on a swing seat that is hot under the sun is unpleasant and uncomfortable. And unimpeded exposure to rain can damage the structure.

Placing in the garden baby swing, it is necessary to provide enough space for swinging
It is also worth taking into account the fact that as the sun moves across the sky, the shadow cast by a tree or other objects will move. For installation, you should select a place where there will be shade at midday. During this period of the day the sun has its strongest and most aggressive influence.
Drawings and photos of a wooden swing for a summer house
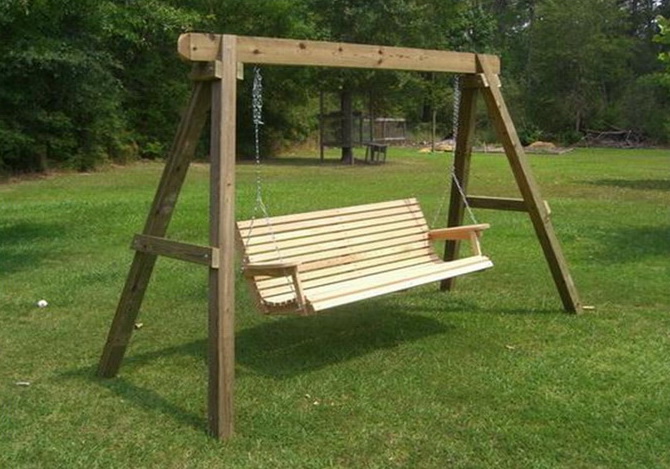
If we talk about universal designs, then a hanging swing, installed on A-shaped supports, will become a real recreational object for the whole family. Moreover, they can be installed on both large summer cottages, and in small gardens near the house. And the process itself is not expensive in terms of time and effort.

Swing chair design with soft cushion cover
The list of required tools for work should include:
- tape measure and pencil (the tape measure can be replaced with a measuring tape);
- mechanical or electric jigsaw;
- circular saw;
- hacksaw;
- square for measuring angles (combined type);
- rafter pins;

DIY swing bed
- test square;
- sawhorses;
- thicknesser and planer;
- hammer, screwdriver, clamps, wrenches;
- chisel (25 mm);
- electric drill with a set of drills (10, 8 and 4.5 mm);
- sanding block.

Simple wooden swing for children's outdoor games
Note! Of course, purchasing a ready-made design in a store is much easier and faster. But in this case, it is unlikely to fully meet all your requirements in terms of design, size, etc. Creating a garden swing with your own hands from wood according to your own drawings will allow you to endow the structure with all the necessary characteristics.

Swing in a quiet corner of the garden will allow you to enjoy the aromas of greenery
Building a wooden swing for the garden with your own hands: drawings and selection of materials
At the initial stage, materials are prepared to create a garden swing with your own hands, the photo of which you liked the most. Based on the drawings, you can easily understand how many blanks will be required to assemble the structure and what dimensions they should have.
Dimensional table for creating blanks:
| Detail in design | Dimensions of the transverse part of the workpiece, cm | Final length, cm | Required number of blanks, pcs. |
| Frame part of the structure | |||
| Spacer (upper) | 4.5x14 | 23 | 2 |
| Spacer (lower) | 4.5x14 | 96 | 2 |
| Leg | 4.5x9 | 198,7 | 4 |
| Rigel | 4.5x14 | 210 | 1 |
| Seat parts | |||
| Rear pillar | 3.5x7 | 60 | 2 |
| Bar (support) | 3.5x7 | 95,5 | 2 |
| Bar (for seat) | 3.5x7 | 120 | 2 |
| Armrest | 3.5x7 | 60 | 2 |
| Back strap | 2.5x7 | 130 | 2 |
| Armrest support | 3.5x7 | 27,5 | 2 |
| Seat bar | 2.5x7 | 128,4 | 8 |
| Upper bar | 2.5x9 | 130 | 1 |
In addition, to connect the above blanks together into a single structure, fasteners with different parameters will be required.
Additional materials for creating a family or children's hanging wooden swing
The final dimensions of the structure are: 2.1 m (width), 1.235 m (depth) and 1.9 m (height). It is recommended to use impregnated pine as a raw material.
Dimensional table of fasteners:
Helpful advice! Prepare in advance an antiseptic suitable for wood processing, as well as materials for finishing. These points are thought through at the design and planning stage of the future structure.
In addition to fasteners, you will need a number additional materials: a pair of wooden spacers for the corner area (length 38 cm), sandpaper with a grit level of 120, hooks equipped with a fuse (6 pcs., 5 mm), chain 4.4 m long (link thickness 2 cm).

DIY swing with a soft mattress and cozy pillows - a great place to relax
Drawings of a garden swing: how to make a family structure with your own hands
For swing placement It is recommended to choose the back of the house. Even if your site is fenced off from a noisy street and neighbors, this area will still be the most comfortable and quiet. The backyard in most cases is set up for relaxation, and you can safely use it to install family or children's outdoor wooden swing for the dacha.

Wooden swing-bench, step 1: design sketch and preparation of parts for assembly
Marking the supporting part of the product
To make the support, you will need to cut the cross beam to the specified size using a circular saw. At a distance of 15 cm from each end, marks are made and a straight line is drawn. It should go along all the faces on the beam. This line will be considered as the outer edge for the A-shape support.
Markings for inclined cuts should be applied to the end part of the legs. To do this, the square is fastened with rafter pins. One of the pins is installed on the larger leg (at a distance of 316 mm from the corner), and the other on the smaller leg (at a distance of 97 mm from the corner). The leg is placed on the edge and marked with the positions of the square. You should have a bevel for making the bottom cut.

Wooden swing bench, step 2: applying glue and fastening the parts together
After this, the positions of the ruler of the square are marked on the edge of the legs. To do this, you need to move the square along the leg to align it with previous position rulers. Having outlined the length of the ruler, you can move the square further.
Note! This procedure is carried out until the square is adjusted to length 6 times.

Wooden swing-bench, step 3: fixing the connected parts with self-tapping screws
The last marking line is intended for cross-cutting the beam. These positions are marked using straight lines leading to each of the edges of the leg. To make a pattern, you need to saw off the material on the side that is not processed.
Cutting the supporting part of the structure
To saw off material using a hacksaw, you must first place it on the edge and clamp it in the saw sawhorses. The cutting is carried out strictly according to the markings. Remember to control the sides. This is especially true for the upper cut area. Sometimes it becomes necessary to straighten the bevel. To do this, it is enough to process the end part of the cut with a plane.

Wooden swing-bench, step 4: installation of the back and seat structure
To form the second leg, you need to put the first one next to it, joint to joint. After this, all marks on the bevels and length are transferred to the second leg and sawed off according to the markings.
Then both legs are placed on the edge so that the end parts of the vertices are located on opposite sides of the cross beam. The lower part of the legs is moved to the sides until a distance of 1.2 m is formed. The upper part of these parts must be adjacent to the crossbar. To check the bevels, use a ruler, applying it to the ends. Make adjustments if necessary.

Wooden swing-bench, step 5: attaching armrests
A distance of 50 cm is measured from the base of the legs and the lower block is applied. Next, the lines of the legs, as well as the upper and lower parts of the bar, are transferred to the corresponding parts. After this, the top block is placed on the legs. This must be done so that it is located 15 cm lower than the cross beam lies, and is parallel to the first bar. The marking is carried out in exactly the same way as in the previous version.
After this, the bars are removed, and the markings are aligned on the surface. By given points these elements must be cut to the required length.

Wooden swing-bench, step 6: hanging the structure
Drawings of a garden swing: assembling the support part
Next stage building a swing with your own hands– checking fit. The markings are transferred using a square to inner part legs
Helpful advice! You can use these 4 pieces as samples to make a second side frame. It is assembled in a similar way.
The template is set at the 22 mm mark and markings are made between perpendicularly located lines on the inside of each of the legs.

Wooden swing bench, step 7: treatment of the product with protective compounds
- With outside a nail with a convex head (25x65 mm) is driven into the legs;
- adjusting joints and driving nails into the frame;
- Forming a hole with a drill whose diameter is 8 mm. The hole should reach the central part of the end of each block;
- forming an installation hole with a drill whose diameter is 4.5 mm. This needs to be done as deep as possible into the end part of the bars;

Drawing of the support part for a wooden garden swing
- tightening parts through the installation hole using screws with a square head, equipped with washers 8x100 mm. You need to do this procedure with all the bars;
- placing the cross beam in the appropriate place at the top of the frame;
- alignment of frame edges with perpendicular markings on the cross beam;
- forming a hole with a diameter of 10 mm in the beam and in both legs;
- fixing parts using a bolt with a semicircular head (125x10 mm) and a nut;
- checking the angles between the beam and the leg;

A-shaped design - the most reliable in quality swing supports
formation of through holes in the leg with a diameter of 4.5 mm at a level of 30 mm from the bottom of the beam. Fixing parts with screws (65 mm). Similar actions are performed in the upper part of the leg. Only in this case, other screws (38 mm) are used for fastening.
Next you need to connect the top bar and the crossbar. The spacer is fixed with a through screw, the size of which is 65 mm. The upper part of this element is fixed to the bottom edge of the beam at the end with a 38 mm screw into a pre-made hole (4.5 mm).

Swing installed on the terrace - a great place to spend time with family and friends
Making a swing seat out of wood
The technology for creating a seat is carried out in stages based on an L-shaped frame made of boards (40-50 mm).
Note! DIY drawings of children's swings made of wood are in many ways similar to conventional family-type structures. Only in this case, you can shorten the seat, making the swing single, or add several seat belts to secure each child in a large seat.

Pallet swing, step 1: cutting the pallet to the desired size
Step-by-step instructions for making a seat:
- from the boards you should form 3 frame parts for the bench. They should be L-shaped. Fixation is carried out with self-tapping screws. To adjust the frame part to the curve of the spine, use carpentry tools. Thanks to this, you can achieve a comfortable posture for your back while riding;
- frame elements should be placed along the length of the bench with the same spacing. Use a thin board to hold them together. The resulting design will become the basis for creating a bench. The part with the vertical type of placement will be the back, the horizontal part will be the seat;

Pallet swing, step 2: treating the wooden seat with a moisture-proofing compound and varnishing
- the remaining seating area is filled with boards. Pre-drill holes in them to facilitate the process of screwing in screws and prevent cracks from occurring. Make sure that the boards are located at the same distance and have equal length;
- sand the surface using a grinding tool. Thanks to this, you can eliminate unevenness and burrs on the wood;
- secure the armrests.

Pallet swing, step 3: secure the swing with a cable or strong rope
Photo of a wooden swing for a garden and the hanging process
In order to hang the seat in its side (approximately in the middle), screws equipped with rings should be installed. Two more rings are attached to the bottom of the crossbar. These elements will be used to connect the support and the swing using hangers. In this case, chains are used.
The connecting elements between the main parts will be carabiners. The length of the hangers can be adjusted as desired. Optimal height to place the bench is 30 cm above the ground.

Drawing of a double swing suspended on metal chains
Helpful advice! Chains can be replaced with rope or strong rope. The advisability of this substitution lies in the fact that rope or rope creates much less noise than chains. But it is worth remembering that their service life is also reduced compared to metal elements. The rope stretches over time under the influence of weight loads, so periodically you will have to adjust the height of the swing.

Swing suspended from a tree with a rope
The final stage of construction of the structure
The next stage of construction will be the final one. For protection purposes finished design, swing needs to be treated with a varnish. It will provide a smooth surface, preserve the natural beauty of the wood and extend the service life of the product.
Depending on personal wishes, swing You can paint it in any of the colors you like or install a small canopy. Show a little imagination at this stage, and you will be able to create a unique product.

Finished designs can be decorated with pillows, blankets and other decorative elements
For greater comfort, you can place pillows or a small mattress on the bench to reduce the rigidity of the landing. Its size must match the size of the seat. Anyone who is familiar with the technology of making upholstery for furniture can be advised to apply these skills when creating a swing. Make soft not only the seat, but also the back, as well as the armrests, if they are present in your design. Do not forget that upholstery is only possible if the product is located under a roof or canopy.

Wooden and metal parts of swings must be periodically treated with protective compounds
Photos of children's swings made of wood and how to create them
Children's design options are much easier to implement, since the requirements for weight loads are much lower. On the other hand, safety standards in this case must be strictly followed, since children are extremely mobile and can swing in various ways.

Baby swing from a skateboard, made by yourself
Making a kindergarten swing with your own hands: video and various manufacturing methods
The most popular designs for the garden are hanging swing. There are several simple methods creating products for children.
According to the first technology, a seat made of wood in the form of a wide and thick board is used. There are holes made in it (a pair on each side) through which the rope is threaded. This is done in such a way that the suspension is pulled into one hole and comes out of another located nearby.

Children's swing made from a skateboard, step 1: preparation of materials and tools
Helpful advice! In order to strengthen the structure and prevent the board from breaking in the area where the holes are placed, an additional board with through grooves can be installed under the seat on each side. These holes should be located exactly under those made in the seat. The rope will pass through all paired holes.

Children's swing made from a skateboard, step 2: removing the rollers from the board and drilling holes in it
The second technology involves creating a swing based on a frame made of wood. This element is tied to a crossbar or tree branch with ropes, and the free space is filled with small but durable planks.

Children's swing made from a skateboard, step 3: preparing round wooden blocks for the armrests
Half of a rounded log is used as a seat for the structure created by the third method. It should be cut lengthwise. This option The seat is considered very durable, but requires careful processing. The surface of the log must be well sanded and polished to get rid of knots and burrs.

Baby swing from a skateboard, step 4: pulling the rope through the holes of the board and armrest bars
The fourth option for creating a structure involves using a board as a seat and through metal fasteners. An assortment of modern stores offers fixing fasteners various forms, so you will have quite a large selection.

Children's swing made from a skateboard, step 5: securing the created structure to the tree using carabiners
In terms of design baby swing do not impose serious restrictions. To create them, you can use any available materials. For example, a rope can be replaced with a chain, wooden board, used as a seat, can be replaced with a chair by first removing its legs. Be sure to use bright colors, as children really like the abundance of colors.
Video: how to make a garden swing with your own hands
It is not difficult to make a garden swing with your own hands if you know how to use tools. All work can be completed in one or two days.
What to make a swing from
You can construct them from almost anything you can get your hands on:
- Wood: beams, trimmings, logs, slats from boxes, boards, slats, benches.
- Metal: pipes, profiles, rods, wire, chains, rings, hooks, sheets.
- Plastic: boxes, chairs, hoops, pipes.
- Shaped parts from sewerage: tees, elbows.
- Bearings.
- Ropes, ropes.
- Tires.
- Thick fabric, tarpaulin.
- Cases and seats of old cars and motorcycles.
As you can see, we can continue ad infinitum, but we will limit ourselves to this list for now.
Beginning of work
To properly make a garden swing with your own hands, you first need to prepare a project and drawings of the future structure, based on the material you have. If you are planning to make a metal garden swing, but there are not enough parts, you can ask your neighbors, friends, or make them from another material, such as wood.
Prepare a pencil (pen), eraser, ruler, paper, protractor. They will be needed not only for drawing, but also for subsequent marking of parts. If you can’t immediately start drawing (you don’t know where to start), then just sketch out a drawing of the swing, “as you see it.” It will be much easier to draw from a drawing.
Don't feel like you're wasting your time drawing out all the details. At the construction stage, you will have to refer to the drawing more than once.
Installation of supports and crossbar
Installation of supports can be carried out in different ways:
- Install two vertical beams or pipes.
- Dig two capital letters L.
- Install two A-frames.
- Mount the supports like the letter X.
The photo shows different kinds installations. As you can see, the crossbars are also secured differently. In addition to such fastening methods, for example, in the first picture, you can drill the racks at the top and install metal pipe or a thick rod. An axle from a cart or trailer is used as it.
If you made the racks from wide boards, you can drill them out and install bearings in the holes. Cover them on both sides with perforated sheets of metal, which are nailed to the board. A rod must be inserted or pressed into the holes.
A more advanced method of fixing the horizontal line involves a special design mounted on poles, made by welding three sections of metal pipes.

There are several options for mounting supports:
- Install on the ground or dig into it. The option is bad. Due to dampness, the end of the beam will rot and the whole thing will collapse to the ground.
- Wrap the butt of the support with polyethylene or paint it.
- Concrete the support.
- Install on a special podium or terrace.
The second and third options are more acceptable. You need to wrap the end so that the film extends 20-50 cm outwards. This will protect the bottom of the protruding part of the pillar from dampness in winter (into snowdrifts). The same must be done when filling the pillar with cement. The formwork should protrude from the ground.
Suspension and mounting structures
To prevent children and especially adults (due to the greater weight) from falling, it is necessary to hang the swing securely. To do this you need to find:
- fairly strong ropes - you can use parachute lines (withstand 150 kg each) or mountaineering ropes;
- chains - even those used to tie dogs are suitable, but preferably thicker ones;
- thick wire or long metal rods with a caliber of at least 10 mm.
Mounts can be completely different:
- From a rope. Throw a rope over the crossbar and secure it at the bottom of the seat. Or pull it through the saddle and tie it with a knot at the top.
- Hook or ring.
The second method has several options:

The first two are designed to grip shaped crossbars: rectangular and round. They are a kind of clamps with hooks.
The last two are designed to strengthen hooks or rings in the through hole of the crossbar.
Manufacturing of seats
Everyone has long been tired of classic boards and half-logs on swings.

We will talk about several unconventional methods for making swing seats. They are easy to make and do not take much time.
Option 1.
The easiest way is to use old chairs or benches made of any material that have broken legs. It's beautiful and practical. There are several ways to attach them to a swing:

- We drill 4 holes in the seat of the chair (blue), pass ropes through them and tie a rod or thin metal tube at the bottom. He won't let the rope slip back.
- We screw or nail boards to the seat (yellow) and drill them. We thread ropes through the holes and tie large knots. For safety, such knots can be omitted to prevent them from unraveling and passing through the hole. It's better to just tie the end of the rope around the board.
- Instead of holes in the seat, we cut out grooves and wrap a rope around the chair (pink). But the child may jump, the rope will become free and slide to the side. To prevent the rope from jumping out, we stuff boards from below.
Option 2.
You can make a seat from tarpaulin or fabric, but it is not very comfortable, since it hugs the person sitting on both sides, squeezing him. For convenience, you can install a spacer above the seat on a rope or chain and then the degree of girth will decrease.

Option 3.
Make a pseudo seat from a tire. Hang it on the ropes. Stuff soft unnecessary things into the sector facing the ground.

For convenience, take large tires, for example, from the rear wheels of a tractor.
Option 4.
Hoop as a seat. Take a hula hoop and wrap it with ropes along the diameter:

If this is difficult for you, you can put a ring in the center of the hoop and thread the ropes through it. First, place a small circle in the center and reinforce one cord so that its two ends are on the same side. Then reinforce the twine on the opposite side. And so on.
Option 5.
For this, use an old, durable basin, tub, or even a trough.

But just sitting on wood, plastic or metal is not very pleasant. For greater comfort, you can put cushions for garden swings on the seat, made of foam rubber and covered with thick fabric or leather. If you carefully make soft seats during assembly, then no pillows will be needed.
How to make a garden swing from wood
There are two ways:
Option 1.
They represent a seat made of any suitable material, suspended by one or two ropes on a branch.

From the photo you can see that the ropes can be tied in different ways, the main thing is that they do not slip:
- on the left side, two ropes are thrown over a branch and secured below with four knots;
- in the top right picture, one rope is suspended from a hook;
- on the lower one there are two ropes hanging on hooks.
Option 2.
Make a swing entirely from wooden parts. That is, make the supports and crossbar from beams or logs, and the seat from boards, slats or wooden benches and install it as stated above.
If you pour the foundation, attach a knocked down special shield and a podium to it and install a swing - it will be even better. After all, the supports and shield do not touch the ground. Moreover, additional beams are installed between the shield and the foundation to ensure ventilation of the shield.

We provide drawings of the two designs below.


As you can see, a wooden garden swing is not that difficult to make.
How to make a garden swing from metal
Typically, a welded structure is made in the shape of the letter U, on which the seat is suspended using hooks with clamps or through ones.
It is made from pipes with a caliber of at least 5 cm. You can simply dig in or concrete two risers, in advance drilled holes insert the axle from a wide wheelbarrow or cart and lock it with the mounted wheels.

You can weld a wire with a swing onto the axle, because the axle will rotate freely. For greater effect, you can install it on bearings, as mentioned above.
To complete the second option, you need to weld something resembling the roof of a house. Everything is clear from the drawing.

Constructions of this type can also be made from a profile. Let us warn you right away - it is not made of plasterboard. That profile is very thin and may not support a swinging person. It is designed for stationary load.
The industry produces rectangular pipes, T-beams, I-beams. Here you can make a swing from them. Their appearance is no different from the other structures described above.
The following options are more difficult to implement, because to implement them you need to weld several pieces together.

To bend pipes, you can use a proven method:
- the mandrel is prepared;
- the pipe is tightly clogged with sand and plugs (wooden);
- then carefully bend the future support along the mandrel.
These designs are distinguished by the fact that they can be easily carried or moved. True, this may require 2-4 people.
How to make a 3-seater swing
Typically, swinging designs require a single-seater, less often a double-seater option. But now the 3-seater garden swing has come into fashion.
The installation of the stands and suspension is identical to those described above, but the width is much larger.

To do this, you will need to make a special elongated seat that can accommodate three people, and install racks at a distance of at least 2 m.
The seat can be made in two versions:
- Classic - everyone sits facing the same direction.
- Modern - average rider, looking in the opposite direction.
Let's consider the first option. It is easy to implement. To make it, you can even hang a bench like the kind you see in parks. But due to its heavy weight, this is not worth doing. It’s better to make a special seat yourself.
It can be made of aluminum pipes or wood. Below is the assembly procedure for the three-seater seat. Its length is 1500 mm or more, the width and height of the back is 500-600 mm.

DIY wooden swing (video)
We will send the material to you by e-mail
How to assemble a children's garden swing
They try to do the weaving with a climbing rope. It has increased strength, so it will wear out for a long time. Let's start creating a swing.
- We divide the hoop into eight identical sectors. We make markings with a marker. This is necessary in order to correctly place the future rope web.
- Measure two diameters of the hoop and cut the required length of rope with a small margin.
- Let's start weaving the web. Remember that the rope should not be taut. The child should then fit comfortably into the seat and not fall out of it.
- All ropes, starting from the center, are intertwined crosswise. In the resulting central unit, multi-layer stitching is performed with nylon thread.
- In the same way, loops and knots are sewn, which are attached directly to the metal circle.
- The workpiece is wrapped with synthetic padding and sheathed with thick, moisture-resistant fabric. For convenience, a specially sewn pillow is placed on the woven web.
- Sew strong loops to the four edges of the circle. We attach carabiners to them and hook the swing on a strong rope to a crossbar or tree branch.
It is allowed not to sheathe the structure with fabric. You can simply wrap the hoop with a thick multi-colored rope.

PHOTO: the-furnish.otzovy.ru
On a note! One hoop in a ready-made swing can support up to 50 kg. If you need to hold more weight, you will have to take several hoops and twist them together using a rope.
Do-it-yourself outdoor children's swing for a summer house: production features
If there are two or three children in the house, then you will have to create a multi-seat or at least a double design. Such swings are made quickly using the metal profile you are familiar with.
The available materials are: metal, fasteners and welding. It is also necessary to use the project that can be seen in the photo. Otherwise, there is a risk of making mistakes.

PHOTO: youtube.com
How to make a swing at the dacha with your own hands for two children
Let's start solving the question of how to make a children's swing with your own hands.
| Illustration | Description of action |
|---|---|
 | We saw the material according to required sizes and weld the parts together. You should end up with two identical bases. |
 | Next, you need to weld them together so that the finished frame takes the shape of a triangle. |
 | We take a metal tube and connect it to a wooden block. Making a hole with a drill for a carbine |
 | We hang four chains on the carabiners, which will serve as holding elements. |
 | We cook the seat according to the planned pattern. Don’t forget to create rings through which the chains will be threaded |
 | All that remains is to paint and dry the structure. Option for children's entertainment ready |
Try to make swing seats from. It is treated with moisture-repellent agents and painted. This will ensure that the material does not delaminate over time.
DIY country swing for the whole family: popular options
To make a swing with your own hands in the country, metal is most often used.
Interesting do-it-yourself swing made from a profile pipe
To create a swing for a summer house with your own hands from metal, you need to provide the following components:
- quadrangular frame (it should become a load-bearing frame in the finished swing);
- A-shaped sidewall. It is made by welding several crossbars;
- one long tube. It will become the basis for attaching the swinging bench.

PHOTO: sadovyrai.ru
How to make a swing with your own hands from metal
The process of installing a swing for a garden with your own hands consists of the following steps.
- Using a grinder, we cut the material into separate fragments. To do this, you need to have a preliminary diagram according to which you can make blanks in accordance with the dimensions.
- We sand the boards using a special machine or manually using emery.
- We connect all the necessary parts together using special fasteners, bolts or welding seams.
- We dig 4 holes in the ground, install a metal swing for the cottage and fill it with concrete. Next we paint the structure.

PHOTO: krainamaystriv.com
As a result, you get an individual forged swing for the garden. For such a product it is necessary to have a preliminary diagram indicating all dimensions.
Sofa swing for a summer residence
Country sofa swings are in great demand. If it is not possible to buy them, then they try to make them themselves. Metal options are highly durable. And if it is also properly processed, it will not be afraid of moisture.
Tools and materials for manufacturing
For production you will need metal profiles, a welding machine and seating material. Typically, wood is used for such purposes. In addition, you will also need material for the roof. Those who plan to use it should know that it is quite hot under it in sunny weather, and it is not practical during hail (the material begins to crack). It is ideal to take a tension awning.
How to make a garden swing with your own hands from metal: instructions with photos
Let's start following the instructions for assembling the garden swing.
| Illustration | Description of action |
|---|---|
 | We weld the frame. You can take your own sizes. It all depends on how much material you have. As a result, you should get a base like the one in the photo. |
 | We weld the frame for the swing to which the sofa will be attached. Next, we bend the arcs from the metal profile. They will play the role of armrests |
 | We hang the finished part on carabiners. Next we prepare the tree |
 | The finished version should look like this. The swing folds out into a sofa. The upper part of the frame is attached to the frame using strong chains. All metal parts must be primed and then painted |
To make the bed soft, it can be covered with a special fabric or periodically laid on top of a mattress and pillows for relaxation.
Dear readers, if you do not understand enough about the question of how to make a garden swing with your own hands, do not hesitate to ask questions and share your opinion. Our team will definitely contact you as soon as possible.

Save time: selected articles delivered to your inbox every week


. Fill in the missing letters and explain the spelling of the words.")


- Girls and women almost always associate white shoes with a wedding dress, although the white color of shoes has long been no longer required. A...
- New
- Turkey stewed in a slow cooker: spicy, with vegetables, in sour cream, cream and walnuts
- Types of speech: description, narration and reasoning
- Martyrs Tatiana. Moscow Church of St. Martyrs Tatiana Temple of the Martyr Tatiana at Moscow State University schedule
- Milotici: return of the Russian village Moravov Alexander Viktorovich
- Why you shouldn't cry in front of the mirror
- Recommendations: what to grease the pies to make them rosy and appetizing
- Actors Spiderman Aunt May Aunt May in Spiderman
- Making sounds for children Lessons on making sounds for children
- Pink salmon in the oven - delicious and easy recipes for baked fish Pink salmon fillet baked with vegetables
- Deciphering the natal chart of the house
- What does mulberry help with?
- Photo report “Birthday of Samuil Yakovlevich Marshak in the group”
- Breathing at high pressure Breathing correctly at high pressure
- Bryansk State University named after
- Tasks to test spelling and punctuation literacy
- Application...burning, grow...sti, to...sleep, m...roll, warm...up, sk...roll,...
- The Forex Economic Calendar is a reference book for every trader, regardless of trading experience and level of professionalism, and especially...
- Representatives of the arachnid class are creatures that have lived next to humans for many centuries. But this time it turned out...