How to install hobs. How to install a built-in hob into a countertop? Types of hobs
An integral attribute of the kitchen is gas stove, behind which in ideal A husband is standing and preparing breakfast for his wife. It is not classic gas or electric stoves that are gaining popularity, but hobs. Their convenience lies in their compactness and the possibility of separate installation oven. But installing them on a countertop will make an inexperienced craftsman sweat. Is it possible to install such a module yourself and what will be needed for this? This will be discussed in the article.
Types of hobs
All hobs can be divided into two large groups. These groups are united by a power source; its role can be:
- electricity;

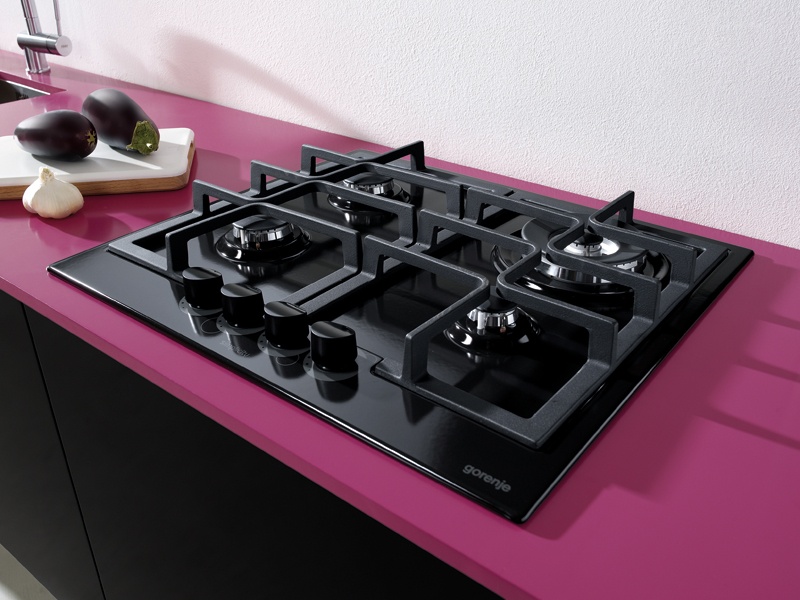
In appearance, hobs that are connected to the gas mains are practically no different from conventional stoves. An option for such modules may be an automatic start system, which can be autonomous or dependent on electricity. In the first case, it is represented by a piezoelectric element, which supplies a spark at the right moment. Burners on gas surfaces may vary in size for greater ease of use.
Electric hobs can be of two types:
- classical;
- induction

In a classic hob, the role of a burner is performed by a heating element or other heating element. This module costs less and is not particularly economical. Induction hobs are the dream of any modern housewife. The essence of the product’s functioning is to heat the product thanks to electromagnetic field. At the same time, if you put your hand on a working burner, you will not feel anything. For normal operation of the product, a metal pan with a thick bottom is required. In this case, the material from which the dishes are made must be magnetic. The installation process for each of these surfaces is very similar. The difference lies only in the need to connect a gas hose for the first version of the stove.
Installation tool

The entire installation process does not take much time and requires a tool that may already be in the home DIYer's arsenal. Among the main tools are:
- screwdriver or drill;
- electric jigsaw;
- roulette;
- marker or pencil;
- silicone sealant.
Additionally, you may need a level or a long metal ruler to make it easier to draw straight lines.
Preparatory stage

If we are talking about a hob that is powered from an electrical network, then preparatory stage will consist of power supply. The average power consumption of such modules is within 3.2 kW. This means that a regular but good outlet will suffice for connection. If the socket was not installed in advance, then you can purchase a surface-mounted version, since it will be easier to install and will not be needed additional tool in the form of a hammer drill or drill with a crown. The cable for such an outlet must come directly from the distribution panel.

This step is being taken in order to provide such a powerful device with a separate circuit breaker, who would control its work. The rated current for which the machine must be designed is 16 amperes. The best solution There will be installation of a differential machine that is capable of detecting the slightest leaks. The socket is mounted slightly below the tabletop. This is done not for greater ease of connection, but to ensure that moisture and fats do not get on it during cooking. The outlet must be grounded in case of a short circuit.
Pay attention! It is worth noting that a standard outlet can withstand a load of 3.5 kW and a current of 16 amperes.
Step by step instructions
An important step during installation hob There is a marking in the tabletop. Typically, the manufacturer, in the technical documentation that comes with the hob, indicates what the dimensions of the installation hole should be. One option would be to make a sample from cardboard, which can be used to draw the outline of the future hole. There is another option for marking, it can be seen in the photo below.

You need to place the hob on the countertop, but turn it upside down. She will be the model. It must be located in the place where direct installation will be carried out. The photo clearly shows that it is important to make a small gap from the edge of the countertop to the hob. Usually it is about 5 cm. It is done so that the edge of the cooking surface is not damaged by constant interaction with it.

The next step, as shown in the photo, is to apply markings. To do this, the hob is simply outlined in a circle with a pencil. The lines must be accurate so that they do not have to be redrawn several times, as this will only confuse you later.

The photo shows that the hob has a small protrusion, thanks to which it is fixed in the hole. This protrusion has a certain size that must be taken into account. It is also important to mark it on the outline of the future hole, as shown in the photo below.

In this case, it is necessary to make a small gap. If the protrusion has a length of 15 mm, then the size of the hob should only deviate 10 mm from the main line. A five-millimeter gap is required for smooth installation of the hob into the prepared hole.

After marking the hob, you need to prepare the holes to make it easier to cut out the required part. Holes are drilled with a drill or screwdriver in the four corners. In this case, it is necessary to ensure that the drill does not damage the facade or other elements of the kitchen unit. The diameter of the drill should be such that the nail file fits freely into the hole.

To continue the hob installation process, you will need a jigsaw. His file is inserted into the prepared hole and the cut is made. It is important to remember that you need to cut along the inner, not the outer line. If a mistake is made, then the surface will simply fall into the hole without fixation.

During the work process, it is necessary to promptly remove sawdust so that it does not block the cutting line, as it can easily come off and damage the tabletop. When cutting, you must ensure that the file does not damage the walls of the cabinets or their surface. Before going through the last side, it is necessary to provide the tabletop with sufficient support so that the nail file does not bite, and also so that part of the tabletop does not fall on your foot.

Once the hole is ready, you can try on the hob to make sure it fits as needed.

The process doesn't end there. The tabletop is most often made from particle board. If moisture gets on it, it swells and becomes deformed. When cooking on a hob, this scenario is inevitable, so it is important to protect the area that has lost the laminated layer. To do this, a special sealant is applied to it, which is used when installing the panels. It simultaneously acts as a fixing basis for the entire structure. The layer should be sufficient to cover all areas accessible to moisture.

An adhesive sealant is applied to the back side of the hob edge, which will additionally secure the product to the countertop. After this, the panel is inserted into place and gently pressed until contact with the surface of the countertop is felt. The sealant that has come out must be removed immediately, because after drying it will be more difficult to do. It is important to check that the connection is the same over the entire surface. If this is not done, the pressure from a heavy pan may cause the glass to burst.
Advice! If the hob is glass, then it is important to be careful when applying pressure so that it does not break.
The fixation doesn't end there. Special metal plates are supplied with the surface, as can be seen in the photo above. They must be screwed in such a way that they provide support and prevent the panel from lifting off the tabletop. A video about installing the hob can be seen below.
Network connection
After completing the installation process, you can proceed to connecting the electrical part. Most often, hobs are supplied in a single-phase version, but they can also be three-phase, which will be useful if three phases come into a house or apartment. Usually the hob has a built-in power cable. But if you don't have it, you will need to buy it separately. To connect, you will need a wire marked PVA 3x4. Each core of this cable is designed for a rated constant load of 8 kW.

This is necessary for a small margin, which will prevent overheating of the conductor. The wires are stripped on both sides. A plug is mounted on one, which must correspond in current strength to that specified for the hob. If this is not observed, then it may simply melt. The wire is not monolithic, so you will need to crimp the wires with lugs. Markings are usually applied near the terminal block where the connection to the hob will be made.

The Latin letter L denotes the cable through which the phase arrives, the letter N denotes zero, and there may be a third letter E, which denotes the location of the ground wire connection. Most often, instead of the third letter, a drawing is applied that indicates grounding. It is important to secure each core that is crimped with a ferrule firmly with a bolt. The service life will depend on the quality of the contact. If an oven is to be installed under the hob, then a separate outlet must be provided for it. Total power surface and cabinet consumption is twice as high as permissible for a single-phase socket.
Resume
As you can see, installation of the surface can be done independently without significant skills. During work, all precautions and safety precautions must be observed. When drilling and working with an electric jigsaw, you must wear safety glasses on your eyes to protect you from flying sawdust. When installing the socket and connecting the electrical part, it is necessary to use tools that have dielectric handles that protect against breakdown electric shock. Before starting work, it is necessary to de-energize the machine, which is attached to the prepared wire in the kitchen.
Many years ago, kitchen sets did not offer the option of installing a hob in them. Today this is a common phenomenon, which allows you to save space in the kitchen, and also makes cooking more convenient and comfortable. You can install the hob into the countertop yourself. The main thing is to correctly determine the sequence of actions and follow it. It is very important to correctly determine the dimensions of the future opening.
Modern technologies do not stand still. Today it has become possible to integrate hobs into kitchen units, which has a qualitative effect on the interior of the kitchen and its functionality. The insertion of the hob will not be noticeable for a long time.
The first step is to make a marking on the countertop that will correspond to the dimensions of the hob.
A hole must be drilled next to each side of the niche, the diameter of each should be from 8 to 10 mm. The next step is to cut out a niche and treat its interior with silicone. The tabletop is installed on the lower level of the set. Inner part The panels are secured with double-sided tape or a little plasticine. The tabletop is coated with silicone.

Step-by-step installation:
- The tabletop is placed on the lower part of the set. If the walls are uneven, the tabletop will need to be trimmed. And if gas pipes will pass through it, special holes must be made for them. The countertop should be ready to be installed down the kitchen.
- Inside the box in which the hob will be installed, it is necessary to make markings. To do this, you can simply make pencil marks that will help you make further markings.
- The tabletop is laid face down, and on back side make markings for future insertion.
- In each proposed cut, you need to make small holes so that you can work with a jigsaw.
- Carefully cut out the niche using a jigsaw.
- You need to make sure that the tabletop does not sway under its own weight. It is better to carefully support it during the cutting process.
The inside of the cut is treated with silicone. After installing the panel, you can additionally coat it with silicone and outside. This is done in order to create an additional water barrier, since the fasteners may not be sufficiently pressed against the tabletop.
A gas hob must be chosen very responsibly, because it must last for many years. After the choice is made, the panel must be installed so that it is convenient and safe to use. You can install the panel yourself, but you should not do this if you are not confident in your abilities. In any case, you can contact a specialist for help.
At self-installation it's important to prepare everything necessary materials: panel, measuring instruments, pencils, sealant, adjustable wrench, saw, gas winding, steel hose.
All work involving gas is unsafe. It is best to carry out the installation together with a specialist or person who thoroughly knows the entire installation process. One of the most important stages of installation is the choice of hose.

Tips for choosing a hose:
- Check the hose for damage. There should not be a single defect on the hose.
- The hose must be certified. When purchasing, you should ask the seller to present all documents for the goods.
- The hose can be corrugated metal or rubber.
When installing the panel, special attention must be paid to calculating the dimensions. Sometimes, included with the hob, you can find a template that needs to be used in order to correctly cut the countertop. It is important to remember that water should not get on the surface of the panel. The gas countertop should be placed at a safe distance from furniture and textiles.
How to properly install a hob into a countertop
A built-in electric stove is a very convenient device to install in the kitchen. It works as efficiently as a stationary stove, but does not take up as much space. You can install such a panel quickly and easily, without the help of specialists. The surface can be combined with an oven, which will make cooking even more convenient.
If this is not the first time the master has carried out independent repairs, then installing the hob will not cause any difficulties.
Before installing the panel, you need to correctly cut the hole in the countertop. To make installation easier, manufacturers indicate required dimensions in the instructions for the device. Preliminary marking greatly simplifies and speeds up the installation process.

Installation steps:
- You need to make markings on the countertop that will correspond to the dimensions of the panel.
- Using an electric jigsaw, you need to make a cutout in the tabletop. To get started, you need to drill a small hole for the jigsaw. The cut will be even if you use a jigsaw file with small teeth.
- The dimensions of the hob must match the cut hole. Sections must be treated with sealant or nitro varnish. Sealing self-adhesive tape can be used for processing.
The electric tabletop is connected based on the diagram. It can be found on the back of the panel. It is important to connect the wires correctly in order to be able to regulate the activation of the burners and their temperature.
What to pay attention to: attaching the hob to the countertop
The hob installation process is simple, but requires careful preliminary preparation. The first step is to choose the right hob, check its passport data, prepare the tools and decide on the installation location. Installation of gas cooking and electrical surface practically no different.
You need to attach the panel to the tabletop, in which you need to make a corresponding cutout.
Please note that to install electrical panel you will also need installation electrical outlet. For a gas panel, you need to take care of the gas communication. The built-in panel must be installed so that the maximum gap between it and the tabletop is 1-2 mm.

What to pay attention to:
- Correctly measure the dimensions of the panel and transfer them to the cutout in the tabletop.
- Cut out the required segment in the tabletop in order to perform the installation correctly.
- Treat the countertop with special materials that will protect it from external negative factors.
- Recess the panel into the cutout.
It is important to remember that the mortise panel should not be forced into the gap. If there is any play, the position of the tabletop must be aligned, focusing on the front edge. Fastening the seal over the entire surface of the tabletop will prevent contamination of the panel.
Hob seal
A sealing gasket must be attached to the hob. If the panel is removed after some time of use, you may notice that the seal will be covered in dirt and grease. The gasket requires replacement from time to time.
If there is a gap between the panel and the countertop, then the plate can be fixed in the plane, but this must be done so that debris does not fall into the vertical gap.
You can buy a special tape, or you can use a glass sealant. The table and cutout can be pre-treated with clear sealant. Remaining sealant must be wiped off or carefully removed with a spatula.

Advantages of sealing tape:
- Reliability;
- Ease of use;
- Environmental friendliness.
Bosch seals are known for their high quality. Simply installing the panel is not enough. It must be protected from moisture, grease and debris. If the panel is installed in a large opening and a gap forms, then tape and treating the gaps with sealant will help save the situation.
Installing a hob into a countertop (video)
The built-in hob is a convenient device that saves space in the kitchen and provides comfortable cooking. The rules for installing the panel are simple, so you can install it yourself. It is possible to embed a panel efficiently only when the dimensions of the panel are measured correctly. After cutting a hole in the countertop, it must be well treated with sealant to protect the panel from water and dirt. All actions must be gradual and coordinated.
The boring gas and electric stoves have been replaced by more compact and functional hobs and ovens built into kitchen furniture. It is difficult to overestimate their advantages - this is ease of use, and activation with one movement of the handle, and the most important advantage is their simple and quick installation hob, simply done with your own hands.
How to install a hob
The first step in the installation process is to mark the hole where the hob will be installed. The hole is marked based on the dimensions of the hob and its location on the kitchen worktop. To maintain the rigidity and integrity of the tabletop, do not place the hole close to the edges, otherwise weakened edges may break over time.
Using an electric jigsaw, we cut out a rectangular hole along the pre-marked lines.

To make the task easier when it comes to installing the hob, before cutting, you need to drill a small hole in the part to be cut, from which the entire cutting process will begin. You only need to use a new file with fine teeth; cutting will take a little longer, but you will get smooth, chip-free edges.

We try on the hob in the freshly cut hole and, if the markings were made correctly, proceed directly to installation.

First, you need to stick a sealant on the edges of the hole, which will prevent dirt and water from getting under the panel and quickly ruining the kitchen countertop. A self-adhesive seal is sold complete with the hob. There is nothing complicated about this process.

Now that the seal is glued, install the panel into the hole. If the hole is a little larger, align the hob with the edge of the countertop. There's just a little bit left to do.

Using special clamps, also included in the delivery set, we fix the hob. Clamps are installed from the bottom of the tabletop, they seem to wedge the panel between its upper part and the bottom of the base of the tabletop.

Well, the new and shiny hob is installed; to improve the sealing of the gap between the countertop and the hob, you can additionally use sanitary antibacterial silicone. There is only one thing left - to supply gas to it and connect it to the electrical network.

This point also does not cause any particular difficulties. Like a gas stove, the hob is connected to the gas pipeline using a flexible hose. The connection is made using a union nut through a paranitic sealing gasket. The nut is pressed tightly and checked for gas leaks with soapy water. The electrical part is connected directly to the outlet.

That's it, you can install gas burners and stands for pots and pans, and make the first start. And, if everything works as expected, put the new hob into operation. You may have to slightly adapt the hob to the gas used in your region. For this purpose, additional gas injectors are included in the package. Pulling out the burner at the very bottom of the mounting hole, you can see a small brass nozzle. We unscrew it using a wide flat screwdriver, and in its place screw in a new one suitable for your gas.
In the era of new technologies, inconvenient and bulky gas and electric stoves comes completely new look kitchen equipment. These are hobs. Such devices fit harmoniously into the design kitchen furniture, convenient to use. Installing a hob into a countertop with your own hands is a fairly simple process. Even if you have a little skill in working with power tools, even a beginner can handle this task. At the same time, you can save money on installation services.
Hob selection
These kitchen appliances practically devoid of shortcomings. All devices can be divided into categories:
- electrical;
- gas;
- combined;
- induction
According to the material of manufacture:
- stainless;
- ceramic;
- glass;
- enameled.
 In this case, the panel can have a different number of burners and a different arrangement of them on the surface. At the first stage, you need to choose the most convenient and suitable device. When ordering kitchen furniture, you need to think in advance about the installation location in the furniture. It is possible that an oven will be installed along with the panel. You need to think about it first about connecting to the network: to gas pipe when choosing a gas panel and to the electrical network if you prefer an electrical device.
To install the electrical network, it is imperative to provide the cross-section of the power cable and the power of the socket, taking into account the current consumption of the panel and the possible oven specified in the instructions. Do not forget about grounding or protective zeroing metal parts of an electrical appliance. After preparation, you can start working.
Installing a hob into a countertop with your own hands is a simple process, accessible even to a beginner . First you need to prepare all necessary materials and tools. The insertion of the hob into the countertop begins with drawing dimensions. Further installation depends on how correctly and accurately the markings are made. First you need to remove from the panel all parts that may fall out during installation (these are protective grilles, burners, controls).
Applying markings to the tabletop
 The dimensions for the technological hole in the countertop can be specified by the manufacturer in the instructions. If they are not there, you will have to take the measurements yourself. It's not difficult. To do this, you need to turn the panel over and take its dimensions, taking into account that it should lie on the tabletop along the entire perimeter. For convenience, you can make a template by cutting it out of a sheet of cardboard according to the appropriate sizes. Then transfer the dimensions to the tabletop using a long ruler, square or prepared template. With maximum precision to avoid curvature, use a pencil or marker to draw the outline on the tabletop.
Window cutout for panel installation
 After making sure that the markings are correct, you can begin cutting out the hole. Using a drill with a diameter larger than the width of the file of the jigsaw used by 2 mm, drill 4 holes along internal corners drawn outline. Insert the jigsaw blade into one of the holes and make a cut in the tabletop along the entire contour. To prevent large chips, you need to use a file with fine teeth or a hand router.
Place the panel to be installed into the resulting niche and align it. See from the outside whether everything is done smoothly. If everything is done correctly, proceed to the next one stage of cutting into the tabletop. Now process the cut areas sandpaper, file, rasp. If the countertop used is made of wood, be sure to exclude the possibility of moisture penetration. To do this, carefully treat the cut area with moisture-proof material:
- silicone;
- sealant;
- nitro lacquer
If the tabletop is made of plastic materials, you can skip this processing. The plastic will not swell or swell due to moisture. Can be coated in several layers for reliability. After the last layer has dried, cover the cut with self-adhesive sealant. Preparations are complete. Installation can be done.
Installation and connection
 Installing the hob into a prepared window is not difficult. To do this, lower the panel into the hole. Using a measuring tool, align its position. After making sure that it is correct, secure it from below with special brackets and screws to the tabletop. The brackets and screws are supplied by the manufacturer as a set. It would be useful to use a seal around the perimeter of the installed device. This step will also prevent debris and moisture from getting under the installed surface. As a rule, it comes with the product.
All that remains is to reinstall all the previously removed parts and begin connecting the energy carrier. If the panel is gas, it must be cut into the gas line. If an electric one was installed, then connect it correctly to a pre-prepared electrical network. All that remains is to try it out and use it comfortably. You can watch the video to see how to install the hob correctly.
Modern kitchen units allow you to independently install a gas, electric or induction hob. Such models can be used both together with an oven, that is, to be dependent, and separately, that is, to be independent. Despite some differences in their design, general rules, which should be followed when carrying out work, are similar for all versions.
Preparing the bore hole
Marking
How accurately the marking is carried out depends on appearance finished kitchen, and an error of even half a centimeter will force you to purchase a new countertop.
Marking can be done in two ways:
- put the device in place and circle it with a marker;
- calculate and mark the mounting location to the nearest millimeter.
Despite the apparent simplicity and attractiveness of the first path, there are a lot of chances to make mistakes and apply incorrect markings.
Preliminary sizing
It is much safer to mark the installation location through careful calculations:
- Borders are applied to the surface of the tabletop internal space cabinets above which the hob will be placed. Thus, the place within which the work will be carried out will be designated. The markings must be applied with a pencil so that the lines can be easily erased upon completion of the work. If the countertop does not allow you to draw clearly visible lines, then you should stick paper masking tape on its surface, and draw markings on it.
- It is necessary to find the future center of the hole into which the housing will be installed. To do this, diagonals of a rectangle are drawn on the tabletop, formed by the front and back parts of the tabletop and the drawn boundaries of the cabinet.
- The center of the hob will be located at the intersection of the drawn diagonals. You need to draw two straight lines through it: one parallel to the edge of the tabletop, the other perpendicular.
- On these straight lines you need to mark the dimensions of the built-in part of the housing. You can look at them in the technical documentation or try them on yourself. These dimensions should be increased by 1-2 mm to make it more convenient to install the device later.
- Straight lines are drawn through the marked marks (parallel and perpendicular to the edge of the tabletop). They form a rectangle, exactly corresponding to the recessed part of the body and located in the center of the tabletop.
- It is necessary to ensure that there is compliance between the final marking lines and surrounding objects. minimum distance specified by the manufacturer in the technical documentation.
- The resulting rectangle must be circled with a marker, and extra lines erase so as not to make a mistake when cutting a hole.

The marked rectangle corresponds to the size of the hob
Cutting the mounting hole
To cut out a seat for the hob, you can use the following tools:
- milling machine;
- jigsaw;
- drill.
The highest quality cut is obtained when working with a milling machine. A slightly lower-quality cut is made by an electric jigsaw with a fine-toothed file.

For work you can use a drill or jigsaw
The procedure for cutting a hole with a jigsaw is as follows:
- At the corners of the marked rectangle (with inside) drill holes with an 8-10 mm drill.
- Using a fine-toothed file, carefully make a cut along the marked lines. The body of the jigsaw cannot be kept suspended; it should be pressed tightly against the tabletop.

The hole is cut along the marked lines
But not every household has convenient tools. A much less beautiful, but nevertheless suitable for installation cut can be made using a conventional drill.
The procedure for cutting a mounting hole using a drill is as follows:
- Using an 8-10 mm drill, holes are made along the intended line. They need to be drilled from the inside of the marks so that the drilled areas are in contact with the intended cutting line. Holes must be made as often as possible so that the cut piece of the tabletop can be easily broken off.
- Rough edges of the hole must be aligned with the marked line. To do this, you can use a rasp or a small file for wood or metal. The resulting edges must be made as smooth as possible.
Attention! After the mounting hole is made, you need to insert the hob into it. The device should fit effortlessly and completely cover the cut hole with its body.
Sealing the mounting hole
The next step is sealing. It is necessary to protect the countertop from water during cleaning or cooking. A tabletop made of wood or chipboard can swell and deteriorate as a result.
Sealing is done using acrylic sealant for plumbing or nitro varnish. It must be carefully applied in a thin layer from the inside to the ends of the hole made. There is no need to apply sealant to the top surface of the countertop - a special gasket in the form of a sealing tape, supplied with the panel, will be used there.

The ends of the table top are treated with silicone
Sealing tape sticker:
- An adhesive layer covered with a film is applied to the sealing tape. It should not be removed all at once, but peeled off gradually as it sticks to the surface.
- The tape is glued around the perimeter of the mounting hole in one piece. It is not cut at the corners, but simply glued with a turn.
- The end and beginning of the tape are connected end-to-end, without overlap or gap.
Some manufacturers equip hobs with aluminum seals. Instructions for installing them are contained in the documentation for the device.
Panel fastening
The hob is mounted as follows:
- The device is inserted into the mounting hole and centered so that the front side is parallel to the edge of the countertop.
- From inside the cabinet, the cabinet is attached to the tabletop with special plates included in the delivery set.
- Installation must be carried out in such a way that there are no gaps between the hob and the countertop.
- Using a utility knife, trim off the excess sealant from the top.

The seal is cut with a utility knife
Connecting an installed hob
Electrical panel
It is advisable to provide a connection point for the electric hob before installing the kitchen unit. The socket must meet all electrical safety requirements:
- have a grounding line;
- The supply copper cable must have a cross-section of at least 4 square meters. mm.
A hole is cut in the back wall of the base cabinet opposite the electrical outlet of such a size that you can easily insert and remove the plug from the hob by hand.
Sockets installed for self-connection come in two types:
- three-pin;
- four-pin.
If there is a plug installed on the hob cord, then to connect it, just plug it into the outlet. The power cord must be of such length that it is not too tight when connecting the device.

Plugs and sockets for connection hobs
For models sold without a plug, certain steps will be required:
- If the socket is three-pin and there are four wires in the wire, then you will need to connect a two-phase model to a single-phase network. To do this, wires with black and brown insulation are connected in the cord. This connection is connected to the socket phase. The blue neutral wire is connected to the socket neutral, and the green-yellow wire is connected to ground. All connections must be securely insulated.
- If the placement of the wires in the socket is unknown, then using a multimeter you need to determine the phase and zero. If necessary, they are swapped so that they match the wiring in the plug of the device.
Attention! When installing an electric hob yourself, you must provide mandatory installation individual RCD and circuit breaker. For example, for a 16A socket you need an RCD of at least 40A, and an automatic circuit breaker - at least 25A.
Induction hob
The induction hob is connected using the same general principles, as electric.
Many models do not have power cords, and only have terminals for connecting an external cable.

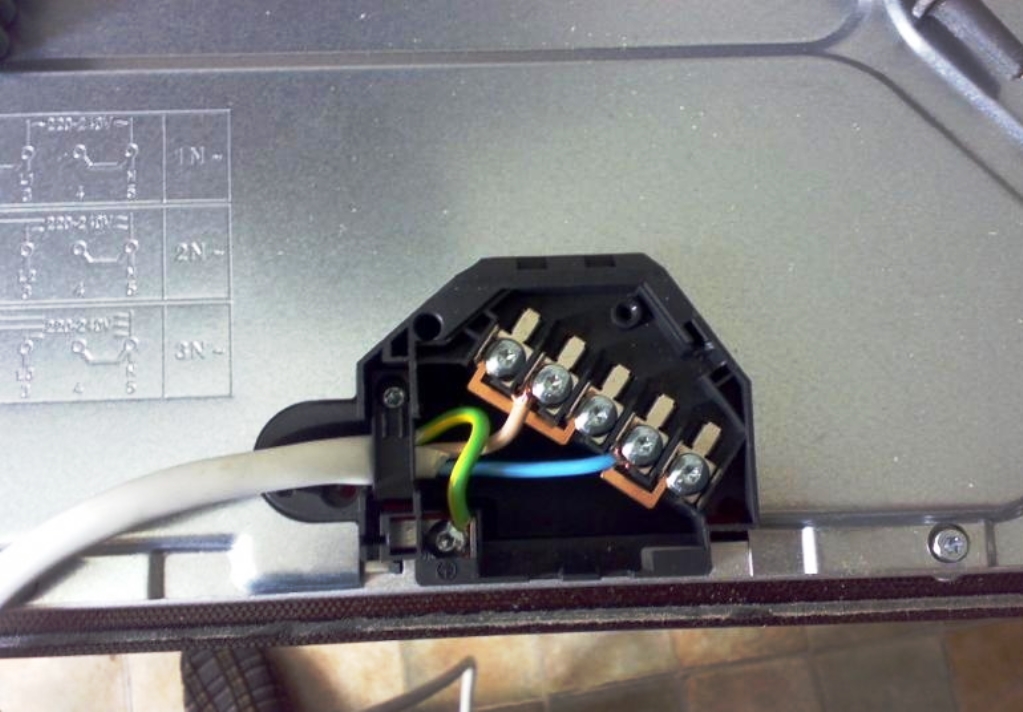
The connection diagram is printed next to the terminal block
In this case, the connection is carried out in the following order:
- Remove the protective cover from the back of the device.
- The external cable is passed through the cover.
- The cord is connected to the terminal plate according to the diagram supplied with the panel.
- If a jumper is installed connecting zero and ground, it must be removed.
Gas panel
Household gas is a source of increased danger, therefore special requirements are imposed on the kitchen area:
- Availability of ventilation hood.
- Air flow of at least 2 cubic meters. per hour for each kilowatt of panel power.
- The distance to the wall is at least 130 mm.
- The supply gas hose must be located so as not to be subject to excessive heat and to allow periodic inspection by the inspection agency.

The hob is connected with a flexible hose
Attention! If the mandatory requirements are not met, the operating organization will not allow the installed gas panel to be operated.
The panel connection is carried out by a certified specialist in the following order:
- To the seats threaded connections sealing fum tape is applied.
- Paronite gaskets are inserted into the gas hose.
- The hose is connected to the hob and the gas supply point.
- The joints are checked for leaks using soap foam.
- The power cord plugs into a spill-proof outlet.
For operation gas models their acceptance by the service organization responsible for this work in the area of residence is necessary.
Integrate the hob into kitchen set you can do it yourself, carrying out the work carefully in accordance with the recommendations provided.


- Turkey stewed in a slow cooker: spicy, with vegetables, in sour cream, cream and walnuts
- Types of speech: description, narration and reasoning
- Martyrs Tatiana. Moscow Church of St. Martyrs Tatiana Temple of the Martyr Tatiana at Moscow State University schedule
- Milotici: return of the Russian village Moravov Alexander Viktorovich
- Why you shouldn't cry in front of the mirror
- Recommendations: what to grease the pies to make them rosy and appetizing
- Actors Spiderman Aunt May Aunt May in Spiderman
- Making sounds for children Lessons on making sounds for children
- Criteria for preparing an act on write-off of motor vehicles
- Pink salmon in the oven - delicious and easy recipes for baked fish Pink salmon fillet baked with vegetables
- What does a lizard tattoo mean?
- Deciphering the natal chart of the house
- What does mulberry help with?
- Photo report “Birthday of Samuil Yakovlevich Marshak in the group”
- Breathing at high pressure Breathing correctly at high pressure
- Bryansk State University named after
- Tasks to test spelling and punctuation literacy
- Macroeconomic calendar
- Interesting signs about spiders
- Why do you dream of wedding shoes? Why do you dream of wedding shoes with heels?