Professional restoration. Recovering old and damaged photos
Photos on paper have the unpleasant property of fading, fading, and becoming covered with small cracks and scratches over time. Almost every person has old black and white photographs from the family archive, damaged by time, in their home. However, they are dear to the heart and can be restored if you use a computer and the appropriate software.
Photo recovery methods using modern technologies a bunch of. Let's consider one of the methods - photo restoration using Adobe Photoshop. In any of them, you can note the use of the following tools: Clone Stamp Tool, Healing Brush Tool and Patch Tool. What you will need: a computer with appropriate software and a scanner for scanning images. Here is the simplest and most common method for image restoration:
1. Scan photos
The photograph must be scanned with high quality. Before scanning, be sure to wipe off fingerprints and old dust from the photo.
In the scanner settings you need to set the highest resolution - at least 300 - 600 dpi. A lower resolution will not allow you to print the restored photo.
It is necessary to scan black and white photos in “color” mode (RGB), and not in black and white, since the color mode allows you to save more details. When scanning in grayscale mode, the result may be of lower quality and may big amount noise
2. Image analysis and framing
In the process of scanning and converting a photograph from damaged paper into digital form, many small cracks, scratches and specks of dust appear, which are sometimes completely invisible in the original photograph. After scanning, it is important to analyze the image to determine whether dust needs to be removed, which areas of the photo require restoration, and which can serve as donors for lost areas.
3. Removing scratches and dust
To remove dust, use the Dust&Scratches filter, followed by applying a layer mask and restoring areas undamaged by dust. Dust is always more visible in the shadows and, accordingly, it will be much easier to remove it automatically there. When removing dust, work at 100 percent zoom to ensure you end up with a clean, restored photo that won't leave any scratches or specks of dust that go undetected when you print.
To eliminate cracks, you will need to switch to Lab Color mode, where you can correct the image both in relief and color. Cracks and scratches are removed from the photo using the Clone Stamp Tool. You can also use the Healing Brush Tool for this purpose. When using these tools, take extra care to remove scratches and cracks from faces in your photo.
Hair, clothing and some other details are often the only areas on old photograph, which can be called clear and detailed. Therefore, when working with them, extreme care should also be taken. If necessary, you can additionally remove bags under the eyes, wrinkles and other imperfections from the photo using the same Clone Stamp Tool and Healing Brush Tool.
4. Restoration of missing areas

Some areas of an old photograph may be so damaged that they will have to be restored using other, similar areas in the photo. To restore missing or damaged areas, you need to use the Clone Stamp Tool. Here you only need to select an area in the photo from which you can copy some of the pixels and, thus, restore the damaged area with their help. The cursor is placed on this area, after which you need to click the left mouse button while pressing the Alt key. Next, you need to move the cursor to the damaged area of the photo and click the left mouse button again. You may have to create a new layer to correct every major detail in the photo.
In order to close large damage, it is better to use the Patch Tool, which provides for the creation of a kind of patch that can be used to cover the damaged fragment of the image. To restore symmetrical details of the face, use the Flip Horizontal function from the Transform group to display the copied fragment as a mirror image horizontally. Then use Warp to transform the fragment so that it complements the photo. However, here you need to take into account that a person’s face is very rarely symmetrical, as a result of which a face restored in this way may look unrealistic. So, you will probably have to perform additional correction and shading of the restored fragment.
5. Color correction

Finally, download Adobe Photoshop. And the first task is to make black and white color, and make the lost color play with its original colors again. To do this, just use the keyboard shortcut Ctrl+L to bring up the Levels dialog menu. First, you can use the Auto button and look at the finished color correction result. If the result is not satisfactory, you will have to adjust the tone manually.
When working with Levels, the white and black point sliders will need to be moved to those points in the image where the histogram displays the beginning of areas with dark and light pixels. To increase the contrast and color saturation of a photo, you will also need to use the Match Color menu. Here you can increase the intensity of the color using the Color Intensity slider, and you will need to check the Neutralize checkbox to neutralize the emerging midtones.
6. Minor corrections, clarity improvements and general photo correction

If there are shadowed areas in the photo, they can be removed using the Shadow/Highlight option. To correct dark and light areas, you need to select the settings correctly so as not to lose detail in the image and not “kill” the contrast. To achieve a truly high-quality result, it is recommended to use Curves, with which you can further work out dark and light areas photographic images.
To improve the clarity of your photo, use the Unsharp Mask tool. Don't get too hung up on removing noise when restoring photos. Grain in old photographs looks quite impressive, adding a peculiar spirit of the times to the image.
Finally, you can try to make the photo more interesting and colorful by additionally adjusting the contrast and color saturation of the image using the Hue/Saturation option, which is called up by pressing Ctrl+U.
Printed photographs are fragile reminders of important points and events of the past. Often old photographs are available in a single copy, so damage to the photograph can greatly sadden the owner. Paper is exposed to moisture, water, sunlight and dust for years. Sometimes, if stored improperly, even new photographs can become unsightly. Learn the basic ways to recover photos, learn how to do them at home, and start storing your photos properly to preserve memories for generations to come.
Steps
Digital restoration of minor damage
- Open a new tab with a full-size photo to see the changes.
-
Repair tears and missing pieces. If your photo has tears, cuts, or missing pieces, use the Stamp tool to recreate parts of the photo and damaged areas. Select a tool and select the part of the photo where you want to copy or use information with a mouse click. Move the cursor to the area you want to restore using the copied material.
Print the image. After restoration, print the photo using an inkjet or special photo printer on glossy photo paper.
Secure tears with acid-free duct tape. Fix a tear or repair a torn photo with acid-free adhesive tape. Regular tape or adhesive tape contains an acidic adhesive that can damage your photo over time. Buy an archived one duct tape or tape with acrylic adhesive compound in the office supply department or specialty store. Cut small strips of tape and fix the tears with reverse side picture.
Use patch tape. A torn photograph can be repaired using paper tape and acid-free glue. Patch tape is available at craft stores or office supply stores. Apply a small amount of glue to a strip of paper and press it into the tear area on the back of the photo. Collect all excess glue with a cotton swab. Leave the photo to dry face down on a towel and weigh it down with a small book to keep the edges from warping.
-
Create a humidification camera for photos with warped edges. If old photos are curled or deformed at the edges, then this will help solve the problem homemade camera hydration. The camera will allow you to saturate the dry, fragile photograph with moisture so that the paper at the edges unclenches and straightens.
- Fill a plastic storage container with water room temperature 5–7 centimeters high. Place a wire rack in the container and make sure the top is not submerged. Place the photo on top of the grille and cover the camera with the lid. Leave for several hours. Periodically inspect the photograph and wipe away any water drops on the paper. Once the edges are straightened, remove the photo and let it dry face up on a towel. Cover the photograph with blotting paper or parchment and weigh it down with a book.
Use the right equipment. To restore photos at home, you will need a quality scanner and image editing software for your computer. So, you can purchase a photo editor like Photoshop and a scanner that allows you to scan photos into high resolution, which is measured in dots per square inch. The higher the resolution, the more detailed the scanned image will be. In most cases, a resolution of 300 dpi is recommended.
Scan the photo. Carefully place your photo into the scanner and select high-resolution scanning to capture every detail in your photo. Subsequently, save the finished image in TIFF format instead of JPEG. The TIFF format will increase the file size, but will provide high detail and quality of the image. Save the image and open it in a photo editor.
Crop the image. Use the appropriate tool to remove signs of damage around the edges of the photo. The edges of old photographs often warp when exposed to high humidity or water. If the damage is located around the perimeter of the photo, then cropping will help quickly solve the problem.
Remove scratches and traces of dust. The Dust and Scratches filter or the Spot Healing Brush tool in Photoshop or similar tools in other photo editors make the process of removing imperfections much easier. Zoom in on the image and use the mouse cursor to remove traces of damage. Take your time and zoom out periodically to monitor the results. The filter will also remove some detail, so don't overdo it.
Old photographs, rusted with age, have always aroused genuine interest not only among lovers of historical values. After all, they capture moments in the lives of our ancestors. And, although, in the historical and cultural aspect, it is these originals, crumpled and half-worn, that have the greatest value, in some cases it is quite difficult to get a full idea of who (what) is captured in the photograph.
All kinds of software are designed to help the modern researcher, allowing him to restore the image as much as possible without losing information content. For example, the capabilities of only one Photoshop editor already allow you to approach this issue creatively, correcting not only all kinds of damage to the photo card, but also restoring approximate color scheme, appropriate to the specific situation.
First, you need to scan the existing rarity and save the resulting jpeg file.
Having opened the original image in the editor’s working window, let’s evaluate the complexity of the work ahead. The fact is that the file in question has minor damage (fold lines, partial abrasions and a torn edge). We pay attention to the faded (weakened) photo layer last, since mandatory color correction will help get rid of the sepia tone.
If part of the face is missing on a portrait photograph, then it makes sense to look for some other images of this person. Only in this case can you count on a reliable final picture.
All attempts to complete the missing (eye, ear, for example) parts of the face by sequentially selecting, copying and reflecting (editing \ transforming \ reflecting) the selected area do not in any way contribute to obtaining a believable portrait.
Without going particularly into the physiological features of the human structure, it is worth noting that symmetrical faces do not exist.
So the file is open.
(click to enlarge)
The next step (mandatory) will be software recoding to another (LAB) image mode. This measure is necessary because the separation of channels in LAB is based on a different principle than in RGB. And in our case, such a division into an independent brightness channel and two independent (red-green and blue-yellow) color channels from each other allows us to reduce the brightness of the kinks without affecting the color palette at all.
Image recoding in LAB occurs after selecting the appropriate mode in the submenu of the “mode” line of the “image” tab.

(click to enlarge)
Leave it visible and select the “brightness” channel. Since the main color axes remained hidden, the image in the working window of the program is displayed without a combination of RGB colors, only white and possible shades of gray.
To remove breaks and scratches, use the “stamp” tool,

(click to enlarge)
defining (clicking with the left mouse button while holding down the alt key) as the starting position for copying, the point above the break, on the border of the frame and the image. To avoid sudden transitions, the “pressure” value should not exceed 50%. By moving the working brush of the tool along the fold line, we get rid of the unwanted defect. In the same way, we remove other scratches and small cracks from the scanned photograph.

(click to enlarge)
We get rid of the dull white stripe that occurred on both babies using the “dimmer” tool (exposure no more than 15%).

(click to enlarge)
Having returned visibility to the remaining channels, we immediately see the difference between the image and the frame (deliberately left without adjustment).

(click to enlarge)
In a way already known to us, we return to the RGB mode and using the “blur” tool, with an intensity of no more than 20%, we get rid of pixelation and specific grain on the faces.

(click to enlarge)
The next type of this tool is “sharpness”. Allows you to select eyes and lips by briefly pressing the left mouse button

(click to enlarge)
After correcting the texture of the image, through the “image” tab we convert it to a simplified black and white palette.

(click to enlarge)
We adjust the exposure, giving the photo the necessary sharpness at the boundaries of black and white.

(click to enlarge)
Frankly “littered” dark tones, at the bottom of the photograph, a torn edge and useless frames - we remove them by cropping the image with the “crop” tool. In fact, the restoration of the rare source can be considered complete.

(click to enlarge)
Additional processing, which allows you to colorize a black and white picture, also does not present any particular difficulties, but it will require much more time.
To do this, you will need to turn on editing in quick mask mode under the “selection” tab and select the “brush” tool. We shade, for example, open area skin, excluding eyes and jewelry.

(click to enlarge)
Uncheck the edit box under the quick mask and invert the resulting selection. Coloring the selected area can be done in several ways, among the most common is the use of a photo filter (the “image” tab, the submenu of the “correction” line)

(click to enlarge)
and using (under selection) an adjustment layer, oriented by color (in this case, the “overlay” mode is required).

(click to enlarge)
Highlights are created for each part of the image, presumably having differences even in halftones. And gradually the entire photograph is colored.

(click to enlarge)
Restoring a print, even one made from color photographic film, is a fairly simple process and can be done by automatic means corrections in Photoshop.
The proposed image clearly shows a color mismatch (most likely due to an incorrectly selected film).

(click to enlarge)
The “image” section of the tab, which includes auto-tone, auto-contrast and automatic color correction, is capable of correcting the proposed image in the shortest possible time.
Cropping will give the image a finished look.

(click to enlarge)
Finally, I got my hands on Odnoklassniki. I registered an account a long time ago, but I didn’t get around to filling it all out. What should I fill in? Well, photos of course! Latest photos, as you yourself understand, everything is already in digital format, but the old family and school ones are only in paper form. I looked at the already faded and wrinkled paper photos and realized that it was necessary to immediately digitize and restore them, otherwise after a while it would be too late.
 Having restored several old photos, I decided to write a short step-by-step article for beginners on how to get a completely acceptable result with practically no experience, within about an hour of work using a scanner and Photoshop, as well as skillful hands.
No sooner said than done! And so let's start in order. First, let's scan a paper photograph with a resolution of 600 dpi, as a color image (even if your photo is black and white), into jpg format, approximate file size 3-5 MB.
1. Launch Photoshop and open the scanned file. To do this, click the “File - Open” menu and specify the path to the file.
 2. In the Toolbar, select the “Spot Healing Brush” Tool, set the brush size we need (depending on the defects, its size can be changed in the properties), press Ctrl++, zoom in on the defect and place the crosshair (circle) in the center, start clicking with the left mouse button removing scratches, dirt and other defects.
 3. If the defect is too large, then use the “Stamp” tool. Place the crosshair (circle) on the undamaged area of the photo and press the Alt button, as soon as the cursor changes, click the mouse, then place it on the defective area and click, moving it and thus gradually restoring the photo.
4. By using one or the other tool alternately, you will gradually restore the photos. If you make a mistake, roll back one or more steps using the “History” option.
 To finalize the photo, use the following tools: “Frame”, cut to frame, and Autotone, Autocontrast and Automatic color correction.
There are no similar publications.
How to professionally restore such a photo?
In this lesson we will study in detail how to restore an old torn photo. I am sure that your family archive or your clients have such photographs. Therefore, the skills of a photo restorer will definitely come in handy.
Introduction
When choosing material for this lesson, I ran into a problem - I didn’t have a damaged photograph on hand. In the end they sent it to me. After scanning and in terrible resolution. But she came up perfectly to show - good results You can achieve this with scanned photos of poor resolution. Let the print size in this case remain small.
I will guide you through all stages of recovery. Some of them just need to be remembered and repeated, however, this does not mean that you do not need to be creative and not look for other options.
These are the stages:
1. Make a copy of the original
2. Change the resolution and crop areas you won't be working with
3. Restore the necessary areas of the image
4. Remove noise and unwanted elements
5. Even out the light/shadow level
6. Even out brightness and contrast
7. Adjust sharpness
Step 1
Let's start right away with photo restoration. Because you can crop the image and set the resolution yourself. First I use Patch Tool for rough preliminary work with large areas. Then I switch between Patch, Healing Tool And Clone Tool. Next, I will explain the choice of this or that tool.
Step 2
The patch works the same way as Marquee Tool. Circle the area you want to correct. Then click in the middle of the selected area and, holding the button down, move the selected area to a similar part of the photo. Make sure you level the selected area before you begin. Then proceed to the next step.

Step 3
Make sure the shades are aligned on the background. Notice how Patch saves time. Therefore, you need to start photo restoration with this tool.

Step 4
After processing all large areas of the photo, change the tool to Healing brush(I marked it in red in the picture below) and Stamp(marked in green). Feel free to experiment with these tools as you work. Especially if you want to dig deeper into the topic of photo restoration than the initial level.
Keep in mind that minor imperfections in the photograph - marks, scratches, dots - can be quickly and conveniently removed Spot Healing Brush. During the work, I changed according to the situation Spot healing brush to regular Healing brush and back.
As you can see from the photo below, I used Stamp along the edges of the picture. Healing brush And Patch usually leave unwanted effects around the edges of the image. Try it and see for yourself. Once again, change tools at your discretion. And experiment freely with them to achieve the desired result.

Step 5
Now we are done with the first part of the restoration.

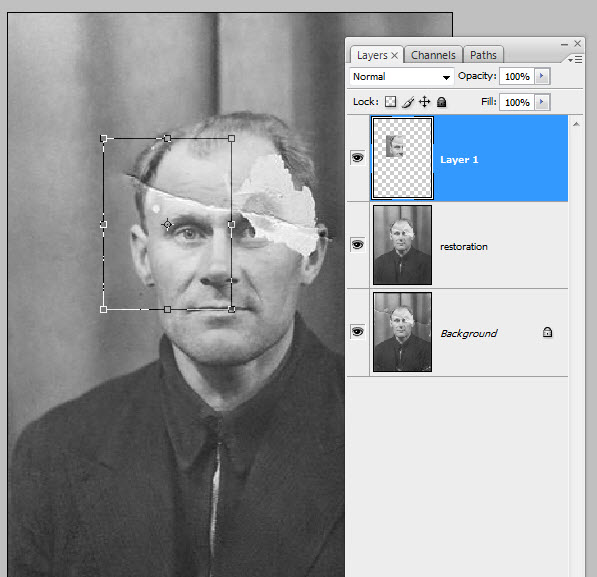
Step 6
Let's move on to serious image defects. We use the right eye to replace the missing left eye. To do this, use a rough selection for the eye, and press Ctrl+J to copy the selected area to a new layer.

Step 7
Press Ctrl+T to select Free Transform.
Step 8
Right-click on the highlighted area and select Flip Horizontal.

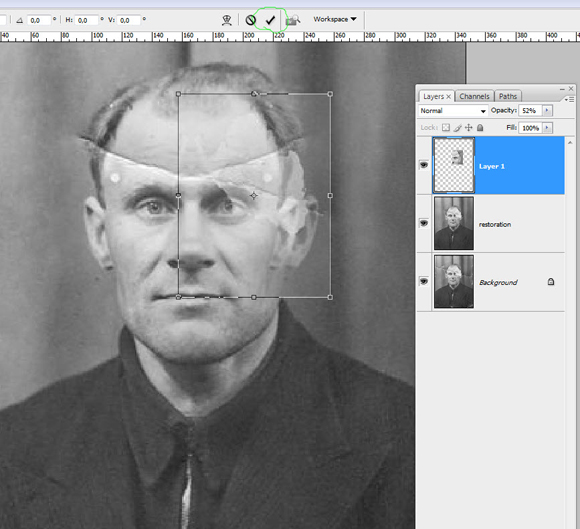
Step 9
You have dragged the selected area to the place where the eye should be. But you will probably want to straighten it out and reduce the opacity. And also remove noise under the new layer. Align the eye, and then press Enter or click on the area that I highlighted with a green circle (see photo below) in order to apply the changes. Then increase the base opacity to 100%.
Step 10
Now select the layer, click on the mask button (which looks like a green circle at the bottom) to confirm the mask.

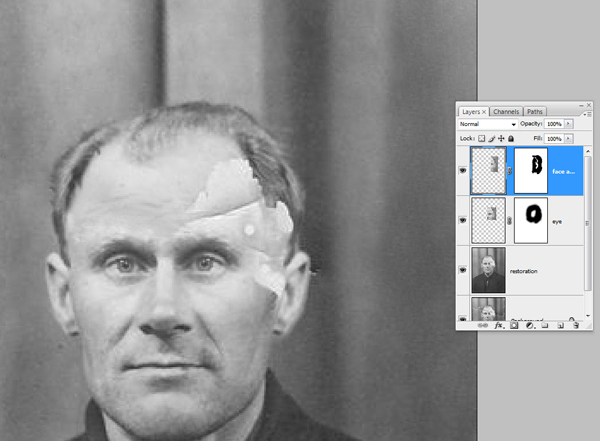
Step 11
Now we will paint black over the mask in order to hide the areas that we do not need. When using masks, keep in mind the following rule: white reveals, black hides. If you need a soft transition, use gray. You can lower the opacity of the brush until the strokes remove only what is not needed, creating the desired level of transparency between layers.
Hint: keep your finger on X, to quickly switch between black and white - you will have to do this often. A D key will do the front and backgrounds black and white, if their colors are different. If you only need a mask to smooth the area, hold down the Alt key and click on the mask.


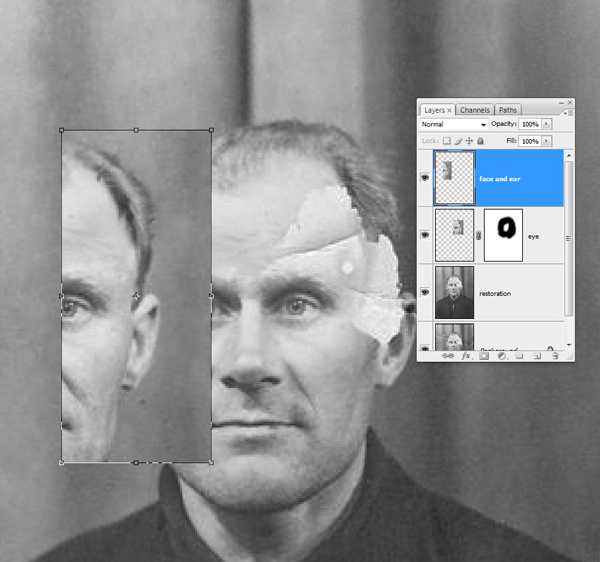
Step 12
Let's do the same with the ear as with the eye. you can use free transformation depending on the photo you are working on. In the case of the ear, I used deformation. I also slightly adjusted the hairline by rotating and changing the scale. At the same time, I cloned where it was necessary.
Step 13
After you have put the large parts of the image in place, we will return to the stamp and retouch all the edges. I place the retouched layer on top of my own. You may also need to reduce the opacity of the stamp to better control behind the cloning process. At the same time, keep your fingers on Ctrl+Z throughout the entire process.

Step 14
Often during retouching you have to use different layers to different parts. To get rid of unnecessary layers, use merge function. I usually do some work on multiple layers and then merge it into a rough layer. But I never do this with base layers.
Don't do a merge if you think you've missed something! Give yourself the opportunity to go back to the retouched layer and make adjustments.

Step 15
We are done with the restoration.

Step 16
Let's group all the layers. To do this, press Ctrl+G. Now create a new layer from this group using the command Ctrl+Shift+Alt+E and rename it “noise”. This is a layer to get rid of excess noise in the workspace.
There is something else that I may not have mentioned. As you can see, the original file serves as a background layer, which I eventually turn off. I always keep the original PSDs and can always return to them using the Ctrl+J command. Basically, I make an extra copy to work with and then switch to the background.
Clue: If you hold down the Alt key while clicking on the eye that is on the background layer, you will activate this layer and turn off the others. Another press will bring everything back. This is useful for quickly comparing differences.

Step 17
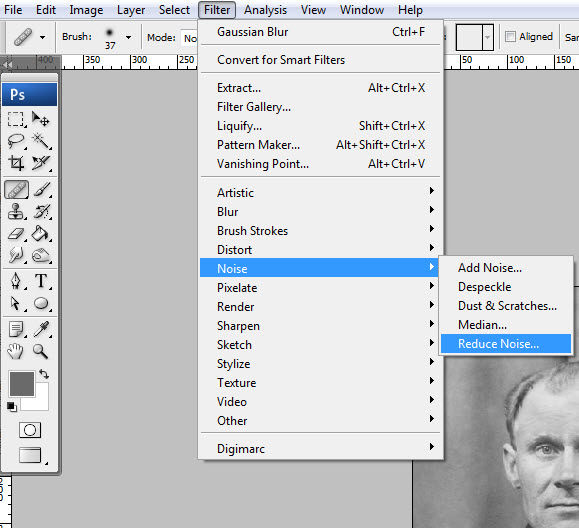
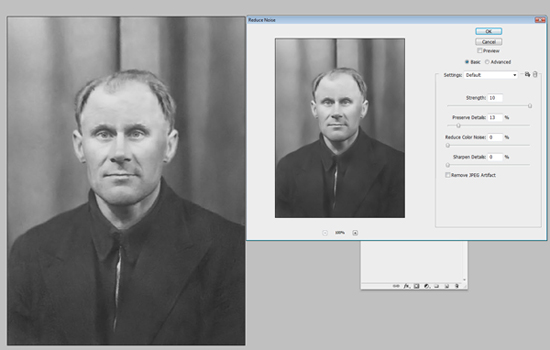
Now we will remove noise from the image. There are several ways to do this, but I use for this Filter > Noise > Reduce Noise. I slightly changed the noise reduction settings - I set the strength to 8 and detail to 20.
Another hint: go to the advanced view and turn the strength to maximum in the blue channel and the detail to 0. In the red channel, do the same with the force and slightly increase the detail. This way, the red channel will contain more detail without being too blurry.
Step 18
After reducing noise, let's move on to sharpening. Fine-tuning sharpness is a topic for another article. So now we use the function Sharpening (High Pass). To do this, try the settings below.
For the tutorial I increased the variables too much. Not the way you would want to see in black and white photography. For example, the edges should be made sharper. There are a few more technical features that must be kept in mind.
Once you have sharpened enough for printing, you will want to add sharpness for the monitor screen. Remember - printers blur the image slightly when printing. By applying Sharpening, set the blending mode to Overlay or Soft light(Soft Light). I usually sharpen a little more than necessary. And then I adjust the opacity level.


Clue: Often you only need to sharpen certain parts of the image. In the example below, I created a mask and painted everything except the face, so only that was left sharp. Often this technique is used for the eyes.
This technique works well in combination with curves, which can be used to lighten or darken areas. If you only need to make your eyes lighter, you can create separate layer for curves. Press Ctrl+I to invert the mask, making it black, and lighten only the eyes. It's easier than painting over everything unnecessary.

Step 19
This is the last step. Here I adjusted the contrast using the S-curve. I didn't include this step in my original file. But you can apply it before adjusting the sharpness. I myself often use the command Ctrl+Shift+Alt+E to create a new layer below the previous ones. I did this here too.
I placed the curves layer above the noise layer, and then merged all the underlying layers into one. After that I adjusted the sharpness using a filter Sharpening, keeping the curves layer intact. After which I decided to go back and work on the previous two steps.

Conclusion
Here I described the process of restoring an old torn photograph. Keep in mind that each step can be worked in much more depth. Always experiment and think about what else you can add to make the job easier and achieve better results.


. Fill in the missing letters and explain the spelling of the words.")


- Turkey stewed in a slow cooker: spicy, with vegetables, in sour cream, cream and walnuts
- Types of speech: description, narration and reasoning
- Girls and women almost always associate white shoes with a wedding dress, although the white color of shoes has long been no longer required. A...
- New
- Why you shouldn't cry in front of the mirror
- Martyrs Tatiana. Moscow Church of St. Martyrs Tatiana Temple of the Martyr Tatiana at Moscow State University schedule
- Milotici: return of the Russian village Moravov Alexander Viktorovich
- Making sounds for children Lessons on making sounds for children
- Recommendations: what to grease the pies to make them rosy and appetizing
- Actors Spiderman Aunt May Aunt May in Spiderman
- What does a lizard tattoo mean?
- Deciphering the natal chart of the house
- What does mulberry help with?
- Photo report “Birthday of Samuil Yakovlevich Marshak in the group”
- Breathing at high pressure Breathing correctly at high pressure
- Bryansk State University named after
- Tasks to test spelling and punctuation literacy
- Application...burning, grow...sti, to...sleep, m...roll, warm...up, sk...roll,...
- The Forex Economic Calendar is a reference book for every trader, regardless of trading experience and level of professionalism, and especially...
- Interesting signs about spiders