DIY greenhouse: the best projects and assembly recommendations. Ideas and ready-made solutions for building the cheapest greenhouses with your own hands How to make a greenhouse with your own hands
Ecology of consumption. Estate: With the onset of spring, every summer resident is faced with the task of planting seedlings and their further planting in open ground. Simple and cheap greenhouse design from plastic pipes Suitable for all summer residents and owners of country houses without exception.
Many summer residents strive to provide themselves with self-grown vegetables for the whole year. But due to climatic features, it is not always possible to achieve this goal in those areas that are located in the northern regions of our country. An excellent solution This problem is the construction of a greenhouse on a garden plot.
True, not all gardeners have the financial ability to purchase a ready-made factory greenhouse. For such people, a way out of the situation may be to build greenhouses from plastic pipes with their own hands.
You can design and build a greenhouse from plastic pipes yourself, without resorting to outside help. And such a greenhouse made of plastic pipes will serve throughout the year, for several seasons in a row. Obvious advantage, when building greenhouses from plastic pipes, is the prevalence, long service life and low cost of polypropylene products.
CHOOSE A LOCATION FOR CONSTRUCTION
When choosing a future location for building a greenhouse made of plastic pipes, you should take into account a number of factors that affect the quality and quantity of the future harvest.
There are the following options for placing a future greenhouse made of plastic pipes on a garden plot:
- You need to place a greenhouse made of plastic pipes, created by yourself, in an open space, away from other buildings on the site and large garden trees. This placement option can be combined with the placement of small shrubs and plants around the greenhouse. This will add aesthetic appeal to the building.
- If, due to the small area of the site, it is not possible to use an open space of sufficient area, you can provide for the location of the greenhouse with one side adjoining the wall of an already erected building, house or barn. With this option an important condition will be the location of the other sides of the greenhouse on south side in order to obtain the maximum amount of sunlight.
SELECTION OF FORMS
The most common form when constructing a greenhouse from plastic pipes is an arched structure. This is primarily due to ease of construction and relative cheapness.
When choosing a form for the construction of a future greenhouse from plastic pipes, it is necessary to take into account the characteristics of the garden plot and the place chosen for the installation of the structure.
If the greenhouse made of plastic pipes will be located in an open area, then it is better to choose a gable model. In the case where the greenhouse will adjoin one side to the wall of an existing building, it is more advisable to choose a lean-to model.
The base of the greenhouse can be made in different ways geometric shape, be it a square, rectangle, circle, oval or trapezoid. IN Lately Tent-shaped greenhouses are gaining popularity.
Attention! Greenhouses of this design have greater light transmission than classic versions.
PROS AND DISADVANTAGES OF BUILDINGS FROM PLASTIC PIPES
Construction of a greenhouse from plastic pipes has a number of advantages over structures made from other materials:

The main and, apparently, only drawback when building a greenhouse from plastic pipes is its lightness. This can cause the entire structure to sway in strong winds. At the same time, this problem can be solved by using additional metal rods driven into the ground to strengthen the structure.
MATERIALS AND TOOLS REQUIRED FOR CONSTRUCTION
Before you make a greenhouse from plastic pipes, you should make a calculation necessary materials and tools. It is recommended to do this immediately after determining the location on the site for the future structure. Such measures will help to avoid additional costs already at the construction stage of the structure.
So, for work you will need:
- Beams or boards to form the base of the greenhouse. It is recommended to treat before starting construction wooden elements special protective substances that will protect the wood from rotting.
Advice! To save money Money It is recommended to use non-branded professional products for processing wood, and improvised ones. For example, soak wooden beams resin, coat with drying oil several times, and treat with a blowtorch.
- Polypropylene pipes. It is necessary to calculate how many linear meters will be needed to build a greenhouse. For a more accurate calculation when building a greenhouse from plastic pipes with your own hands, it is recommended to make a drawing of the future structure. After receiving a certain footage of plastic, you can add 10% of total length for stock.
- Polyethylene film is used to cover the polypropylene structure. It should be strong enough. High strength will protect it from tearing and allow it to be used for several seasons.
- Several metal rods. The reinforcement must be at least 1 m long.
- Nails and screws.
- Handles with locks and hinges for installing doors and windows in the greenhouse.
- Additional metal loops for attaching individual plastic elements designs.
CONSTRUCTION OF A GREENHOUSE
If, at the stage of calculating the materials used, a detailed drawing of the future structure was drawn up, then you can immediately begin directly building the greenhouse. Otherwise, it is recommended to draw up a detailed diagram of the structure - this will significantly simplify and speed up construction work.
INSTALLATION OF FOUNDATION
Before you make a greenhouse yourself from plastic pipes, you need to create a foundation. Under future foundation greenhouses need a flat, flat area with a small depression. Therefore, before starting work, you must level the ground and make a small depression of a few centimeters. As a material for the foundation, you can use either boards or wooden beams.
Attention! Before proceeding with the installation of the foundation, the wooden boards must be cleaned with a planer or sandpaper, and also treat with protective substances.
To strengthen the foundation of the future structure, it is recommended to use additional metal brackets or corners. Metal corner attached at each internal joint wooden planks. If timber is used as the material for the base of the greenhouse, it is more advisable to use staples that are driven in at each external joint of the structural elements.
The finished foundation should lie tightly on the soil prepared for it. If there are gaps between the foundation and the ground, they must be covered with earth.
FRAME INSTALLATION
After building the foundation, along its outer perimeter, metal reinforcement should be driven into the ground in increments of no more than 100 cm. Pre-prepared and cut sections of plastic pipe of the required length are placed on these metal rods.
To secure plastic pipes, self-tapping screws are used, with the help of which the base of the pipe must be pulled to wooden foundation. Plastic couplings, corners and crosses are used as connecting elements in the horizontal plane of the structure, which must first be drilled inside. This will allow the pipes to pass through the connectors.
WE CREATE A ROOF
When choosing a material for building a greenhouse roof, you should take into account the features of some of the most common options:
- The optimal and common material for covering a greenhouse is polyethylene film. If financial capabilities allow, you can use a special reinforced polyvinyl chloride film as a covering. This material has good thermal insulation, which will allow you to maintain desired temperature in a greenhouse even at night. At the same time, this material is highly transparent and transmits up to 95% of sunlight during the daytime.
- A polycarbonate roof has the longest service life, but is more expensive and can present additional difficulties during construction. In addition, such a roof cannot be quickly dismantled, unlike a polyethylene one.
- Textile material for covering of the “agrotex” type has low thermal insulation. True, the lightness and simplicity of this material allow installation and dismantling work to be carried out in the shortest possible time.
CONCLUSION
To summarize, we can say that the option of independently building a greenhouse from plastic pipes in a garden plot seems to be the most acceptable option. Such designs have a number of undeniable advantages. These include the lightness and strength of the structure, its durability, ease of installation and dismantling works. In addition, such greenhouses are ultimately the cheapest option, and from an aesthetic point of view they are in no way inferior to expensive factory-made counterparts.
We will learn how to build a greenhouse from plastic pipes with our own hands from the video
SUBSCRIBE to OUR YouTube channel Ekonet.ru, which allows you to watch online, download free videos from YouTube about human health and rejuvenation. Love for others and for yourself, how the feeling of high vibrations is an important factor in healing - website
Please LIKE and share with your FRIENDS!
There are many reasons for self-construction, most often they are not suitable ready-made solutions offered by industry, their high cost. Let's consider the most affordable ones, enough effective ways building a greenhouse.
Why do you need a greenhouse? If it’s for growing seedlings and extending fruiting periods, that’s one thing. If for industrial year-round cultivation of vegetables and fruits, this is different. I think that those who are building a greenhouse of 300 m2 or more already know the methods for constructing a greenhouse.
Greenhouse dimensions determined by the ease of maintenance of its internal space. One of the main criteria is the width of the track. Why so much attention to the tracks? An error in planning will make it impossible to transport fertilizer, products, and equipment. It is most rational to make the width of the tracks according to the width of the wheels of the widest wheelbarrow, at least 0.5 m.
The greenhouse area must be carefully planned for rational use internal space, the cost of m2 is quite high. Calculate the cost of materials, time spent and think whether you need it or not.
If you need a small greenhouse, it is better to make a greenhouse on arcs 1-1.5 m high, covered with film.
Greenhouse width is chosen based on the ease of maintenance from the path, i.e. at what distance you can efficiently process the bed without stepping on it. Practice suggests the best ratio: the width of the path is 0.6 m, the width of the greenhouse is 3 m, leaving 1.2 m for the beds. If you want to expand the greenhouse to two paths, the total width of the greenhouse is 6 m: two beds at the walls are 1.2 m each, one in the center is 2.4 m. But 3m is more convenient, easier to build and maintain.
Greenhouse length determined by the assigned tasks, the capabilities of the site, and the availability of free space. There are optimal length-width ratios. With a width of 3 m, the optimal length ratio is 6-8 m, due to ease of maintenance, ventilation and heat preservation.
Greenhouse height determines ease of maintenance and a list of plants. For example, only tall tomatoes are grown for greenhouses. Walking around the greenhouse in a bent position is unacceptable, so the height is at least 2 m.
Greenhouse shape can be any, single-slope, gable, complex shape. General recommendations: height of the side walls - 1 m, slope angle of the slopes - 45 degrees, height along the paths - at least 2.2 m.
Interesting is the experience of using the southern walls of house buildings for arranging lean-to attached greenhouses. It is worth considering only if there is no space for a full-fledged greenhouse: the wall becomes saturated with moisture and becomes covered with mold, and the wall needs to be heated.
Summing up the choice of sizes, we determine: width – 3m, length – 6m, height – 2.5m, shape – gable.
Greenhouse frame material
Frame materials can be anything: wood, metal, coated profile metal. There is positive experience in using reinforced concrete mullions and old window frames. Coatings used: film, glass, polycarbonate.
Let's look at the most successful greenhouse designs.
Greenhouse made from old window frames
When replacing old windows in high-rise buildings, the problem of their disposal has not been solved. Old frames with glass can be easily found through janitors and housing office workers. After cosmetic repairs they will still last for 10-20 years, being a ready-made frame and excellent insulation for the greenhouse. Having standard DSK dimensions, they are easily assembled into blocks. It is necessary to lay a stone edging around the perimeter of the greenhouse, raising the frames 0.3 m above the ground, protecting them from rotting. To increase the rigidity of the entire structure, we screw the frames to the longitudinal rails with self-tapping screws, and fill the narrow cracks with foam. It is convenient to use balcony frames with doors for the entrance, installing them at the ends; they also allow you to ventilate the greenhouse.
This greenhouse is the cheapest and most quickly erected, highly maintainable, and most importantly, one of the warmest.
Greenhouse made of wood
Easily erected structures, often made from available materials, the plasticity of wood allows you to conveniently attach any coating: film, glass, polycarbonate. The problem with application is wood rotting under conditions of high humidity and temperature, especially when in contact with the ground. The problem of accelerated deterioration of wood in the ground is easy to solve. It is necessary to install support pipes made of metal or asbestos, raising the level of entry or fastening of wood above the ground by 0.3 m.
The most common material for greenhouses, quite cheap and easy to use.
Metal greenhouses
It makes sense to use it in the presence of cheap black or profile galvanized metal. A profile design is preferable; the calculated shape and thickness of the metal ensures that it can withstand wind and snow loads. The coating allows you to extend the service life to 15 – 20 years.
These designs have not gained significant popularity due to their high cost, low maintainability, and it is problematic to attach film and glass coatings.
Greenhouse on racks made of reinforced concrete structures
Exotic, but long-lasting material. It is convenient to use in the presence of waste reinforced concrete supports, support posts for wooden supports. There is only one installation condition - the depth of the pit for the support is at least 1.5 m. It is easy to mount horizontal longitudinal structures made of metal and wood on supporting vertical posts with flat edges.
Greenhouse covering
Cover the frame to create greenhouse effect maybe ok unit cost the following materials: film, glass, polycarbonate.
Polyethylene film for greenhouses comes in several types:
- Heat-saving, containing an adsorbent that does not allow infrared radiation of the soil to pass through at night, increasing the night temperature inside the greenhouse by 3-5C;
- Ultraviolet stabilized, allowing to increase the service life of the film under the influence of solar radiation from 3-6 months to 1-4 years;
- Light-scattering, protecting plants from harsh direct irradiation with sunlight, which primarily destroys seedlings;
- Two-layer, allowing you to retain heat, one of its varieties is a foamed film, consisting of an outer layer - monolithic, and an inner layer - foamed;
- Anti-condensation, allowing the formed condensate droplets to flow down, improving the passage of light through the film, preventing drops from falling on delicate seedlings, leading to their damage.
The film is not a durable material, the maximum service life is 2 years. The advantages include fairly low cost, ease of use on wooden frame. The wide range of films used makes it possible to implement the features of greenhouse technologies through the coating.
Glass- most old material according to application, with high light transmittance - up to 95%. Disadvantages include: high weight, difficulty in fastening, fragility. The frame under the glass must be rigid; vibrations cause the glass to collapse.
Polycarbonate- modern, practical material as standard sheets, taking the best from polyethylene and glass.
For greenhouses, cellular polycarbonate is used - a two-layer structure with stiffening ribs inside, which has remarkable properties:
- Thermal insulation properties are 3-4 times better than glass;
- Impermeability to ultraviolet rays;
- Sufficient plasticity allows you to give it any greenhouse shape; it is 16 times lighter than glass;
- Easily attached in standardized grooves through the plane of sheets;
- Allows you to withstand significant mechanical loads in the form of snow, wind, hail.
Selection priority
What to choose from the variety of materials? Let us make a few recommendations. The ideal greenhouse is metal carcass with anti-corrosion coating, having special grooves for installing polycarbonate. Although this is a rather expensive design, it pays off due to its durability and properties.
The second most practical option is a greenhouse made from old frames, due to its low cost and thermal insulation.
The third is a wooden greenhouse with a polyethylene coating. For convenience, glass can be used on the side walls.
For small greenhouses, it is better to use small frame forms in the form of small sections of semicircular pipes stuck into the ground. The film is stretched over the pipes, one edge is dug in, the remaining edges of the film are pressed with pipes or bricks for ease of access.
A more common form of a small greenhouse is the same semicircular pipes welded around the perimeter into a frame. The film is stretched over the frame and secured. Access to seedlings is facilitated - by lifting the frame and placing it on a spacer, it is convenient to work with plants.
On this moment Ordering ready-made greenhouses is not done too often. Owners of personal plots try to collect them themselves, with their own hands. This is understandable, because it is possible to make a design that will fully meet the gardener’s needs.


Construction of a greenhouse: main stages
When we think about how to build a greenhouse with our own hands, with or without heating, from what material, what shape, a lot of ideas come to mind. However, in any case, self-construction any type of greenhouse will have many similarities. They will be discussed further.
How to build a greenhouse yourself: design and drawing up drawings
The construction of even any greenhouse is not complete without design, even a primitive one. Conventionally, it can be divided into two stages. The first is drawing up a sketch. It reflects the basic parameters of the greenhouse, which are then specified in the drawings:
- Geometry.
- Dimensions.
- Character of the frame.
- Presence/absence of foundation.
- The nature of the foundation, if any.
- The type of materials from which the frame will be assembled.
- Type of covering material.

How to build a greenhouse with your own hands, from wood or any other material: an example sketch
Next are the drawings. Standard, three projections: side view, end view, roof. If there are design differences on duplicate sides, they are drawn separately. If there is a foundation, draw it separately, also in three projections. We calculate and set the exact dimensions of the building, the type of fastening points, the pitch between elements, etc.

Drawing - diagram of the end part of the greenhouse
Note:if you plan to build a large greenhouse, then we also make a drawing general view, where the structure will be displayed with covering material. Fastenings for polycarbonate/film are also drawn here, depending on what will be used. This drawing will be useful when calculating required quantity, and then cutting out the covering material.
How to build a polycarbonate greenhouse yourself: it is advisable to make a general drawing
How to build a greenhouse, the video describes the construction of a wooden arched structure
Preparing the work site, pouring the foundation
The working field is prepared as standard: clearing + leveling + marking. The latter can be single- or double-circuit. Single-circuit marking is suitable when you need to build a greenhouse without a base - in this case we simply mark the future location of the structure. Under the foundation we make two contours that define the width of the trenches.
Under the stretched cord, a layer of earth is removed to a depth of about 10 cm - this is a kind of marking that allows you to remove the cord and start digging. Foundation trenches are dug to a depth of 35-50 cm, depending on the type of greenhouse you want to build.

Marked construction site
We build formwork along the edges of the finished foundation trenches. Its height depends on the presence + height of the base. Additionally add 10 cm to the free side. Next step by step:
- Sand - 10 cm layer, compacted.
- Crushed stone – layer 15 cm.
- The reinforced belt is double-circuit, tied to rods driven vertically into the bottom of the trenches.
- Embedded parts or anchor studs.
- Cement-sand mortar, 3 to 1.
- Polyethylene film. It is used to cover the foundation until it reaches preliminary strength (36 hours).

Formwork for the foundation
How to build a greenhouse: assembling the frame
After stripping the formwork, we begin to attach the strapping, on which the construction of the greenhouse frame will then be carried out. The strapping is made of wooden beams or thick boards, screwed to the foundation using embedded parts or anchor pins that were previously concreted into it. We tighten the nuts tightly, but without pressing them into the wood.

How to build a greenhouse with your own hands, a frame is screwed from wood onto the foundation
The frame for further construction of the greenhouse is secured to the harness as follows:
- Metal profile - with screws.
- Wooden - with self-tapping screws.
- From plastic pipes - with metal clamps.
All stages of greenhouse construction must be accompanied by level checks. This is necessary, since a slight misalignment of the greenhouse base can lead to problems when assembling the roof.

How to properly build a greenhouse with your own hands: the frame can be attached to a harness different ways
Note:compound individual elements During its construction, the frame can be made in different ways. The simplest one is to use crab clamps, cross clamps, as in the photo, and triple or double clamps. Through screws and welding are also used. Which one to choose – it all depends on your preferences, physical and technical capabilities.
How to build a greenhouse with your own hands, from polycarbonate or other material: assembling the frame
How to build a winter greenhouse with your own hands, the video illustrates the process of assembling the frame by welding
Covering material
The last stage of greenhouse construction is the installation of covering material. The simplest ending is plastic film. We throw the cloth over the greenhouse and throw a fishing net or a system of several ropes on top. This will help to attract the polyethylene more tightly to the building frame. We press down the material at the bottom with pieces of wooden blocks, stones, or fasten it with special clamps.
We begin installing polycarbonate from the ends, then move on to the remaining parts of the structure. For fastening we use thermal washers, we clamp the joints of the sheets with connecting profiles. We close the sections with an end profile, having previously covered them with punched tape.

How to build a greenhouse with your own hands, the easiest way to make a covering is from film
A bit more useful information on how to build a polycarbonate greenhouse with your own hands, the video contains a story about installing polycarbonate and insulating the building for year-round use
A greenhouse is a section of the garden that is not affected by the vagaries of weather and factors environment. Here you can create the microclimate necessary for plants. The greenhouse allows you to grow vegetables even in winter. In addition, it makes it possible to arrange a greenhouse and winter garden, where you can all year round admire the greenery and flowers.
Making a greenhouse is not as difficult as it might seem at first glance. It is enough just to know what the structure consists of, as well as general laws its functioning. Many gardeners and owners of summer cottages build such structures on their own. In this article we will talk about how to properly make a greenhouse with your own hands, and show photo and video instructions.
Basis of design
The greenhouse consists of several parts. The basis of the entire structure is the frame. When choosing a frame, you must take into account that the strength of the entire building depends on its strength. Today you can find three main types of frames: wood, PVC and steel.

- The wooden frame is easy to install. However, it is not resistant to various factors external environment.
This design has to be specially processed additionally, but this does not guarantee strength.
The advantage of wood is that it is a natural, environmentally friendly material.

- Steel structures are very durable, wear-resistant and strong. They can withstand increased loads. Having installed such a frame, you don’t have to worry that the greenhouse will be damaged by snow, wind or hail. Steel is the most popular material for greenhouses. Very often, gardeners choose galvanized steel profiles.
The metal must be treated to protect against corrosion.
Some gardeners believe that metal will negatively affect the growth of vegetables and other plants. However, the assumption that plants develop worse in steel greenhouses is nothing more than a myth.

- Constructions made of polyvinyl chloride are environmentally friendly, durable, and safe. Their strength depends, however, on the strength and thickness of the profile. The advantage of this material is that it allows you to create sealed systems in which the microclimate is completely regulated by the owner. The disadvantage of PVC greenhouses is their relatively high cost. Winter gardens are often installed in PVC structures, which serve as relaxation areas for the owners.
Before you build a greenhouse at your dacha, you need to carefully select the material for the frame.
Materials for covering greenhouses
To protect plants from unfavorable conditions environment, you need to choose for the greenhouse good coverage. There are several solutions to this issue available on the market today. There are three main types of coatings: glass, several types of special films and PVC materials.
It is better to choose durable glass as a coating. Triplex or tempered glass is suitable for greenhouses. If it is not possible to install any of these types, then you will have to install several glasses. The best option- This is an unbreakable coating that can withstand the load of snow, hail, and wind.
Glass transmits well Sun rays However, along with useful infrared radiation, ultraviolet radiation also enters the greenhouse.
Film is the most popular material for greenhouse construction. It is durable, wear-resistant and can last for many years with proper care. Recently, several types of film have been produced specifically for greenhouses and greenhouses.
- Light-converting film is useful because it converts ultraviolet radiation into infrared radiation. This stimulates the growth of vegetation and allows you to obtain good harvest from greenhouses.
- Reinforced film has increased strength. In addition, it protects against frost. This is the type of coating that most owners of such structures choose.
Polyvinyl chloride materials also found their supporters, monolithic and cellular polycarbonate, as well as transparent acrylic plastic are widely used in the construction of greenhouses.
Cellular polycarbonate is especially in demand.

The plates of this material do not fade, look very aesthetically pleasing and serve long years. Possessing excellent heat-insulating properties, cellular polycarbonate is resistant to all natural factors. He is not afraid of either frost or heat.
You need to use cellular polycarbonate depending on the thickness:
- 3.5 mm - used in the construction of greenhouses and greenhouses;
- 4 mm - used in the construction of greenhouses and canopies;
- 6 mm - for canopies, greenhouses and stained glass windows;
- 8 mm is a widely used material.
The average price for cellular polycarbonate varies depending on the thickness: from 80 to 850 rubles. m 2
Choosing a place to install a greenhouse on the site

For the greenhouse you need to choose right place location.
- It is better if the greenhouse is located at least on one side closer to the house. This will make it easier to conduct electricity into the room. Light in a greenhouse is necessary, especially in the winter season. In addition, electricity will be needed to install other devices in the greenhouse.
- It is necessary to decide whether the greenhouse will function in winter. If you plan to use it all year round, then to ensure necessary conditions For plants, the structure is installed from west to east. The long sides of the structure will be located to the north and south, respectively.
- To install the greenhouse you will need the right place. It should not be located in a low area where moisture flows. The area for the greenhouse must be level. Also, the place for the future greenhouse should not be located among trees or in the shade. Plants will need a lot of light.
- The soil should not be clayey. Ideally, it should be suitable for the type of crops that are planned to be grown.
Types of greenhouses

Modern materials, especially PVC, allow you to create real masterpieces. Designs can take shapes that were previously considered impossible.
Among the most common types are lean-to, arched, gable, and tent greenhouses. Also, the structure itself can be collapsible or non-dismountable. It is convenient to have a collapsible one when you do not plan to use the greenhouse all year round. For permanent, year-round use, it is better to install a non-removable one.
Depending on the operation, the type of foundation of the future greenhouse is also determined.
Foundation for a greenhouse: which one to choose and how to do it right

In order to install a temporary greenhouse, you do not need a particularly strong foundation. You can use plastic bottles for this. But for a permanent non-removable structure, a foundation is necessary. It will guarantee the strength of the structure and allow it to serve for many years in any conditions.
It is noted that a monolithic strip foundation would be ideal for such a case. The base of such a foundation must be located below the freezing level of the soil. The lower part is covered with crushed stone. The depth of the ditch is about 80 cm.
The base can be strengthened using reinforcement or reinforced mesh placed in concrete.
The entire structure depends on the strength of the foundation. This is especially important for greenhouses made of glass: disturbances in the base can cause it to crack.
Installing a greenhouse frame on a foundation - basic rules
Greenhouses are often produced ready-made; all that remains is to assemble them after making the foundation.


It has been noted that it is better to assemble structures made of galvanized steel using fasteners: nuts and bolts. Welds may be subject to corrosion.
When installing a polycarbonate greenhouse, you should remember the peculiarity of this material. At high temperature It expands and contracts when cold. Therefore, in the work it is necessary to use sealants and silicone putties.
When installing polycarbonate sheets, you should always leave a small gap of a few millimeters between them.
Window openings are often installed in greenhouses. They are necessary for ventilation. It is advisable to plan such design details in advance.
Modern greenhouses are very complex systems; they are equipped with various devices, the simplest of which is an automatic watering system. However, even such units can be installed independently.

Polygonal greenhouses typically contain eight sides. Such designs have several advantages.
- The polygonal design collects light rays well. At least one of its faces is always facing the sun.
- Such greenhouses are very aesthetically pleasing. They are perfect for arranging winter garden. The building decorates the site, and does not spoil it.
- The design is very stable and can withstand strong winds and even hail.
The only difficulty that the owner of such a building may encounter is the glass. Polygonal greenhouse glass will have to be ordered if necessary. Because they have a specific shape. Another disadvantage of the polyhedron is the difficulty of heating the air evenly. However, by using the latest technological systems, this problem can be easily solved.
Video: building a greenhouse
We bring to your attention a series of videos about the construction of a greenhouse.
And this video will tell you about the construction of a year-round greenhouse.
If you are looking for where to buy a greenhouse, we recommend looking at specialized online stores, since their prices are often lower than in regular stores and markets.
Greenhouses are the best structures for growing fruit and vegetable crops on protected ground. By design, it consists of a frame and a coating that transmits light (propylene, glass or film). In addition, the structure must have windows, doors and vents for maintenance and ventilation. Also, some walls can be sheathed with boards or covered with bricks for additional protection and insulation.
It’s easy to build greenhouses with your own hands from scrap materials, but at the same time such structures have fairly high functionality and allow you to grow vegetables, fruits and herbs all year round.
How to make a greenhouse at home
Many greenhouse owners are interested in the question of whether it is possible to use a conventional structure in the cold season. It’s worth noting right away that without special equipment for heating and ventilation, a conventional structure will not be suitable for growing vegetables and fruits (Figure 1). Based on this, it is worth asking the question of how to build a greenhouse for winter growing fresh vegetables and herbs.
 Figure 1. Types of winter greenhouses
 In general, all greenhouses are built according to the same principle: first they build the foundation, then the frame, after which they begin cladding and installation necessary equipment. But when building winter types, there are certain features that we will describe below.
Conditions
A winter greenhouse can be made either single-sloped or double-sloped, and the structure can be either adjacent to the house or located at some distance from it. But it should be taken into account that wall structures are more suitable for small farms, since the wall of the house will protect the structure from the cold and reduce heating costs.
Before construction, you need to choose an area with maximum sun exposure. To do this, it is better to place the building from east to west: this way the plants in it will receive a sufficient amount of light, although lamps will still have to be used for additional lighting. In addition, if cold winds are often observed in your region, you need to provide wind protection: locate the room near another building or plant a hedge a few meters away from it.
Peculiarities
The technology for constructing a winter greenhouse is typical, but still has some features that help retain heat for normal crop growth.
If you are interested in how to make a heated greenhouse with your own hands, be sure to take into account the following rules:
- The foundation must be strong and high enough so that cold from the ground does not penetrate into the structure;
- It is advisable to arrange inside warm beds with a special soil mixture (sand, turf soil and humus);
- Heating and lighting must be installed to create an optimal microclimate inside. It is also necessary to install a ventilation system, and it is better to use stove or gas heating.
 Figure 2. Marking the foundation
 At the same time, it is necessary to equip all life support systems with automation in order to grow crops in closed ground required minimal human intervention.
DIY greenhouses from scrap materials
The construction of a greenhouse begins with marking the location for the foundation. To do this, take a cord and several stakes and mark one of the side walls. Stick a stake into the ground and measure required length and pull the cord. After this, use a square to determine the location of the end wall, measure its length and insert another peg. The remaining stakes are placed using the same principle, and a cord is stretched between them. Next, we check the angles and measure the diagonals (they should be the same). detailed instructions for marking and building the foundation is shown in Figure 2.
Which covering material is better?
Build a greenhouse without correct selection covering material is impossible. Many people prefer to use regular plastic film, but this material is far from the most successful of those presented on the modern market.
 Figure 3. Types of covering materials: film, glass and polycarbonate
 Let's try to figure out which material is best to use as a covering for the frame (Figure 3).
The use of glass is considered a fairly popular method of making cladding. For example, you can make a small greenhouse from old window frames, but if the greenhouse is large, you will have to order glass for it separately, and they are quite expensive. Despite the high cost, this design will last a very long time, and the glass itself is not afraid of sudden temperature changes, can easily withstand the heavy weight of snow and helps maintain a stable temperature inside the structure.
Note: More economical option A film coating is considered, but it is not durable enough. Regular film can last only one season, so for more durable buildings it is better to choose reinforced film, which does not need to be replaced for 6-8 years. In this case, it is advisable to fasten the film so that it is not damaged by sharp corners.
The most the best coverage considered polycarbonate. This is a lightweight and durable material that allows sufficient sunlight to pass through while retaining heat inside the structure. Since it is quite expensive, it is worth buying it only if the room will be used constantly.
Greenhouses: how to make soil for planting
The abundance of the harvest largely depends on the quality of the soil used for growing plants. It is impossible to pour ordinary soil from the garden onto the beds, as it may contain weed seeds and pathogens of dangerous diseases that will destroy the plants.
Note: If it is not possible to prepare a special soil mixture for the greenhouse, and ordinary garden soil will be used for the beds, it is advisable to disinfect it using special preparations (for example, Inta-Vir).
But, if you want to get a really rich harvest, you still have to spend a little time making a suitable soil mixture. The most fertile substrate is considered to be one that contains one part each of peat, humus, turf soil and sawdust. This soil is quite light and fertile, so additional fertilizer is required only at the stage of direct cultivation of crops. But, as in the case of ordinary garden soil, it is advisable to disinfect the mixture before laying it on the beds.
How to build a greenhouse with your own hands from wood
Depending on the design, greenhouses can be single-pitched, gable, hipped, arched, wall-mounted, pit-built, or be part of the house. In addition, they can be stationary (the structure cannot be disassembled) or portable.
Additionally, they are divided by type of coating (film and glazed) and heating method (heated by the sun or equipment).
When choosing a form, you should take into account the location of the building relative to parts of the world, other buildings on the territory, as well as the purpose and shading. The optimal location is one in which the southern part of the horizon is visible from the entrance. To do this, imagine that you are standing with your back to the entrance. At correct location the sun will pass from east to west clockwise. The transparent wall should be oriented to the south, since in this case the maximum amount of light will get inside.
Note: The location of the greenhouse on the cardinal points is important only if the walls (all or several) are made of opaque material. If it is completely covered with film or glass, these indicators do not play a decisive role.
If the building is shaded by trees or neighboring buildings (for example, on small area), its northern side is made of opaque material that will prevent hypothermia inside the building. To improve the reflection of heat and light, the roof is made transparent, and one of the walls is covered with white paint or a reflective screen.
Each type of greenhouse has certain characteristics, advantages and disadvantages(Figure 4):
- Single and double slope- one of the most popular. They are rectangular and can be placed in any part of the site, and inner space in this case it is used almost completely. If a structure of this type is built on a foundation and equipped with heating devices, crops can be grown all year round. The only drawback is one and gable species is quite complex construction and the need to purchase large quantity materials.
- Arched They are easier to build, but they are not intended for long-term use due to the insufficiently strong frame. However, the streamlined shape makes it resistant to gusts of wind, and the condensation that collects inside drips onto the ground and not onto the plants. In addition, it is difficult to grow in an arched greenhouse garden plants(special shelves are equipped for them). Additional costs will be incurred by ventilation equipment, since standard side ventilation is not suitable for this type.
- Wall mounted Greenhouses and residential conversion buildings are primarily used as winter gardens. They are more economically beneficial, since the heat in them is maintained by heating the house. The disadvantage is that to grow full-fledged plants, additional lighting equipment will be required.
- pit There are single and double slopes. Their main feature is that the side walls are made of brick and immersed in the ground. Thanks to this, heating costs are significantly saved.
 Figure 4. Main types of greenhouses: 1 - single-slope, 2 - gable, 3 - arched, 4 - wall
 If the greenhouse will be used not only for growing crops, but also as a decoration for a personal plot, it can be made polygonal. But in this case, construction costs increase significantly.
What is needed for this
Building a greenhouse with your own hands from wood is quite simple, because it requires a minimum of knowledge, tools and materials (Figure 5).
A frame is built from wood, which is then covered with glass or film. The main condition is to properly prepare and process the wood. The beams that will be used to build the frame are cleaned of dust and dirt and washed clean water and dry. After this, they need to be sanded and treated with an antiseptic solution to prevent early rotting.
 Figure 5. Construction of a greenhouse made of wood with your own hands
 The beams are fastened together with nails or self-tapping screws, and after the structure is completely ready, it needs to be painted, painting not only the wood, but also the metal parts.
Where is the best place to place it?
When planning the placement of a greenhouse on a site, you need to take into account the prevailing winds and the movement of the sun. In order for the plants inside the structure to be illuminated as much as possible by the sun, it is better to place it from east to west.
If your region often experiences strong winds, it is advisable to install the structure near other buildings or big trees. At the same time, too much shading of the structure should not be allowed.
Foundation
When marking the area for the foundation, use a level, since the ground must be absolutely level. Otherwise, it will be difficult to install the frame, and if its parts can be adjusted and mounted, the structure will be subject to overload and the frame may become deformed.
Note: According to the rules, the room must have a slight slope for water drainage, but even when constructing small structures this rule may not be followed.
After marking, you can begin building the foundation. It must be very durable, since it not only supports the weight of the greenhouse itself, but also protects the plants from cold air and pests. As a rule, ready-made collapsible structures include materials for building a foundation (beams or pipes). But they are not strong enough and do not protect against frost and rodents. Therefore, it is recommended to lay it out of concrete or brick. The width must be at least 10 cm, and it should be placed below the freezing level of the soil.
You can also use special blocks to build the foundation. They are hollow inside, so after installation inner part poured with concrete. They also use curb stone laid on a layer of concrete. Options for foundation construction are shown in Figure 6.
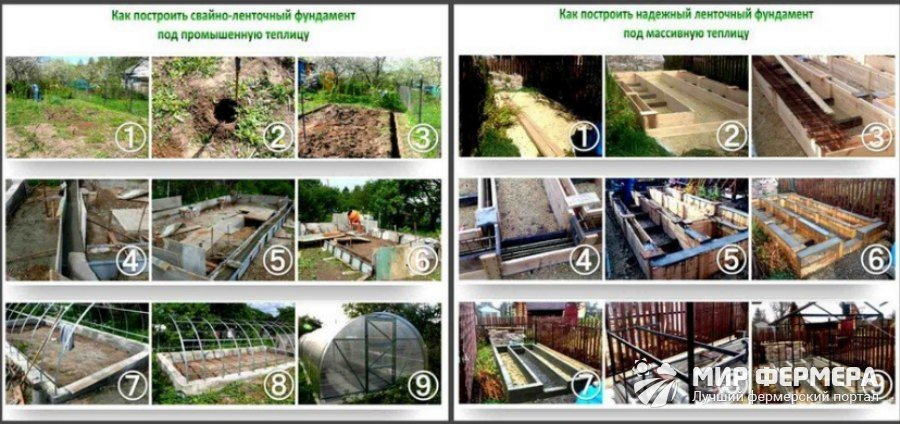 Figure 6. Options and order of foundation construction
 If the foundation is high (for example, located at a height of 30 cm from ground level), it will be inconvenient to bring or bring fertilizers and water inside. In this case, decking is installed at the entrance or the door is lowered to ground level, using the free space to equip shelves on which seedlings can later be grown.
Additionally it is covered waterproofing material to keep the heat inside. During construction, care should also be taken to equip a container for draining excess water. It is better to bury such a container in the ground so that it does not take up internal space. The drain must be tightly closed to prevent condensation and irrigation water from entering it. Practical recommendations on marking and building the foundation - in the video.
Construction stages
Several methods are used to build the basement:
- WITH inside lay sheets thermal insulation material, lay the binding wire and fill the surface with concrete;
- Cast blocks with gravel are placed on the base. This material retains heat well and has a high bearing capacity. But if the wall is expected to be high, it is additionally reinforced with reinforcement;
- Stacked wooden materials, impregnated under pressure with protective compounds. In the future, the tree is additionally insulated.
The choice of material and method for building a basement depends not only on your financial capabilities, but also on the type of soil and type of foundation. Besides, certain types plinths require additional processing. For example, a concrete base does not need to be painted, but if it is built from concrete or sand blocks, the surface must be plastered and covered with moisture-resistant paint (Figure 7).
As a rule, the kit of finished products includes a frame that only needs to be mounted. But if you are building with your own hands, the frame is most often made of wood or metal.
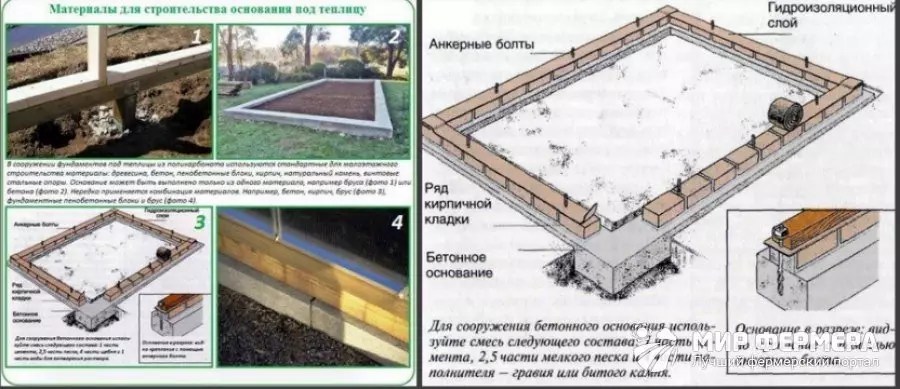 Figure 7. Base construction technology
 For this purpose, planed lumber or metallic profile. When choosing materials for the frame, you should pay attention to several important details:
- Lumber intended for construction is treated with a special green compound, so the frame will have to be additionally painted. Such wood is quite expensive, but its service life is longer than regular wood. It is important that the impregnation composition is poisonous, so the roots or leaves of plants should not be allowed to come into contact with the tree.
- Pillars, ceilings and other vertical elements can be made from boards (50 x 100 or 50 x 125 mm). To install beams, timber is used, the size of which depends on the length of the building.
The construction of the frame begins with roofing felt or rubberized material being laid on the base. On lumber intended for horizontal fastening, mark and drill holes for bolts and place them around the perimeter of the plinth. After this, we outline the places for attaching the vertical beams. A detailed frame installation diagram is shown in Figure 8.
Having attached the horizontal elements to the base, check them at level, cut the vertical beams into pieces of the required size.
Note: It is not recommended to saw vertical beams in advance, since they may cause errors when installed on a plinth.
The next step is to attach the vertical posts to the top beams. Having marked the position of each board or beam, fix it with an obliquely driven nail. The optimal distance between the vertical posts is considered to be 30 or 60 cm, since in this case it is easy to glaze.
 Figure 8. Frame installation diagram for gable greenhouses
 At the final stage, the vertical posts are attached to the lower and upper beams with nails, and to strengthen the structure, it is recommended to tie the joints with steel staples, wire or tape with an anti-corrosion coating. After this, the cladding boards and gutters are attached. During the work, all cut points and holes for fastenings must be treated with an antiseptic. Detailed recommendations You will learn how to install the frame from the video.
How to make a greenhouse from old window frames
Do-it-yourself greenhouses made from scrap materials are practically no different in functionality from expensive polycarbonate structures. Of course, they are not very suitable for winter growing crops, but they will successfully serve for several seasons under operating conditions in spring, summer and autumn.
One of the simplest structures is considered to be a greenhouse made from old window frames (Figure 9). Need to do for her concrete foundation, and if the building is located on clayey or marshy soil- additionally arrange a gravel cushion.
 Figure 9. Construction of a greenhouse from old window frames
 But the most important step is the preparation of the raw materials themselves - old window frames. To do this, remove all handles, latches, hinges and other metal parts. The old paint is removed, the wood is treated with an antiseptic and repainted. In most cases, frames are fastened together with nails. Therefore, it is advisable to remove the glass in advance so as not to damage it during the installation process.
The frames are attached to a frame made of wooden beams. You can leave several vents for ventilation, and make the roof polycarbonate. The remaining windows that will not open during operation are carefully sealed with sealant.
How to make a foundation
The choice of material for building the foundation depends on the characteristics of the soil and the type of greenhouse itself. Let's look at the most popular options.
- Made from concrete
Suitable for homogeneous soil composition with average bearing capacity. In this case, a support is made directly at the construction site: it is installed in a hole 30 cm deep wooden formwork, and the space is filled with liquid concrete. The bottom of the pit should be level and covered with a layer of crushed stone or sand. If the site has rocky soil, dig a hole down to the rock and thoroughly clean its surface (Figure 10).
The formwork must be square (side length 30 cm). The boards must be tied together so that they do not deform when pouring. Reinforcement is placed inside the formwork and concrete is poured.
- From piles
For areas with soft soil, a pile foundation is more suitable. Typically, piles are made of concrete and buried or driven into the ground. However, this method of construction is too expensive and requires the use of special equipment. Therefore on personal plot You can use other methods of constructing a pile foundation:
- Drive old rails or other metal beams into the ground;
- Use sleepers impregnated special compounds for longer use.
 Figure 10. Procedure for constructing a strip concrete foundation
 Metal piles can be freely driven into the ground without fear of deformation. In this case, choose beams long enough so that their lower part reaches soil layers with high load-bearing capacity.
Note: Before driving piles, mark the area so that enough space is allocated for the foundation. This is necessary, since during the driving process the pile may encounter a stone or other hard rock, and its direction will have to be changed.
You need to drive piles while standing on a special stand. But even if you decide to build a small greenhouse on stilts, it is better to consult a specialist in advance.
- From concrete slabs
A foundation built from concrete slabs is quite expensive. But its cost is compensated by its high strength, reliability and load-bearing capacity even on soft soils.
It is based on a reinforced concrete slab 20 cm thick, which evenly distributes the load. However, concrete slabs cannot be laid on loose soil. If this is still necessary, the soil layer is removed and replaced with crushed stone or gravel. Styrox (10 cm thick) is laid on the crushed stone and the surface is filled with concrete. The technology for constructing a foundation from piles and concrete slabs is shown in Figure 11.
 Figure 11. Construction of a foundation based on piles and concrete slabs
 Selecting a foundation is especially difficult for clay areas or soil that changes its composition in depth. In this case, it is better to consult with a specialist so that the greenhouse does not deform after construction and has sufficient thermal insulation.
Construction stages
To make a greenhouse from old window frames correctly, you need to follow certain rules.
Step-by-step instructions for building a greenhouse include the following steps:
- Construction of the foundation: because the this design quite heavy, it is advisable to make the foundation corners of stone, and between them make a structure of concrete on a bed of gravel and sand.
- Prepare construction material : remove all metal fittings from old frames, remove old paint, treat the wood with antiseptic and repaint.
- Make a floor: to do this, first compact the earth, and then work on it concrete screed, on which the beds will be located in the future
- Construction and framing of the frame: the base to which the frames will be attached is made of beams of the same thickness as the frames. The parts are fastened together with nails, and the roof can be made of film or polycarbonate.
After the greenhouse is completely ready, beds are arranged in it or shelving is installed. It is also advisable to provide a vestibule in which inventory and necessary equipment will be stored.
How to make a greenhouse yourself from a profile pipe
Profile pipes are widely used in construction, and since this material is light and durable, it can also be used to make a greenhouse.
Since it is difficult to bend a profile pipe at a right angle without the use of special equipment, it is best to build arched models with it.
Where is the best place to place it?
A greenhouse made from a profile pipe can be placed on almost any part of the site. Since this structure is lightweight, it does not carry much load on the soil, and they can be built even in marshy and clayey areas.
 Figure 12. Recommendations for building a greenhouse from a profile pipe
 It is important to take into account that greenhouses made from profile pipes are subject to the same requirements as buildings made from other materials. To protect the structure from strong winds, it is advisable to build a greenhouse under the protection of other buildings or hedges. And to provide plants with optimal lighting, it is advisable to place the building from east to west.
Foundation
A profile pipe is much lighter than wood, so the foundation for a greenhouse made from it can be anything. However, if you plan to operate the building long time, it is better to make a permanent foundation from concrete.
If a greenhouse made from a profile pipe will be used only in the summer, you can bypass it without a foundation by installing the frame supports directly into the ground. But in this case, it is necessary to provide additional protection to the plants by installing wooden formwork around the perimeter.
Construction stages
The construction of a greenhouse from a profile pipe begins with site preparation (Figure 12). It is advisable to choose a flat area with sandy soil. If there is no such place, the soil is leveled manually, and drainage is installed on swampy soils.
Next, they begin to manufacture and install the frame. If you want to build a rectangular greenhouse, you will have to buy special equipment with which the pipe can be bent to fit the right angle. To avoid additional costs, it is better to build arched structures. In this case, the pipe can simply be bent into an arc and dug into the ground on both sides.
At the final stage of construction, the frame is sheathed with film, glass or polycarbonate, the floor and beds are made, or shelving is installed.
Make a polycarbonate greenhouse with your own hands (drawings)
The most modern and functional option is the construction of a polycarbonate greenhouse (Figure 13). This is a lightweight, durable and wear-resistant material that will last for many years. Its only drawback is the high price, so it is worth building such greenhouses only if it will be used for a long time.
You can make a polycarbonate greenhouse with your own hands according to the drawings, but many prefer to buy ready-made designs and carry out installation on site. We will tell you how to save money and build a protected ground structure with your own hands.
What is needed for this
First of all, you need to buy polycarbonate for construction. Another advantage is that the sheets have a standard length and width (12 and 2.10 meters, respectively). This allows you to build a greenhouse 3.5 meters wide and cover the roof with one whole sheet.
In addition to the polycarbonate itself, for construction you will need materials for the foundation, fittings for fastening sheets and a plastic U-shaped profile, which covers the edges of the polycarbonate to protect its honeycombs from dust.
Peculiarities
Apart from the high cost of polycarbonate, the material has no other significant disadvantages. Of course, its honeycombs can become clogged with dust, and the coating will lose transparency, but this problem can be easily solved with the help of a plastic profile that is attached to the edges of the sheet.
 Figure 13. Procedure for constructing a polycarbonate greenhouse
 Like other types of structures, polycarbonate greenhouses require a foundation, but its purpose is not to strengthen the building, but to protect the plants from the external environment.
Where is the best place to place it?
In addition, it is advisable to install the greenhouse so that the plants receive the maximum amount of sunlight. To do this, you need to position the structure from east to west.
Foundation
To build a foundation that will exactly fit the size of the greenhouse, you need to place the site by installing pegs and stringing rope between them. After this, you can begin installing the foundation.
Note: Since polycarbonate is a lightweight material, the foundation can be built either strip (from concrete) or wooden - from beams and supports.
Asbestos-cement pipes can be used as supports, which are installed in the corners of the greenhouse. The soil around them is compacted, and the foundation is made of wooden beams. It is better to treat the wood with an antiseptic and paint it so that the structure does not rot.
Construction stages
The steps for constructing a polycarbonate greenhouse are the same as for other materials. First, the site is marked out and the foundation is built. After this, the installation of the frame begins. It can be made from wood, profile pipes or aluminum. The latter option is considered preferable, since aluminum is quite light, but at the same time durable.
At the final stages, the frame is sheathed with polycarbonate sheets, equipment for watering, heating and ventilation is installed inside the structure, and the beds are arranged.
How to make a heated greenhouse with your own hands
The design of a heated greenhouse is practically no different from conventional structures. But there are a few things to consider important nuances. First, you need to carefully seal all the cracks so that heat does not escape from the greenhouse.
Secondly, you need to install heating equipment. You can make warm beds by arranging them according to the principle of a warm floor and laying pipes under the ground. But a more popular option is to install heating: a gas, electric or stove boiler.


- Turkey stewed in a slow cooker: spicy, with vegetables, in sour cream, cream and walnuts
- Types of speech: description, narration and reasoning
- Martyrs Tatiana. Moscow Church of St. Martyrs Tatiana Temple of the Martyr Tatiana at Moscow State University schedule
- Milotici: return of the Russian village Moravov Alexander Viktorovich
- Why you shouldn't cry in front of the mirror
- Milotici: return of the Russian village Moravov Alexander Viktorovich
- Why you shouldn't cry in front of the mirror
- Making sounds for children Lessons on making sounds for children
- Actors Spiderman Aunt May Aunt May in Spiderman
- Pink salmon in the oven - delicious and easy recipes for baked fish Pink salmon fillet baked with vegetables
- What does a lizard tattoo mean?
- Deciphering the natal chart of the house
- What does mulberry help with?
- Photo report “Birthday of Samuil Yakovlevich Marshak in the group”
- Breathing at high pressure Breathing correctly at high pressure
- Bryansk State University named after
- Tasks to test spelling and punctuation literacy
- Macroeconomic calendar
- The Forex Economic Calendar is a reference book for every trader, regardless of trading experience and level of professionalism, and especially...
- Representatives of the arachnid class are creatures that have lived next to humans for many centuries. But this time it turned out...