The simplest DIY fireplace made from cardboard. DIY fireplace made from boxes and cardboard
Not everyone in their house, and especially not in their apartment, has a fireplace. And sometimes you want to create a festive mood (to have somewhere to put gifts) or you just want to make the room more cozy and intimate. In this case, you can create an imitation. The simplest option is a fireplace made of cardboard. Typically used are packaging boxes from large equipment.
False fireplace made of cardboard: models
A false fireplace made of cardboard, like a real one, can be wall-mounted or corner-mounted. In both options, the portal can be straight or arched. Whatever you prefer. If speak about practical side things, straight is easier to do, it is easier to finish. Even a beginner can handle it.
A wall-mounted fireplace is great if you have a decent amount of free space on the wall. It looks great in the wall between the windows. If the walls are all occupied, but there are corners, you can build a corner model.
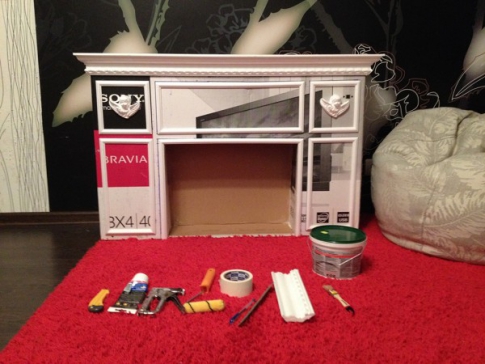
What materials are needed
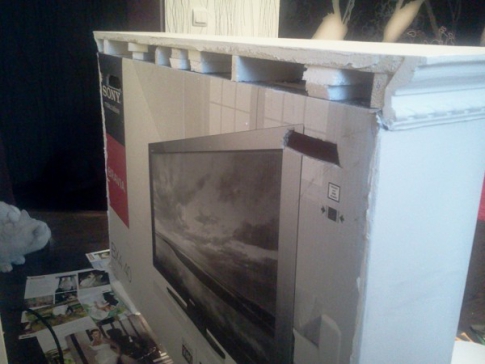
Most best material- carton boxes. The easiest way to make a fireplace out of cardboard is if you have a box for a large monitor or TV. All you need to do is cut out the portal and glue the side walls.

It will be a little more work if you only have small boxes like shoe boxes. But from them you can assemble a more interesting model in shape.
You will also need:

These are all the materials and tools that will be required. Of the entire list, questions may arise only regarding adhesive tape. Why paper? It is good in any finish. Including when painting. So the option is universal. If you are not going to paint the fireplace, you can use regular adhesive tape.
It will still be necessary finishing material, but we’ll talk about this later, since a lot depends on the finishing method.
Assembly options
If there is a big box
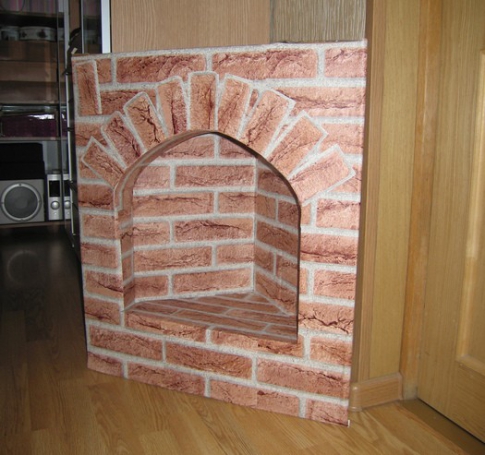
A large cardboard box will make a fireplace with a rectangular portal. Decide on the size yourself, but optimal height- about 80-90 cm, the width is about the same, the depth is 6-15 cm. But there are models wider, and narrower, and higher, and lower. Everything is to your taste. For example, here is a drawing of a cardboard false fireplace with dimensions.

We begin assembling the imitation fireplace from cardboard from the central part. We form the columns first. Cutting rectangles to size is no problem. The problem is to make even folds in the right places. Take a large ruler or a straight bar and a hard object with a rounded end. For example, a ballpoint pen will do, or you can take a spoon or fork and use the pen. The idea is as follows - along the line where the fold should be, apply a ruler/bar, draw reverse side ballpoint pen or crank cutlery along the strip, pushing through the cardboard. But be careful not to tear it. The sheet bends easily along the drawn line.

We glue the central part or paint it right away. Then it will be too inconvenient. You can paint it black, as in the photo. Another option is to imitate brickwork. Looks good too.
It is convenient to glue the parts together with tape (the type of tape has already been discussed). We glue each connection on both sides. We don't regret scotch. This cardboard fireplace was painted, so the columns were covered with white thick paper. You can use a primer and apply paint over it.

We make a shelf above the fireplace from several pieces of cardboard using the same technology. If you plan to install something, it is advisable to make stiffening ribs - several partitions. If the entire structure turns out to be strong and stable, you can make a shelf from a piece of plywood, for example.
If the cardboard is thin, you can use polystyrene/foam. It is sold in construction stores. You can take the slabs that are used to finish the ceiling. They have processed edges and a pattern is applied to the front surface. In general, it might turn out interesting.
Next comes the finishing touches. IN this option“bricks” were cut from paper of suitable colors. They decorated the portal opening. This is where you will need PVA glue. Don't forget to leave seams between the “bricks”. In the presented model they are painted with a base color, but you can make them, for example, black or white.

The rest of the surface of the false fireplace is painted, and foam plastic (polystyrene) is glued on top.

Moldings can be glued before painting. They need to be cut with a sharp edge stationery knife. Then the cut will be smooth. Glued with PVA or special glue. Wipe off any remaining residue immediately, otherwise the paint will lie unevenly.
The same structure can be covered with brick or wild stone wallpaper. Self-adhesive film is also suitable. But you have to work with it carefully - you won’t be able to peel it off.
If the boxes are small
Small cardboard boxes are no more difficult to work with. They can be the same or different sizes, thickness and width. Based on the existing set, the structure is assembled.

There are two ways:

The second option takes less time, but the design is unreliable. If the dimensions are large, it may sag and sag.

To give the fireplace cardboard boxes presentable look, let’s paint it “like a brick.” To do this, cover the surface with thick grayish-brown paper. This color will be the background.
To paint, you need reddish-brown paint and a large foam sponge. It can be cut to the size of the brick - 250*65 mm. Pour the paint into a flat bowl, dip a sponge into it, apply it to the paper and lightly press it, draw the bricks.

When working, you need to make sure that the “seams” between the “bricks” are the same width. This is not an easy task - you get distracted a little, and the size is not the right one. You can do it simpler - cut the masking tape into narrow strips, stick it on, and draw “bricks”. After the paint has dried, remove the tape.

The top part had to be reduced because our fireplace was too wobbly. It is better to use whole boxes.
Fireplace with round portal
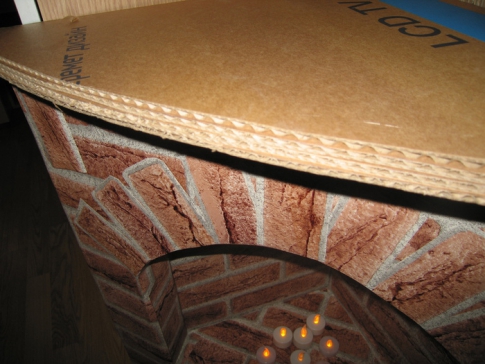
Its assembly is more labor-intensive: you will have to glue the vault well. This fireplace required 4 large boxes (like TV boxes).

The base was glued separately. Stiffening ribs were glued to the inside of polystyrene. The weight turned out to be solid and the base sagged without reinforcement. The strips were installed approximately 5 cm apart. They were glued with masking tape, then the base was taped on all sides.
Then we cut out the front part and decorated the back wall. It’s better to decorate it right away, before it’s glued together. We transfer the arched cutout onto a sheet of cardboard. We cut out “bricks” from cardboard and glue them so that the edges do not extend beyond the “arch.” When the glue dries, we assemble the main part of the portal. We also install several stiffening ribs in the portal - when high altitude the cardboard can “play”, and this is how everything turns out strong and rigid.

The next stage is making the lid. It is multi-layered - cardboard, polystyrene foam, cardboard. Everything is coated with glue, the weight is installed. When the glue had dried (after 14 hours), the lid was secured to the structure with tape. NEXT - finishing work.
To smooth out any unevenness caused by the tape, we cover all surfaces with thick white paper. You can take A4 sheets, or larger ones.
Next you will need a roll of paper towels and PVA glue. We dilute it 1:1 with water and pour it into a spray bottle. We wet the napkin and lay it down, squeezing it a little. Wet thin paper itself gives a relief; we just correct it a little, achieving a better effect. We process all surfaces in a similar way, excluding “bricks”. We wait until it dries.

Take the paint red-brown color and ivory (in this case). We paint the “bricks” brown, and the rest of the surface light. The cardboard fireplace is almost ready. The finishing touches remain.

After drying, we go over everything with a brush slightly dipped in gold paint. We dip the brush, squeeze it out, and once again remove the remaining paint on the sheet of paper. Using a semi-dry brush, we go through the “seams” between the bricks, lightly touching the “bricks” themselves. Next, using the same technique, we emphasize the texture of the surface. It is important not to apply too much paint. That's it. The cardboard fireplace is ready.
Ideas for decorating a fireplace made of cardboard in photo format
You can make an imitation of a fireplace from cardboard of any shape. Several ideas are collected in this section. You already know the assembly principles; you can come up with the decor yourself or use ideas from photos.


If you use good wallpaper“like a brick” it will turn out very natural


In progress…


Decent option...

During the cold winter period, do not forget that the house, like ourselves, needs a warm, pleasant atmosphere. For example, you can make a fireplace out of boxes with your own hands - although it may not be able to warm the apartment, it will definitely add coziness and lift the spirits of your household.
DIY fake fireplace made from boxes
Making a fireplace from cardboard boxes with your own hands is not so difficult - just find large cardboard packaging from furniture or household appliances. For example, a cardboard box from a wide, thin plasma TV is perfect.
Working on the product will take you quite a lot of time - you need to cut out the parts, paint, putty and finish them. Nevertheless, the result will not leave you indifferent - a high-quality fireplace made from boxes with your own hands is very difficult to distinguish from the real thing. And crafts made from felt will help him create a New Year's mood - cute small toys that you can also make with your own hands and decorate the fireplace.
- First of all, determine the drawing of the fireplace - examples can be found on the Internet, looked at in specialized literature, or developed independently. Print out an example picture for yourself and calculate the dimensions of the drawing according to the size of your box.
- Draw the layout on the box - use a ruler and ballpoint pen, so that the markings can be seen better. Auxiliary lines can be made with a pencil.

- Cut out a window for the fire as follows - use a stationery knife to press deep grooves into the cardboard so that the edges can not be torn off, but bent inside the fireplace.

- Glue the resulting blades to the back wall of the fireplace using Moment glue.

The preparatory stage is over. Now you can start finishing the fireplace from boxes with your own hands. The master class continues!
- Cut foam borders the right size for the edges of the hearth, decorative elements - they can be bought at any hardware store. Cut the pieces at an angle of 45 degrees so that later the borders can be folded into rectangles.
- Glue the elements in the marked places.

- Glue decorative foam bas-reliefs in the form of angels in the center of the side elements of the fireplace. Top edge decorate with a beautiful plinth, forming a future mantelpiece.
- From above your product should look like this.

- Cut out a shelf of the desired size from foam plastic or other lightweight material and glue it on top of the work.
The painting step can take place in different ways, depending on what effect you want to achieve. If you want an aged surface with cracks, fill the entire surface with white drywall putty and blow dry it.
To achieve an even, smooth layer, after puttingty, apply water-based paint in 2-3 layers. It can also be dried with a hairdryer.

Show your imagination - you can also decorate the fireplace using the decoupage technique. A fire can be easily made from candles or garlands placed in the hearth. Alternatively, you can simply print out a large photo of the fire and tape it inside the fireplace.
Such a fireplace is perfect not only for decorating any home - many studios use similar decorations when creating home or holiday interiors for photo shoots.
DIY corner false fireplace made from boxes
If you don’t have a lot of space in the room you want to decorate, you can use this option to make a fireplace out of boxes with your own hands, which fits in the corner. You will not only update home interior, but also get an additional shelf.
- Decide where you want to place the fireplace - the parameters of the future product depend on the size of the location.

- Make a semicircular slot in the front wall of the box so that it can be folded inward. Cut 2 arcs from the top so that it looks like a corner that you can tightly fix between the three sides of the fireplace: the front and the sides.
- Cut off the back wall of the box and trim the sides until folding them creates an angle that allows the fireplace to fit snugly in the chosen location. Glue the sides of the corner with tape.
- Cover the entire workpiece with brick-like construction film.
- Glue together a tabletop from several layers of thick cardboard that protrudes slightly above the overall body of the product. Glue it on top.
- Cover the shelf with wood-look film.
- Instead of a fireplace, place candles or glowing toys in the fireplace.

Thanks to the density of the tabletop, you can place small objects of different sizes on it. Decorative DIY box fireplace ready!
DIY Christmas fireplace made from boxes
We often associate a fireplace with Christmas - it is with its help that Santa Claus, according to the beliefs of many Western peoples, sneaks into the house to put gifts under the tree. Despite the fact that Santa Claus is closer to us, it doesn’t hurt to make a New Year’s fireplace with your own hands from a box. This way you can gather all your relatives near the family hearth, in literally words, on a festive night.
To make a fireplace out of boxes with your own hands, step-by-step instruction assumes you have a lot of New Year's decorations for your home, which are also easy to prepare yourself.
- Take 3 boxes: wide and flat for the TV and 2 small rectangular ones for the speakers. Glue them together as shown in the image. If necessary, trim the pieces to the same height to achieve the same level.
- Take another cardboard box and cut out a top border for the fireplace from it, equal in length to the two sides of the workpiece and the front.
- Glue the border. Decorate it on top with a patterned plinth, as in the first master class. Attach a foam tabletop of the desired size.

- Cut out many rectangles with rounded ends and glue them in rows onto the workpiece with PVA glue - they will create a kind of bricks.

- Prime the box fireplace with your own hands in 1-2 layers so that all its parts are the same color. If this is not done, the fireplace may turn out different colors when painting.
- After the primer has completely dried, paint the fireplace. brown, the baseboards on it are yellow. Alternatively, dip a scouring pad in yellow and lightly dab some paint onto the bricks to give them texture.
- Decorate the fireplace with all kinds of New Year's toys, and place a luminous garland rolled up in a ball in the hearth - an imitation of fire.
It will be even better if you replace the yellow paint with gold or silver - thanks to it, your fireplace will simply shine!
You can learn another way to make a fireplace out of boxes with your own hands by watching the following video tutorial.
Take it for yourself and tell your friends!
Read also on our website:
show more
Residents of city high-rise buildings don’t even think about the fact that they can install a fireplace in their apartment, and for this it is not at all necessary to do some tinkering brick chimney and contact the fire department. A decorative hearth made with your own hands from a cardboard box is an alternative to the traditional type of fireplace. To create this piece of furniture, no construction skills or skills in working with equipment are required. All that is needed from a master is fantasy and imagination.
The process of creating a fireplace
Before you begin to implement your plans, you need to know what the work process is. Main stages:
- planning:
- preparation of available means;
- manufacturing;
- finishing and decoration.
Read also the article about in addition to this material.
Planning
In order for a fireplace made of a cardboard box to fit harmoniously into the interior of a house or apartment, it is important to allocate a suitable place for it. Most often the fireplace is placed in a corner or in the middle empty wall. Having selected the future location of the “hearth”, they determine the size of the structure. It is recommended to do this directly at the location where the fireplace is installed. For ease of use, all dimensions are plotted on paper. It is best to make a small sketch of the future fireplace, where all the blanks and details of the decorative item will be marked.
Advice! During the work process, you may need other available tools, it all depends on the design of the fireplace and its design.
Making a wall fireplace

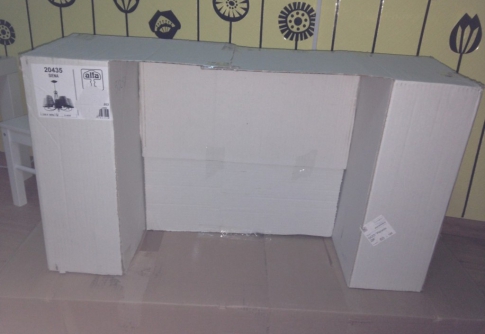
A fireplace from a TV box can be made in two ways - place it against a wall (wall-mounted fireplace) or in a corner (corner fireplace). The simplest and most common option is the manufacture of a wall structure. It is made of three elements - a rigid base, a fireplace portal and a shelf. Manufacturing process:
- First, start creating the base. It must be strong and rigid in order to stand confidently on the floor. To prevent the structure from bending, it is strengthened with stiffening ribs. They are placed inside a rectangular podium in the form of a lattice or in a chaotic manner. The base is cut out from a corrugated box with sides. The upper part of the podium is an additional cardboard panel. The side parts are made of several layers of cardboard glued together and glued to the panels with masking tape.
Important! The width of the base should be 1 cm larger than the fireplace portal.

- It is best to make a fireplace portal on frame basis. Mark the dimensions of the fireplace window on the cardboard and cut out the upper part with a stationery knife. The plane of the window is divided in half, and the resulting sashes are folded inward. The result is the side walls of the portal.
- Width interior walls The portal is equal to the width of the ceiling, and the width of the hearth is the length of the ceiling, cut out of cardboard in the form of a rectangle. The cardboard strip is secured with masking tape.

- Next, we begin to manufacture frame panels. They can be made from cardboard rectangles glued together, or lattice partitions. They are attached to the front of the portal and glued with tape.

- A sheet of cardboard is attached to the frame.
- The resulting fireplace portal is inserted into the base.
Advice! Instead of masking tape, where appropriate, you can use PVA glue and paper.
- The fireplace structure is covered with paper or painted over. The resulting niches in the fireplace frame can become convenient shelves for storing things. To make the walls of the “windows” more rigid, several layers of cardboard are used, glued together.

- The next step is making and installing the top shelf. Without a top panel, the fireplace will look unfinished, plus you won’t be able to put decorations on it. To prevent the structure from falling, the weight of the shelf should be lighter than the base of the fireplace and portal. They put her on liquid nail or polymer glue.
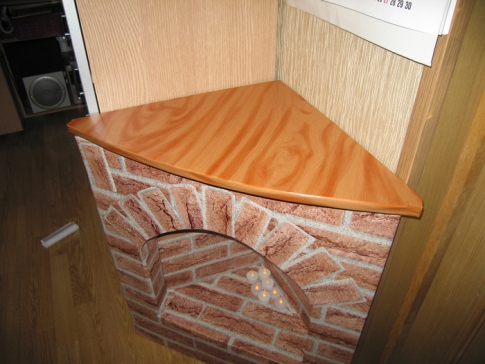
Making a corner fireplace
A corner decorative fireplace made of a cardboard box can be installed in any free corner of the room. Additionally, a fireplace can hide an unsightly or empty corner space. Stages of making a decorative “hearth”:
- First, measure the angle. Some install it in a furniture wall.
- The box is used to form the shape of a fireplace. The walls of the resulting triangle are secured from the top of the corner with masking tape.

- The base of the triangle is given additional rigidity. In the corners of the structure, including the inside, 10 cm cuts are made and folded inwards. This allows you to get an even fold. The strips are glued together.
- From part of the box they make a pattern for a fireplace portal or hearth window. The triangle is reduced on each side by 7-10 cm and a mini copy is cut out. Next, it is applied to the large plane of the triangle and cut out. The same cuts are made in the corners, the strips are folded and glued with tape.
- The back parts of the hearth are made from the corner of a box. For the bottom and ceiling you need two triangular parts. The internal boundaries of the hearth are measured along the resulting opening.
- Between the bottom of the “firebox” and the bottom of the fireplace, two columns made of several layers of cardboard are attached. This is necessary in order to give rigidity to the structure.
- It is recommended to cover the corner fireplace with embossed wallpaper. It is better to start work from a corner.
- The fireplace mantel in the form of a triangle is attached at the end of the finishing work.

Finishing
The appearance of a fireplace from a TV box can be very diverse. The side walls and the front shelf can be framed with relief molding. It will visually divide the fireplace zones. Stucco elements are glued to the resulting areas of the “hearth”, and columns are glued to the sides.
Important! All decorative elements glue with polyurethane glue directly onto the cardboard. You can use any composition, for example, “Dragon” glue, etc.

After gluing all the decorations, the surface of the fireplace is painted with white paint using a brush. Hard-to-reach places are painted with a sponge. To highlight a particular area of the fireplace, it is coated with colored coloring compounds. Gold inserts look great in combination with white paint. Craftsmen advise applying water-based varnish to the front of the fireplace and side panels - it will prevent the destruction of the “hearth” and protect it from external influences.
Video: making a fireplace from cardboard with your own hands
Some people stick embossed wallpaper onto the fireplace structure. From rectangular panels of cardboard you can make an imitation of brickwork, onto which wallpaper is glued. The “bricks” are secured with liquid nails in the fireplace niche at the same distance from each other. After this, they are coated with water-based paint and allowed to dry.

After all the finishing work, they begin to decorate the mantelpiece. It can also be painted or covered with wallpaper. The stucco molding is covered with tinting. The base of the fireplace is decorated with glued painted pieces of foam plastic.

A decorative fireplace out of a box can be decorated with homemade firewood. They are made from corrugated cardboard rolled into a roll. The branches are made from smaller bundles. They are attached to the log using glue. The resulting firewood is coated with white paint - gouache.

Anyone can make a fireplace from a cardboard box with their own hands. The best assistants in this matter will be the imagination and fantasy of the master.
A false fireplace made of cardboard boxes is a common interior item in city apartments and photo studios. There are several ways to make such a structure yourself, but all of them do not require construction skills or serious financial investments.
A decorative fireplace is a solution for those who want to create an atmosphere of comfort and warmth in their home, but it is impossible to install a real fireplace. A false fireplace can be built without difficulty and expense from ordinary cardboard boxes.

Options for decorative fireplaces
There are many tips on the topic: “How to make a decorative fireplace from boxes with your own hands?” This article will discuss the three most common options for creating a false fireplace from cardboard:
- fake wall fireplace;
- fake corner fireplace;
- Christmas hearth.

Making a fireplace from boxes is a simple and inexpensive process. The installation of such a piece of furniture takes no more than 2-3 hours.
Creating a wall fireplace
A fake wall-mounted fireplace made from boxes is very often found in the apartments of city residents. To make such a piece of furniture, you need to prepare the following materials and tools:
Step-by-step instructions for creating a false fireplace from boxes:
- First, a sketch of the future structure is made on paper. Craftsmen without imagination can find a fireplace diagram on the Internet. The dimensions of the parts are indicated in the figure.
- For convenience, the installation layout is transferred to a cardboard box. To make it easier to work, all main lines are drawn with a pen or marker, auxiliary lines - with a pencil.

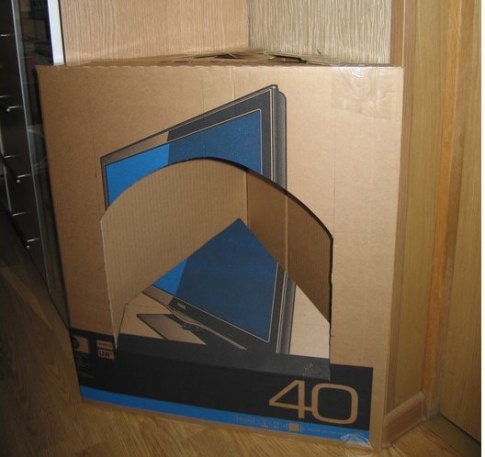
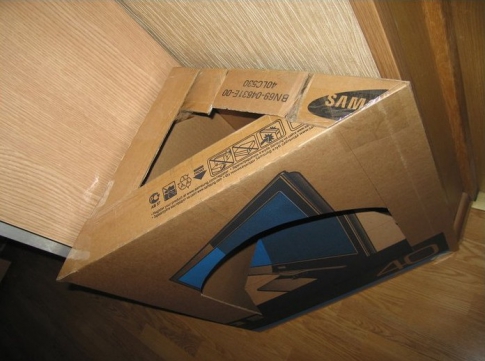
- At the bottom of the box, a stationery knife (cutter) is used to make a rectangular fire hole for the “fire”. The cut off blades of the box are glued to the back wall of the package. If the box is very large, then the excess part is simply cut off.


- After creating the main frame, proceed to finishing works. The surface of the box can be covered with wallpaper, film or tracing paper. Many craftsmen apply Chinese ornaments using special prepared templates. If you plan to do classic version fireplace, then most often they resort to the following decoration technology. Individual parts are cut out from foam borders to create decorative decoration. They cut the foam at an angle of 45 degrees, so that later the parts can be easily assembled into squares/rectangles.

Advice! You can buy parts for decorating the fireplace (curbs, baseboards, etc.) at any hardware store.
- Squares and rectangles are made from the cut out strips on the walls of the future fireplace and glued to the surface of the box. Typically, the figures are placed symmetrically to each other, two rectangles on each side relative to the combustion hole and directly above it. The place for the “hearth” can also be decorated with such borders.

Advice! As decoration, some use foam plastic parts in the form of angels, flowers, etc.
- At the top of the decorative fireplace made from boxes you need to glue the baseboard. It forms a mantelpiece and gives the structure a finished look.
Important! The mantel is made from thicker foam or plywood.
- The material under the shelf is glued to the top of the fireplace.

- Next we start painting the box. Water-based paint is most often used white. If you plan to make an antique decorative false fireplace, then instead coloring compositions use regular putty for drywall. It is applied to the future fireplace and dried with a hairdryer.
Advice! The paint is applied in several layers using a brush, in hard to reach places use a sponge to cover.
The wall-mounted fireplace made from boxes is ready, all that remains is to decorate the structure. To simulate fire, you can glue a photograph of a live fire to the inner wall of the fireplace. You can put homemade “firewood” in the firebox or put candlesticks. It all depends on the flight of fancy of the master.

Master class on creating a corner fireplace from boxes
A corner false fireplace is most often installed in small spaces. The creation of this design takes place in several stages:
- Selecting a location, taking measurements.
- Place a cardboard box in a suitable corner. It is advisable that its parameters correspond to the parameters of the corner space - this will make it easier to make a fireplace.

- A semicircular slit is made in the front wall of the package so that it can be folded inward.
- At the top of the cut part, two arcs are made so that it takes the shape of a triangle. The resulting part is fixed with tape or glue between the sides and front of the fireplace.
- The back wall of the box is cut off and the structure is “adjusted” to an angle.
- The walls of the box are glued together with tape.
- The resulting false fireplace from the boxes is wallpapered or painted. The “hearth” covered with paper or film “like a brick” looks impressive.
- The fireplace tabletop is made of plywood or thick cardboard, glued in several layers. The shelf is covered with paint or pasted over to look like wood.

The mantelpiece can be made of lightweight building material- plywood, thick cardboard, etc.
You can decorate a corner decorative fireplace made from boxes using any attributes - candles, garlands, figurines, etc.

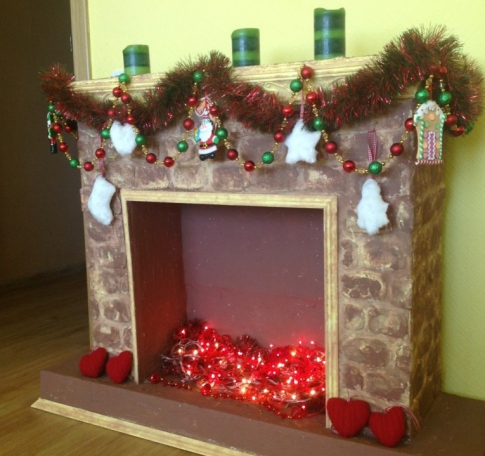
Homemade fireplace from boxes for Christmas
To create a festive “hearth” you will need three cardboard boxes - one large and two smaller. They are glued together - the big one is in the center, the small ones are at the edges.

New Year- a holiday of magic and miracle. Both children and adults are looking forward to it. It is on this holiday that there is an opportunity to get at least a little into a fairy tale, hear warm words and wishes, spend time with family, loved ones and friends. The New Year requires thorough preparation - from gift wrapping to decoration festive table. The main place in the pre-holiday bustle is home decoration. The presence of a fireplace in the house creates a special warmth and mood. According to tradition, New Year's gifts usually lie near it. Therefore, a beautifully decorated fireplace can be the highlight of your home this holiday.
Advice! If the boxes are of different heights, they are trimmed and made the same size.

In the central box, the front wall is removed and a combustion hole is obtained. Visually it is distinguished using a foam border or plinth. To make a fireplace “like a brick,” small rectangular pieces of the same size are cut from cardboard or polystyrene foam and glued to the surface of the boxes in a checkerboard pattern like brickwork. The fireplace is primed in several layers so that all parts are the same color. Next, the installation is painted brown, and the borders are painted yellow. To make the “bricks” more textured, gold paint is applied pointwise to them using a sponge. The finished decorative fireplace is decorated with New Year's tinsel, toys and garlands. We advise you to study the material in more detail and add the article to your bookmarks.

You can easily make a decorative fireplace from boxes with your own hands. Such a structure will make the room warmer and more comfortable.
Since childhood, after books about knights or Sherlock Holmes, the concept of “fireplace” has become synonymous with comfort and warmth for us. For those who live in their own home, if they have money and free space, it’s easy to call a team, choose a suitable fireplace and soon enjoy a live flame. But in high-rise buildings (and private houses, you know, they are also different, in some you can’t even put an extra stool) there is no way to adapt the necessary pipe, and you can’t allocate much space for a fireplace. So, to satisfy your craving for romance and desire for comfort, all you have to do is make a fireplace out of cardboard with your own hands.
Selecting a Layout
Start by deciding for yourself exactly where you would like your fireplace to be. Compared to the real one, the fake one has the advantage that it can be mounted anywhere and made into any shape. You can put a fireplace made of cardboard with your own hands even in a corner that there is nothing to force, but the fireplace will fit harmoniously. Next, figure out what height and width your product will be. It should not conflict with the furniture in the room, it should not overwhelm it, but you should also not allow the fireplace to get lost against the background of, say, bulky cabinets.
Selecting a base
In principle, you can build a fireplace out of cardboard with your own hands and only from this material. For the simplest things, even a fairly large box of furniture or office equipment will do. But keep in mind that cardboard is not a very durable material. If you want to get something more solid at the end, spend a little and order a chipboard frame for the base of the fireplace. Calculate how many sheets of paper you need for your dimensions and what size they should be. In principle, this will be the only part of the process of creating your fireplace that will require outside input. But the “stove” will turn out to be more stable and strong.

The simplest option
The easiest way to make a false fireplace is from cardboard using a packaging box. To do this, all the joints of the box are glued so that the lid does not open and the walls do not fall off. Draw the hole of your “stove” with a pencil, then cut it out with scissors. You can decorate the fireplace at your own discretion. Most quick option- self-adhesive film with a brick or wild stone pattern. If you don’t like this method, let’s say you want to paint your cardboard fireplace differently, it’s better to cover the box with white paper, and when the glue dries, apply the intended design. Even if you draw the same bricks, you can give them a more real look, of course, if you have a penchant for drawing.
Pasting with paper is necessary, firstly, because the packaging cardboard is usually brown, and you will not get the desired color. Secondly, there are always some inscriptions, emblems, etc. on the boxes. They can be visible even through several layers of paint. However, if you want, the pasting can be replaced with a primer - it can be bought at stores that sell goods for artists.

The inside is important too
It would also be a good idea to paint or paste over the inside of the box, otherwise a fireplace made of cardboard, made with your own hands, will not look very believable. You can cover the inner wall with a dark cloth and put a bright red one on the bottom.
For better stability, a “mantelpiece” should be placed on top of the box. For it, you can use chipboard or fiberboard, only treated or covered with the same self-adhesive wood or marble. If you don’t have suitable scraps at hand, you can glue together several sheets of the same cardboard (for example, from another box). You will have a mantelpiece, however, it will not add stability to the structure.
Based on chipboard
If you opted for a more monumental option, you will first have to knock down the frame brought from the workshop. If the fireplace you have designed has a stand-podium, you need to start assembling the base from there. If not, first the fireplace body gets knocked down, and then its pipe.
Since it is planned to build a fireplace out of cardboard with your own hands, about other finishing options (plasterboard or artificial decorative rock) we won’t tell you. For finishing, sheets of cardboard can simply be glued onto the chipboard, but if you think the cardboard is too thin, you can glue the sheets together (cutting out the parts that fit the fireplace) and put them under a load overnight. The next morning, the fireplace itself is upholstered with smooth, thick cardboard. Then it is given the desired look (similar to how it was done with the box).
When we make a fireplace from cardboard on a chipboard base, we shouldn’t forget about its “insides” either. Still, it will be illuminated from within, and wooden frame will become clearly visible.

Only cardboard, not box
If you don’t want to bother with plywood, and the boxed version seems too simple, there is another way to make a fireplace out of cardboard. It is also suitable if you need a “stove” of an unusual shape, for example, triangular in cross-section or tall but flat.
First you need to make a “pattern”. All details are calculated very carefully so that your decorative fireplace made of cardboard does not turn out lopsided. The cardboard is glued together in several layers to make it more rigid. It will lie under the load the longer, the more sheets you glue together. Then, according to the drawings made, individual parts are cut out. You can fasten them together with tape, or by gluing them with paper strips. By the way, if you decide to stick with tape, take paper tape for covering windows. To ensure that the corners of the fireplace are rectangular, at least during assembly it is worth using the corners - plastic ones are sold in construction stores, they are quite suitable. And ideally, it would be good to leave these corners inside the structure forever. They won’t be visible, but they will definitely add strength.

Since such a fireplace is assembled from parts, inner side it can be processed prior to assembly. It is still more convenient to paint or paste over cardboard when it lies on a table or on the floor, and not when it stands vertically. And the holes in the firebox come in different sizes; if you choose a small one, for interior decoration the assembled fireplace will have to show the wonders of acrobatics.
The outer side can also be finished before assembly, but in this case the pattern may not match when gluing individual parts, and the gluing of the corners will be visible. So outside you will have to paint and paste it on the finished fireplace. Not only that, if you choose to paint, you may need to prime the surface first to hide the tape.

Lighting options
Any fireplace requires the presence of a flame. It is clear that cardboard does not make it possible to use real fire. You can buy or make your own lamp that imitates a fire. An alternative is to draw a fire on paper, cut it along the outline and attach it to the hearth. A dim lamp is placed behind it, and a very believable imitation is obtained. open flame. The disadvantage of this method is that thick paper will not be visible through the light bulb, and thin paper will fall forward or backward. The solution could be a wire frame, but it will need to be bent as accurately as possible along the contour, otherwise it will be clearly visible when viewed through the light.
You can put electric candles or a garland in the hearth. It is better to buy both of them with batteries, so as not to make a hole in the fireplace for the cord to the outlet.
For any choice of “flame”, twigs, branches or logs must be placed in the firebox for authenticity.
Fireplace care
All that remains is to ensure that the fireplace pleases you for as long as possible. If you chose self-adhesive as a finish, special care your “oven” will not require it - such films are usually moisture resistant and can be wiped with a damp cloth. But if the fireplace has been painted, then in order to be able to maintain it later, you will have to varnish it. Then it can be wiped clean from dust or accidental dirt.
Now in the evenings you can sit in front of an almost real fireplace and feel like a medieval feudal lord.


- Turkey stewed in a slow cooker: spicy, with vegetables, in sour cream, cream and walnuts
- Types of speech: description, narration and reasoning
- Martyrs Tatiana. Moscow Church of St. Martyrs Tatiana Temple of the Martyr Tatiana at Moscow State University schedule
- Milotici: return of the Russian village Moravov Alexander Viktorovich
- Why you shouldn't cry in front of the mirror
- Martyrs Tatiana. Moscow Church of St. Martyrs Tatiana Temple of the Martyr Tatiana at Moscow State University schedule
- Milotici: return of the Russian village Moravov Alexander Viktorovich
- Making sounds for children Lessons on making sounds for children
- Recommendations: what to grease the pies to make them rosy and appetizing
- Pink salmon in the oven - delicious and easy recipes for baked fish Pink salmon fillet baked with vegetables
- What does a lizard tattoo mean?
- Deciphering the natal chart of the house
- What does mulberry help with?
- Photo report “Birthday of Samuil Yakovlevich Marshak in the group”
- Breathing at high pressure Breathing correctly at high pressure
- Bryansk State University named after
- Tasks to test spelling and punctuation literacy
- Macroeconomic calendar
- The Forex Economic Calendar is a reference book for every trader, regardless of trading experience and level of professionalism, and especially...
- Interesting signs about spiders