Creative ideas for the home. Do-it-yourself crafts for the home: the most interesting things
Unusual and unique handmade designer items have always been highly valued, especially among decorators and home interior designers. Do interesting handicraft for the home with your own hands is not only profitable, but also useful. This is an extremely exciting activity in which the whole family, including small children, can participate. In a short period of time, without having any experience in performing such creative projects, from ordinary things and scrap materials you can get original decoration, which will become an irresistible individual decor in the interior.
Interesting DIY crafts for the home (photo)
To beautifully decorate your living space, there is no need to purchase expensive decorative items. Everything can be done with your own hands, the main thing is to have imagination and be able to handle various materials and a tool.
By investing a piece of your soul into a hand-made product, you will receive a worthy decoration that will bring a special zest to the interior, give warmth and comfort to your home, and make your days brighter and more fun.

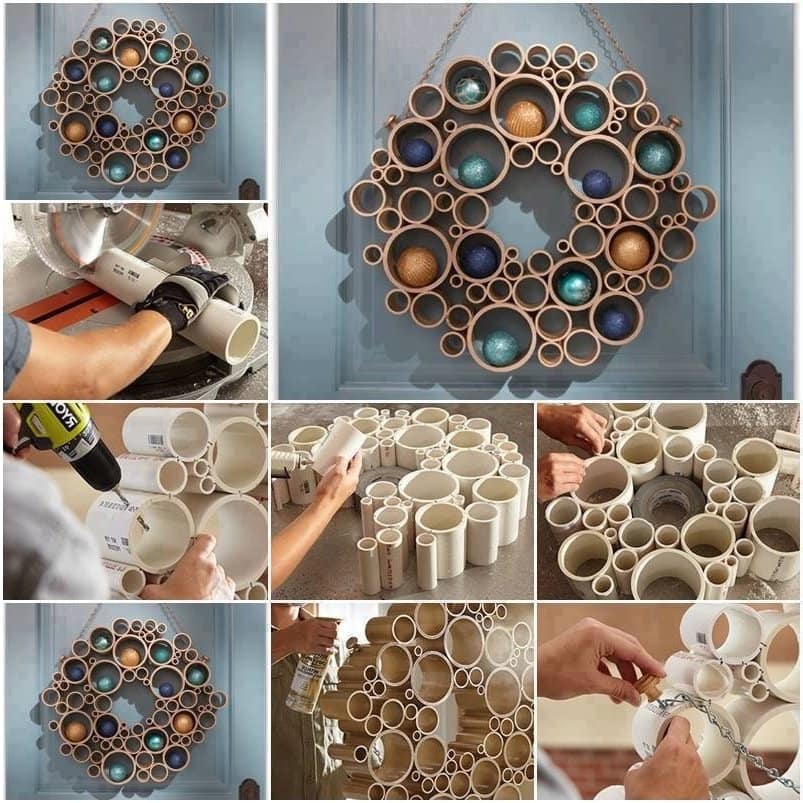
Wall decor
- a great idea, especially if they display good works of authorship with an original design.
For the first product we will need ordinary things that are found in almost every home. And so, we need:
- Cutting board (you can use scraps of laminated chipboard);
- Nails and hammer;
- Knitting thread;
We make panels with our own hands:
- Draw your chosen pattern or design on the board.
- Using a hammer, drive nails at equal distances along the contour of the pattern, so that their heights do not differ from each other.
- Tie the end of the crochet thread to the first nail, then carefully pull the thread to the adjacent one and make one turn around it. Continue pulling the thread from nail to nail until the entire painting is complete.


With knitting skills you can create many beautiful things. For example, using yarn or threads, you can get unusual wall tapestries that will help enliven the interior and create an element of exclusivity.
This decoration is quite simple to make:
- To begin, tie the threads of your chosen color into thick braids;
- Connect the resulting braids together into a single carpet. Make loops along the top edge so that the tapestries can be hung on the wall.
- Insert a bamboo stick with a rope threaded through it through all the loops and hang the decoration on the wall.


Knitted panel - good idea for wall decoration
Carpets and pillows
Mastery of knitting craft will also come in handy for other useful home decor items or accessories.
- They look very stylish and original: floor mats, pillows, ottomans, blankets. You can master the art of knitting them by studying several detailed master classes and lessons with step by step photos, which can be easily found on the Internet.


The most popular are soft floor mats with long pile, having a round or rectangular shape. To knit such a “fluffy decor”, you will need an exquisite artistic taste, a little patience and attention, especially if you are doing beautiful handicrafts for the first time.
- To quickly make a fluffy product, small strips cut from fabric are tied into the weave of the mesh.
- All elements are secured from the inside with tape, and a beautiful terry rug can be laid near the bed.
By replacing the stripes with many pompoms made of multi-colored yarn, you get a soft, cozy product for a child’s room.


There are a huge number of different knitting techniques. Despite this, this type of handicraft continues to actively develop.
The result is a lot of beautiful designer items that not only decorate the interior, but are also useful in everyday life. For example, a knitted blanket, in addition to its decorative function, can warm you up on cold winter evenings.


Ethnic motives remain the most fashion trends in interior design. A hand-made “mat-cape” will decorate an armchair, sofa, chair, or stool. For needlewomen who master the technique of crocheting, the material will be not only strong thick yarn or cord, but also ribbons cut from outdated knitted and textile products.
Most often, handicraft masters knit oval or rectangular multicolor capes. The lace elements sewn around the perimeter give them a special charm.


- A small cozy unit will allow you to insulate the tiled floor in the bathroom. mat with massage properties, which is easily made from ordinary wine bottle caps. They are cut in half along the longitudinal line and glued to a piece of linoleum.

Wine cork rug
- Smooth stones fixed on a rubber base will add an element of sophistication to the room. Wood cuts, sanded and impregnated with antiseptic compounds, are excellent as finishing materials.


Free stitch embroidery
Satin stitch embroidery is one of the oldest species artistic needlework, which consists of embroidering a plane of a specific pattern. Simply put, a piece of fabric with a pattern of your choice is completely or partially covered with dense stitches of thread. The result is beautiful, picturesque paintings and panels that are not inferior in beauty to expensive masterpieces of art.
Mastering this craft on your own will require a lot of time and patience, but believe me, the final result will exceed all your expectations. From seemingly simple things, fashionable, stylish and unique decorative elements are obtained that can emphasize the individuality of any interior.


What you need for satin stitch embroidery
A set of necessary materials and tools that will be required for work:
- Fabric of any density (silk, wool or linen are perfect);
- High quality silk threads, the fibers of which have a characteristic sheen;
- Hoop (special device for embroidery);
- Sharp scissors;
- A set of needles and a thimble;
Important! When choosing a needle, or rather its thickness, you should start from the density of the fabric you choose. For example, if the fabric is dense (sheepskin or wool), the needle should be as thin as possible, but if linen is used, the needle should be chosen thicker.
As for the technology of pulling stitches, everything is simple. Each of them can run in two directions, longitudinal or transverse, the main thing is that they are not all tightly tightened on the canvas. After the entire outline of the drawing is filled with threads, we can assume that another original handicraft for the home is ready.


Beautiful handicrafts for the home have always attracted and attracted people with their subtlety and elegance. That's why hand-made masters, with their own hands they constantly create new, stunning interior items, delighting their fans with real masterpieces of art.
Exclusive handmade items can decorate the interior, fill the atmosphere with warmth and comfort, and add a touch of personal touch to the choice of design ideas from a variety of interesting options.
Soft toys for children
Tilda dolls with their original and unique design will fit into any interior and it is not at all necessary that it be a children's room; these dolls can take their well-deserved place in the very center of the kitchen or living room.
Every handicraft connoisseur will appreciate your choice and will not be able to resist admiration, especially if these dolls are made independently.


- Don't think that sew a Tildy doll It's hard enough. In fact, if you have the skills to work with sewing machine and you have the opportunity to buy everything necessary materials for making clothing parts and accessories - you may well end up with a unique interior doll.
In order not to spend money on expensive materials, some of Tildy’s clothes can be altered from your own unnecessary things of good quality, but with the fabric for sewing the doll itself, it is better not to skimp and purchase high-quality material in a professional store.

Lamp made from improvised means
Even novice needlewomen can make an original lamp with a wire lampshade with their own hands. To make it you will need a simple set of materials and tools:
- Colored wire for home crafts;
- Bulb;
- Cartridge with extended wire;
- Multi-colored double-sided figures on a clothespin - in our case, butterflies.
- We attach the wire to the wire at the base of the cartridge and wrap it in a circular, chaotic motion in a circle, fixing the wire in the desired position.
- After a couple of circles, we attach the wire to the wire again, each time doing it higher than the previous one. With each new circle the lamp increases in volume, repeat the work to the size you need.
- Upon completion of work with the wire, you need to give the product some color. To do this, attach various figures in random order to the newly made lampshade. You can make them yourself or buy them in a specialized store.
The lampshade will gain lightness and airiness thanks to the free space between the wires, so try not to tighten the product and make each circle in a different direction.


Decor from old light bulbs
Do you have old light bulbs at home? Don't rush to throw them away. This simple material can be used as interior decoration. You can find a huge amount on the Internet unusual ideas on their application. Here are some of them.

A miniature garden with light bulbs made with your own hands will be a great gift for a creative person


Paper decoration
Wall compositions using the quilling technique, the material for which is paper, look charming. Even children can create them, which will serve as a reason for organizing joint family creativity.
With their own efforts, folk craftsmen make stained glass fragments that fill the space with a bizarre play of color spots. They get rid of them interior doors, lampshades, create screens that zone rooms


Knitted items, sewing, patchwork, weaving
Do unusual decor for your own home, you can use plain paper.
- Wicker vases, voluminous toys, decorative baskets look great and can fit into a variety of interior styles. To make them, not everyone has the opportunity to prepare willow twig. Home craftsmen successfully replace this wonderful weaving material with tubes rolled from ordinary newspapers.
The prepared sheet is wound obliquely onto a thin knitting needle and glued together to form a thin elastic tube for weaving.


- Having set out on a dream to update the atmosphere of the bedroom, mastering sewing skills, they assemble amazingly beautiful pieces from individual rags. patchwork bedspreads.
Such products are easily obtained from crocheted or knitted elements. To update covers, pillowcases, napkins, tablecloths, the appliqué technique is used. Bright, beautiful fragments are cut out from any fabric, fixed with an adhesive base and processed along the contour with braid, cord or stitched with a decorative seam.

Patchwork is a fun activity for creative housewives

You can find applications for the patchwork sewing technique in any room—the nursery is no exception.

By crocheting an openwork cover for an ordinary glass jar from cotton threads, you get an elegant candlestick. Place a candle inside so that it does not rise above the neck and light it. The flickering of flames through the lace creates a mysterious romance, allowing you to decorate a luxurious holiday table.


Embroidery, beads
For embroidered paintings, pillowcases, napkins that decorate the interior, various threads are used - wool, silk, synthetic, linen. Embroidered fragments decorate the frames of mirrors, the seats of chairs, armchairs, and sofas.
Embroidered curtains look gorgeous. Amazing three-dimensional panels embroidered with satin ribbons become bright accent, enlivening rooms of various functional orientations.


Stunningly beautiful panels, lampshades, and candlesticks are created using beads or beads. They are strung on a fishing line and intertwined into charming openwork patterns.
You can lay out a beaded table top for a coffee table, fixing the material with glue and covering it with varnish.


Updating furniture, garlands
You can update your coffee table using the decoupage technique. To do this you will need to perform the following sequence of actions:
- To start wooden surface need to . To do this, it is polished, after which all dirt and dust are removed with a brush.
- Next, the tabletop is coated with white acrylic paint.
- The top layer with the pattern is separated from the napkin and placed on a dry surface.
- After this, carefully soak the paper with PVA glue, smoothing out all the folds with movements towards the perimeter.
- After drying, the tabletop is covered with a layer of transparent varnish.
Using this technique it is easy to give a new look to chests of drawers, cabinets, and vases. Not only are they used for decoration, but also bright fragments cut from fabric, magazines, and photographs.


An interesting texture is given to surfaces by glued pieces of tiles, washed and dried, in the form of a continuous or fragmented mosaic. eggshell, dyed millet, coffee beans, watermelon and apple seeds.
The final action is to apply varnish to the glued composition.


To make your child’s nursery more comfortable and safe, you can sew soft, comfortable and pleasant-to-touch ottomans for her:
- Using the patchwork technique, two circles are sewn together.
- A strip of fabric is sewn along the edges.
- Stuff the product using foam rubber.
- A decorative handle is sewn on top in the center.

A soft ottoman is an important element when decorating a children's room.


- To zone a room, separating, for example, it can accommodate all kinds of decorative garlands, hanging them in doorways or on windows.
- Elastic cords with stars, butterflies, flowers, and circles of various sizes cut out of foil will help transform the design of the room. Old gramophone records, which are painted and fastened into canvas with metal rings, will also contribute to interior decoration.


A variety of ideas for home crafts
Exists a large number of technological techniques for home crafts that allow you to make the interior not only more decorative, but also functional.
By connecting the ends of thick cuts together, you get a hot stand. Such a product can even be made from paper folded in several layers. The resulting strips are glued together in a spiral or formed into products in the shape of a square, rhombus, or rectangle.


Even photocopying techniques are available for home crafts, allowing you to transfer designs onto fabric. The design is attached to the fabric requiring renewal with the front side. On the reverse side it is pressed with an ironing press or iron until the image is completely transferred. All that remains is to dry and iron the product.


- From an ordinary glass bottle beautiful shape get unusual vases. To do this, the outer surface of the bottle, in a spiral, needs to be tightly wrapped with decorative rope, fixing it with glue.
If you don’t want to bother with rope and glue, you can paint the bottles in bright colors, decorate them using the decoupage technique, or make an interesting painting on them.


A simple and laconic bottle vase will be an excellent gift for your other half
- There is certainly room for creativity: plaster and clay. These materials are used to make unique stucco elements for interior decoration. They are also used to create beautiful garden lamps, original vases, fancy candlesticks, exclusive figurines and other decor.
- Similar handicrafts can become not only an excellent decoration for home interior, but also to be useful in everyday life. For example, for safe movement around local area at night, garden lamps can be placed along paths and paths.


Making a beautiful vase using the papier-mâché technique is very simple
Homemade crafts are a fun activity. From the variety of ideas, it is easy to choose an option suitable for a specific interior in order to add a touch of individuality to it in the form of an original home-made product.

Try, experiment and you will definitely succeed.
Every home owner wants to feel as comfortable as possible in their home. This becomes the reason why there is a desire to decorate the interior not only beautifully, but also in an original way.
However, often the funds for this are not enough, because the services of professional designers, like beautiful things, are not cheap. Therefore in Lately An increasing number of homeowners prefer to decorate the interior of their home themselves using crafts from improvised materials that are inexpensive.
It is worth noting that the main advantage of such crafts is not the cheapness of the materials. The most attractive thing is that every item you create is unique. But it is the uniqueness of the design that attracts attention.

Products that were created with one’s own hands emanate a special energy. And thanks to this, an atmosphere of comfort and warmth appears in the house.

An important circumstance is that such structures can act not only as ordinary decorative elements. With their help, you can organize your space much more conveniently. After all, they can be used to store a variety of small items that are necessary for the household.
Do you think this is impossible because you need to have any special skills? No, even a child can handle this job of creating crafts.

Pay attention to the photo of crafts from improvised means, which is presented below. It shows an example of creating a key holder, which is not only a beautiful addition to the interior, but also serves as a small hanger for keys.

And the process of its creation is not complicated. Let's look at it in more detail.
Key hanger
Surely, many people are familiar with the situation when they have to raise the whole family to look for keys. After all, people often do not burden themselves with buying special small shelves for storing keys and other small things.

And since the key is a fairly small item, it is easy to lose it among larger things. To avoid having to constantly look for keys, many people keep them in their purses.

However, we can offer you a more interesting and original storage method. And for this we will build a key holder.

Its main feature is that in appearance it will resemble a product decorated with brickwork.

We will tell you step by step how to make a craft in the form of a key holder from available materials. But first, let’s look at exactly what tools and materials will be needed to create it: a thick sheet of cardboard or plywood, thick napkins, hooks, glue, varnish, paints.

Stages of performing a key holder
At the first stage, you need to cut out the back wall of the future key holder. As a material, you can use either thick cardboard or a not too thick piece of plywood.

In the second stage, you should cut out small rectangles from cardboard that will imitate brick. Please note that they must be the same size.

In the third step, you must glue the cut out “bricks” to the base using glue. Remember that there should be a small gap between them. You should also not cover the entire surface of the product with them. After all, in the central part there should be a small sign with an inscription, and in the upper part there should be a picture.

Note!

At the fourth stage, you should start lubricating the bricks with glue. Do not skimp on the glue at this stage, because it is necessary so that you can place the crumpled napkin on top of it. It can also be covered with a small layer of glue on top for better impregnation.

Using a stick or the back of a brush, press the tissue into the gaps to create corners. Leave the product to dry.

Please note that any crafts made from improvised materials at home must be durable. Therefore, we strongly recommend not to skimp on binding materials.

At the fifth stage, the process of creating a visual resemblance to the natural one begins. brickwork. Once the panel is dry, coat it with paint. The seams must be painted with bronze paint.

At the sixth stage, you should coat the bricks with paint a second time. However, this time you need to use a dry brush. To do this, dip it in bronze masonry, wipe it on paper so that it becomes dry and then dip it again in the color with which you painted the bricks.

Note!

Remember that to achieve maximum similarity, you should only move the brush in one direction.

At the seventh stage, which is the final one, you should coat the finished product with clear varnish and attach the hooks on which the keys will hang.

Crafts for the garden
If you are the owner country house, then for you the decorating process is not limited only to the area of your home. Therefore, to improve the area around the house you should use garden crafts from improvised means that will decorate any garden or vegetable garden.

To make them, you can use plastic bottles, hemp, tires and old soft toys. In this case, it all depends on what set of tools and materials you have.

Crafts made from tires are extremely popular because they are quite simple to create, but at the same time they look original and interesting.
Note!


For example, you can create a real cup from tires, which will become a wonderful flower garden. To create it you will need one tire, a round board (the diameter of the board should be larger than the tire), paint, and a small piece of rubber.

The tire and board must be painted the color you like. If you have artistic skills, you can use them to decorate the product with beautiful images.
If you do not have such drawing skills, you can paint the design one color or polka dots. The handle of the cup should be secured with a large stapler. And now your product is ready.

We draw your attention to the fact that even children’s crafts made from improvised materials can become a worthy decoration for your garden. Use crafts your kids made from plastic bottles and cups. Despite their simplicity, they look quite original.

If they are small in size, use them to decorate the porch or window sills. This way, you can focus on them, and they will not get lost in a large area of the garden.

Photos of crafts from improvised means


What has not been invented in the world of design for a comfortable, stylish and at the same time original interior. Experienced craftsmen they know how to surprise their customers. Do you think it’s impossible to do something like this? But in vain! We've got 80 luxury home ideas that are not unlike designer bells and whistles.
1. Beaded curtains
Instead of an ordinary door, lovely curtains made of beads and beads look much more interesting. It’s very easy to make these, you just need to buy a lot of beads.
In the process of work you will need: scissors, a base for the curtain (cord, fishing line), a cornice, large beads and the beads themselves.

Think over the pattern, then measure the fishing line, folding it in half. Leave some extra space to attach it to the bar and start weaving.

We decorate the bar and fasten the bead threads.

2. Decor on the wall in the form of a world map

Materials needed: twine, hammer, pen, stationery metal nails, a plain area on the wall, world map.


The finished panel can be decorated with anything - photographs, pictures, postcards and other things that you always want to look at.
3. Marine motifs: unusual clock on the wall
How to transform your home environment and maintain a romantic beach mood? We recommend making a watch from sea pebbles.

To work, prepare pebbles, clockwork, scissors, ruler, paints, marker, glue, cardboard and wrapping paper. 
We wrap the frame with paper (you can also use a nice thick fabric).

We paint the pebbles in different colour, draw a dial, mark the place for attaching the mechanism and attach a loop to it.

Glue the pebbles.

We install the mechanism and admire the unique masterpiece!

4. Magic lamp
Even an ordinary glass jar can shine without electricity. And it won’t be difficult to make such magic happen.

For a sparkling lantern, prepare a glass jar, a lot of glass balls, alcohol, cotton wool, fluorescent paint and a brush.

First, wipe the inside of the jar well with alcohol, and only then use a brush to make strokes and dots of paint. Let it dry completely. All that remains is to pour in glass balls - so the rays in the wonderful lamp will playfully echo.

5. Picket lamp

6. Paintings of flower buds
Everyone can do artistic crafts when they have flowers, paints and inspiration.


7. Felt rose basket for small items
Felt – comfortable material primarily for those who are just learning the basics of cutting and sewing. It is not necessary to skillfully sew and cut out, since such fabric does not require an overlocker. Simply cut and connect.

So, prepare: felt, ruler, knife, pins, thread, hexagon-shaped stencil.
 Transfer the shape and cut it out.

Gather the core with pins.  Attach the remaining petals.
 A wonderful basket in the shape of a rose is ready! It can have a lot of functions - from storing small items, to a newspaper rack and flower pots.

8. Natural composition of branches and fresh flowers
 Materials: wire, wire cutters, a beautiful ribbon, small branches up to 15 cm long (about 60 pieces), pruning shears and the best flowers.

Making a frame.

We twist our composition and secure it with the remaining wire.
 The final touch is decor. We wrap the branches with ribbon, place the flowers inside and place them in a glass flask. The result is incredible!
9. Decorate the walls with origami paper

10. Functional board organizer

11. Original shelf with jars

12. Gorgeous lampshade “Luminous lace”
 Materials: lace fabric (this could be a piece of an old curtain), a brush, PVA glue, an electric mechanism and an inflatable balloon.
First of all, cut the lace fragments.

We inflate the balloon, coat it with glue and overlap our lace circles. Let it dry for a day.

We pierce the ball with a needle, peel it off from the lace surface.

We make a hole in the opposite side for wiring. We install the electrical mechanism.

13. Bucket lampshades
This original lampshade imitates an old bucket, creating an antique effect. But in fact it is made of dense specific fabric.

14. Signs with messages

15. Colorful photo collage

16. Impressive photo wall

17. Creative pendant with photos

18. Letter of Memories

19. Exclusive vase made from a jar and nuts


20. Laconic cute vases on the wall

Materials: planks (preferably square), fasteners, leather tape, cute glass pots, screws, hammer, screwdriver and scissors.


21. Decorative clay pot


22. Transforming old shoes

23. An extraordinary panel - a new role for old-fashioned ties

24. Decorate the wall with children’s hats and elegant dresses

25. Vintage window frame cabinet

26. Not a standard place for skis
 27. “Ski” photo frame

28. Musical wall of guitars

29 ... and vinyl records

30. Headboard made from old pallets
A very simple idea for creating a cozy interior identity. You can hang different things on pallets: mini garlands, ribbons, cute fabrics.

31. Cork mat
A great alternative to regular bathroom bedding! It is convenient, practical and beautiful. This rug repels moisture, and its natural color will harmoniously fit into almost any environment.

32. Old storage boxes

33. Picket fence for a hanger - an element of vintage decor

34. Retro idea: decorate the inside of furniture with beautiful wallpaper


35. Wallpaper on the doors

36. Wall frame - a place of honor for a luxurious wallpaper ornament
 37. Double function of one pattern
Support the theme of the wallpaper on the wall by wrapping books in it.

38. Update your table lamp by decorating the lampshade with some pretty wallpaper.

39. Nature in your home


40. Another role of an ordinary hanger

41. Hanger with clip as a holder for paintings, photographs and other decorative items

42. Office tablet for compositions on the wall

43. Artist's experiments

44. Bright chandelier with pompoms for a nursery

45. Lush paper balls for decoration

46. Garland in boho style

47. Cute braid for a Roman blind

48. Transforming the lampshade with lovely fringe

49. A fun interior detail – a garland of mini pom-poms by the window

50. Restoration of a high chair for a nursery
It’s easy to make a beautiful and stylish piece of furniture from an old chair with scuffs and scratches. Gather your paints, masking tape, and colored wool threads to make a cute pom-pom pillow for the high chair.


51. Snag as a hanger

52. A vintage chest is a great alternative to a coffee table.
 53. Original bedside table from a chest


54. A chest as an exhibit inside a glass box - a central piece of interior decor

55. Extravagant dressing table from a suitcase

56. Unusual minibar

57. “In limbo” – chests a la shelves


58. Storage cases

59. Adorable pet bed

60. Music wall

61. Cities and countries above the desktop

62. Note board

63. Instead of wallpaper, old newspapers

64. Precious bookmarks
IN modern world computer technology books also purchased electronic format. But for some of us, the ritual of reading good old books in their original form still takes place. A luxurious bookmark will not only further emphasize its significance and value, but will also become a decorative highlight of your interior. This kind of thing is easy to do with your own hands.

Any decorations are suitable for decoration - beads, brooches, stones.

For work you will also need: wide colored ribbons (velvet or satin), scissors, thread, needles, wire cutters, glue and clips for decoration.

Think about it perfect combinations to your taste. 
Glue the ribbons well by folding them in half.

We decorate the ends with clips.

65. Serving decor – butterflies made from napkins

Add a romantic touch to your table decor by turning paper napkins in cute bright butterflies. You just need a thin wire, scissors and, of course, the napkins themselves.

Fold the napkin in half. 
We form triangles along diagonal lines.

On one side, we connect the ends of the triangle to the vertex.

Turn over to reverse side and bend the top to the base.

That's all! All that remains is to make the antennae from the wire.


66. Bird on canvas


68. Stylish decoration of plates

Materials needed: white plates, tape, special markers, water, cotton swabs and an oven. Cotton swabs with a glass of water will be needed to adjust the pattern.

Option N°1


Option N°2


The final touch is to secure the resulting drawings by placing our plates in the oven. For porcelain 220°C for 30 minutes, for ceramics – 160°C for the same 30 minutes.

69. Unusual cover for a vase
A vase made from a plastic bottle with a decorative cover made of multi-colored lightning bolts looks much more attractive!

Materials: 12 zippers (20-25 cm), plastic bottle, thread, knife.

Sew along the length of the zipper.


Sew the two edges together (you can do this by hand).

Let's try it on.

Cut off the top of the bottle.

We trim the flowers and enjoy the composition! 

78. Family organizer: making a menu
 79. Luxurious basket “Pink Heart”
80. Romantic decor – heart made of branches

Such options for great ideas for handmade crafts and other things for the home are what you need when the usual interior is no longer inspiring, and you can’t afford to radically change the decor.
A stylish apartment is a dream that seems unattainable to many. It is generally accepted that only the efforts of professional designers and huge financial investments will turn an apartment into an ideal one. But the fact is that to create a harmonious and sophisticated interior, you don’t need to hire specialists and spend astronomical sums. It is enough to show a little imagination.
Skillful hands can work wonders even in a tiny apartment. Don't believe me? Look on the Internet. There are many different websites where you can get some great DIY interior design ideas. It has everything: reviving old furniture, decorating a room, creating unusual decorative elements from scrap materials. Even an old lamp, scattered volumes of the Encyclopedia Britannica or a broken chair that have been lying idle on the balcony for many years can become a chic decoration for your bedroom or living room. The main thing is not to be afraid to experiment.
Decoupage furniture with wallpaper
Do you have pieces of old wallpaper left over from the renovation the year before last gathering dust on your mezzanines? Don’t rush to throw them in the trash as unnecessary trash! They will help breathe life into old interior items, turning them into designer items.
A coffee table will look impressive if you put a piece of elegant wallpaper under glass on it. No need to fuss with glue. If you get tired of the pattern, you can change it at any time.
Decorating a lampshade with wallpaper is an excellent idea: the thing becomes bright and sophisticated. In addition, when the lamp is turned on, it illuminates the pattern, casting bizarre shadows around the room. Isn't it beautiful?
An unusual headboard can be made by simply gluing a piece of wallpaper in a contrasting color above the bed. This solution is especially convenient for beds without headboards.
Wallpaper in black and white, striped or checkered - stylish option decoupage
Photo wallpaper pasted on cabinet doors allows you to create unique furniture in exotic styles.
IMPORTANT: to make cleaning easier in the future, choose easy-to-clean wallpaper, such as vinyl.
Decoupage the closet with wallpaper
A boring table or shabby cabinet covered with wallpaper scraps will turn into a work of design art that enlivens the atmosphere. This type of decoupage is very simple to perform and accessible to everyone. Check out these great ideas like:
- Pasting with pieces of wallpaper with the same pattern. A boring white cabinet will become much more expressive! Make sure that the pattern matches and the color is in harmony with the color of the walls and the overall appearance of the room.
- Patchwork technique. It looks creative to cover furniture with pieces of wallpaper with different patterns, like when sewing a patchwork quilt. The main thing is that the “rags” combine with each other and create a harmonious composition.
- Wallpapering from the inside. A labor-intensive but effective idea for open shelves. Allows you to create a bright composition by making the back wall of the rack and the shelves themselves a design element.
IMPORTANT: before you start gluing, use sandpaper and acrylic paint Clean the work surface from stains, cracks and scratches.
Other types of decoupage
Exquisite compositions for decorating furniture are also created by other means.
Napkins for decoupage. They are easy to find in specialized craft stores. Diverse in style, they allow you to decorate furniture in accordance with general style premises.
Textile. Decoration with matter - effective way breathe life into old furniture. It is convenient to use old curtains for this. A wardrobe covered with pieces of fabric looks elegant and unusual. Reupholstering an old chair will give you a stylish piece of decor.
Varnish. A simple and elegant way is to glue decoupage napkins and cover them with varnish. The idea of using a special craquelure varnish is impressive: such a varnish creates beautiful cracks on the surface.
Paint tinting. Furniture tinted with colored paints looks bright and elegant. An extravagant option is to paint the table through the tulle, creating an elegant pattern. Skillful tinting can artificially “age” furniture, giving it a noble appearance. The effect of antiquity is created by golden or silver paint. Luxurious gold or silver will make even the most unprepossessing furniture stylish.
Headboard
The headboard is the main decorative element of the bed. It’s easy to make it a bright accent in your bedroom design if you use your imagination:
- soft headboard: a piece of polyurethane foam is glued onto a hard base and covered with velvet, velor or other material. Use buttons for decoration;
- natural wood. A colossal selection of ideas: noble wooden panels, exquisite wooden lattice, cute shelves and much more. A headboard made of natural branches looks impressive;
- stone. Inserting from natural stone will refine the headboard. Lovers spectacular designs they can make a panel of sea pebbles as a headboard;
- bamboo. An exotic material that allows you to create unique headboards - from an elegant panel to an exotic headboard assembled from bamboo sticks of different heights;
- image. A favorite painting or photo that evokes warm memories will become an exquisite headboard and expand the space of the bedroom;
- installation. Here you can show your imagination by using the most unexpected objects for decoration. The result is stunningly beautiful. Don't be afraid to experiment!
Roman curtains
Roman blinds are a convenient and stylish solution for the interior of any room in your home. They are a piece of canvas the size of a window with sewn-in slats. Thanks to the latter, Roman blinds can be gathered like blinds, forming beautiful folds.
Simplicity and grace make Roman blinds magnificent decorative element. You can decorate your living room or bedroom with them, or hang them in your nursery. This is a practical option for the kitchen. A wide selection of colors allows everyone to find an option to their liking.
Roman blinds are easy to make yourself. To do this you will need a piece of fabric of your choice and old blinds:
- measure the width and length of the window, add 1 cm on each side for seams and cut a piece of fabric. Iron and stitch along the seams;
- remove the excess slats from the blinds, glue the rest to the curtain from the inside out;
- hang the curtain.
Instead of blinds you can use wooden beams. In this case, the strips are glued or sewn in, as desired. Don't forget to sew on rings to pass the cord through.
Wall decor from photos
Gorgeous photos from your personal archive or from the Internet will become an exclusive interior detail. You just need to try a little!
Photo frames are not the only way to hang photos on the wall. Consider ideas such as:
- Photo on backing. Find a thick, firm and light base ( perfect option– polystyrene foam or polystyrene foam). Print the photo so that it is 5 cm larger than the backing: the gap is necessary for folds. Carefully glue the photo to the backing, folding the ends. Treat the photo with glue to make the image shine. If you cut a photo into several parts, you will get an effective modular picture.
- Photo on canvas. You will need a canvas stretched on a frame and a printed image to size. Apply a thick layer of medium glue to the canvas, press the image tightly onto it and leave for several hours, remembering to wet it with a spray bottle. Then carefully peel off the paper and apply another layer of gel medium to the canvas for protection. The result is a gorgeous image with spectacular scuffs!
There are many creative ideas for using photos in the interior. Use it!
Original rugs
It's hard to believe how magically your interior can be transformed thanks to a cute rug. It is also easy to make it yourself from scrap materials, the choice of which is very large.
Leather belts. A dozen genuine leather belts (their number depends on the width of the future rug) are fastened together using metal staples or rope. Looks great!
Textile. You can thread scraps through the holes of a bath mat to create a fluffy surface, or you can weave a cute bath mat from narrow strips of fabric. Old t-shirts or fluffy bath towels make great materials.
Wine corks. Of about two hundred wine corks, cut in half and glued onto a water-repellent backing, you get an incredibly stylish rug. You can make a pattern out of corks.
Wool threads. By making pompoms from woolen threads and fastening them together, you will get an incredibly cozy rug. The choice of shades is rich!
Sea stones. Beautiful pebbles you collect from the beach can be turned into a spectacular bath mat. Incredibly stylish!
Cozy pillows
Soft sofa cushions create a feeling of comfort and serve as a bright accent in the interior. If you find it difficult to find a pillow that suits your tastes in the store, don’t worry: it’s easy to make it yourself.
DIY pillow. Every craftswoman who knows how to handle sewing machine, can sew himself a pillow or soft ottoman of any size and shape. Update old sofa cushions by sewing cute pillowcases for them. A wide selection of fabrics and prints in stores guarantees the realization of any idea.
Coloring. If you don't know how to sew, it doesn't matter: boring pillows can be easily painted in new color with help special paints for fabric. An effective option is a drawing or pattern applied using a stencil. White pillows are especially convenient for painting.
Ombre. To get a fashionable and surprisingly effective color, dip the pillowcase in the dye 2/3 of the way and immediately remove 5 centimeters from the liquid. Wait another 5 minutes and remove the next 5 cm, and so on until the end. The result is a stylish gradient.
Decorative lampshades
An original lampshade will become a real decoration of the room. You can make it yourself and get a truly exclusive item. The choice of materials for manufacturing is very large:
- paper. An elegant carved cap will not only decorate the lamp, but will also cast fancy shadows. A creative lampshade can be made from a world map or favorite photographs;
- textile. Needlewomen can sew a lampshade to their liking or decorate the one they already have with ribbons, appliqués, and draperies;
- threads Wrap the lampshade tightly with twine and secure: simple and elegant! Using an inflatable ball, thick threads and glue, you can make a stylish ball-shaped lampshade;
- beads or buttons. Sew or glue them to table lamp, and it will turn into a work of art. Another way is to string beads on threads and attach them to a metal hoop to make an elegant lampshade;
- twigs. Collect even twigs and fasten them together. You will get an unusual lampshade made from natural material.
You can do this and much more yourself: all you need is skillful hands and imagination. Don't be afraid to create!
Living decor from succulents
Living plants as decoration are truly magical. A design element made from succulents is sure to elicit exclamations from your guests. It's hard to believe that such beauty can be made at home with your own hands:
- Wall of succulents. The shallow box is closed on top with a metal mesh using a wooden frame. Soil is poured inside (any mixture for cacti will do). A composition of succulents is planted. These unpretentious plants feel great in the most difficult conditions. The design is fixed vertically and is pleasing to the eye.
- "Plantation" on the table. You will need a thick tabletop with a recess in the middle. Place a box of succulents there and admire the extraordinary “plantation” growing green in the middle of your living room table.
- "Green" coffee table with glass table top. Its lower part turns into flower pot, where a variety of succulents are planted. Decorate the composition with elegant stones.
IMPORTANT: to create a composition, choose plants of various shapes and colors.
Glass containers in decor
Glass bottles, jars, and vials have been accumulating in our homes for years. Surprisingly, these useful everyday items can turn into an exquisite decorative element. They are easy to make even for a beginner.
Decoration. With a brush, paint and inspiration, you can turn an ordinary jar or bottle into a work of art. Threads, beads, fabric, paper are also suitable for decoration. adhesive tape and all the materials that come to hand. The finished container can become an exclusive vase or a cute souvenir.
Lamp. The simplest way– put an LED strip into a colored glass bottle and get a spectacular holiday lantern. If you saw a bottle or cut a hole in it, you will get an unusual candlestick or original shades for a chandelier.
Exclusive dishes. It is enough to saw the bottle and sand it well. A bottle sawn crosswise will make a unique glass or vase. Saw the bottle lengthwise and you will have exclusive coasters for food.
There are hundreds of ideas on the Internet for using glass containers in decor that are accessible to everyone. Take action!

You really want your house to look stylish and expensive, but doing this with your own hands is actually easier than you might think. From the most ordinary, and sometimes unnecessary things, DIY crafts for the home look great.
Expensive furniture, works of art, modern gadgets will undoubtedly make your home look luxurious, but sometimes very little money, a little creativity and neatness are enough to get an interior that looks expensive and stylish, and all this attractive splendor is very inexpensive.
If you want to put your hands and soul into decorating your home, here are some ideas on how to do it.
DIY crafts from jars
Use jars to organize small items such as cotton balls, ear buds, and bath salts. This useful decor is ideal for a bathroom or bedroom. The jars may be the same or not, this is not very important here. An important element This is where the handles come out. These are furniture handles. When I'm in construction stores, or in furniture workshops, it is difficult for me to tear myself away from display cases with handles, I am especially attracted to transparent ones in the form of crystals. It truly looks luxurious. I always regretted that I didn’t have furniture where I could attach such luxury.
And here it is, a godsend for beautiful hands. Naturally, the lids on the jars originally came in all sorts of colors, but they were painted with simple white spray paint. And the luxurious handles were glued with metal glue.
From bottles
Such exquisite decor The simplest bottles can be made using decal paper with transparent film. Of course, first you need to paint the bottle in the desired color, and then start decorating the surface.
Need to find interesting drawing, which suits your interior in shape and color and transfer it to the surface of the bottle. The design is printed on decal paper for a laser or inkjet printer.

By the way, such paper is called differently. Decal paper, gummed paper, decal and even transfer paper are all the same thing.
Then, the drawing is cut with scissors and lowered into the water. After 10-12 seconds, the picture will separate from the substrate. You can watch the video, a very interesting way to accurately transfer a design to the surface of a cup.
Read the guidelines for printing on decal paper carefully. Find out for inkjet or laser printer paper, in the printer settings, check whether the paper type is specified correctly. Before applying to the surface, it must be degreased with alcohol. The treatment liquid must not contain acetone. Dry the applied design with a hairdryer or in the oven. Attention! The oven temperature should not exceed 150 degrees.
After application, coat with acrylic matte or glossy varnish, depending on the purpose of decoration.
With this paper you can make designs that will last for many years, such bottles and vases can be washed, nothing will happen to them.

Anyone who has a creative streak is sorry to throw away empty “glass containers”.
And this is the right regret, because even the simplest glass bottles, they look magical in the interior.
Serving napkins
Great idea! I talked about such exquisite home decoration in a previous article about. And I liked Lyudmila Sanzharovskaya’s comment that such table setting gives status to the owners of the house.

From newspaper and magazine tubes
I never thought that such practically free material would be so flexible. I was a guest at a children's creative center with a surprisingly cute name “White Rabbit”. The hostess showed me the children's handicrafts, I was amazed, here is a dish woven from newspapers. After all, you can’t tell it from a vine. This dish will be varnished, it will not be afraid of water, and it can be used perfectly in the kitchen or in the garden for fruit.

This craft requires more skill and experience. But, as they say, the worst is the beginning.

From the cord
The pleasant natural color of cotton cord is a favorite material for DIY crafts. Flowerpots and organizers look elegant and noble, especially in combination with brightly colored tassels made from floss threads or natrul materials such as leather.


You can make rugs and baskets from scraps. But if the rugs can be made only from shreds, cut into ribbons and tied together into one thread for knitting. It is better to make a basket on a cord around which the shreds are wrapped. The basket should keep its shape. You can put tangles, scraps and everything a needlewoman needs in her craft corner.

From an old sweater
You can make a craft box stylish using just an old sweater that no one wears anymore.

Book holders
I found such a cute guy on the Internet, I already have an article about holders, but it’s hard to pass by such a charmer. An ordinary stone, so skillfully painted and doing its functional task so well. Although in the article about holders the idea of a silver or gold polyhedron looks very expensive, the painted stone looks very nice and homey.

Beans and brushes
This proposal looks more like a life hack, but it looks so stylish that I decided to place this photo in crafts for the home. The truth about “making” here is only the process of pouring beans into a transparent vessel of suitable size.

Crazy Shred
A wonderful technique for crafts for the home - crazy patchwork or crazy patchwork. The good thing about this technique is that all kinds of fabric scraps are used. Every girl who sews more or less has somewhere a treasured bag with scraps and leftovers. In the technique of real, academic patchwork, special attention is paid to the selection of fabrics. They even sell sets. But there are no restrictions in this technique and it is easy to do.
Here, a guest of my site, Luda Strakovskaya, shows how to sew a potholder using this technique, everything is simple and clear.
In fact, potholders are a very necessary and beautiful detail of the kitchen interior.

But there are also options for this technique in the living room. Decorative pillows for beauty, comfort and as a connecting color element of the interior.

A scattering of puzzles
I don’t know about you, but I have a huge number of puzzles that have migrated from one box to another, got mixed up, rearranged, and now it’s no longer possible to assemble anything worthwhile from them. And here is such a nice and beautiful idea for a nursery.

Crafts from buttons
This is a classic of the genre. Anything can be made from buttons, and there is practically no person who does not like to look at buttons. And in hardware stores there are always crowds of people near the scattering of buttons sold at discounts.
Recently I went into a store, there was a table with high sides and inside there were piles of various buttons that were left in the store one or several at a time, leftovers and illiquid items. A special scoop is stuck into the slide; you can pick up buttons directly with the scoop.
Mom and daughter, daughter, about 5-6 years old, are collecting buttons in bags, their faces are happy, overjoyed. I ask what you will do with them. Mom, hurriedly, - Oh, we don’t know yet.
I really want to see what they came up with with their buttons.
Maybe such beauty, for example.

Cinder candles
Candles are always needed in the house. To create a romantic mood, for relaxation and release from negative energy the past hard working day, and, of course, for cases when there is an emergency power outage in the house.
Oh, this incident is perhaps the most favorite in our family. Especially when the children were little. Everyone pulls up to the kitchen, the kettle is turned on, the candles are lit and moments of happy family unity begin. It would be nice if everyone’s phones were dead by this time.
After such gatherings, a decent amount of cinders remains, or rather, this amount depends on the time needed by the emergency service to fix network problems.
The cinders need to be melted and poured into cups left over from sets or for some reason not used for their intended purpose.

Or you can make the “cup” itself from the same molten mass.

More ideas for a wooden nursery
A kind of stadiometer, or rather an age meter made of wooden square planks, will decorate and allow you to observe changes in the size of the hand of the owner of the room.

Well, or just decorate a children's room on a budget using creative process both kids and adults.

Friends, decorating your home with your own hands is a pleasant thing when ideas have been formed and all that remains is to select materials and tools for crafts. When your soul is rushing and you want both this and that, there is no need to rush. I hope this article helped you decide, or at least was simply useful.


- Turkey stewed in a slow cooker: spicy, with vegetables, in sour cream, cream and walnuts
- Types of speech: description, narration and reasoning
- Martyrs Tatiana. Moscow Church of St. Martyrs Tatiana Temple of the Martyr Tatiana at Moscow State University schedule
- Milotici: return of the Russian village Moravov Alexander Viktorovich
- Why you shouldn't cry in front of the mirror
- Martyrs Tatiana. Moscow Church of St. Martyrs Tatiana Temple of the Martyr Tatiana at Moscow State University schedule
- Milotici: return of the Russian village Moravov Alexander Viktorovich
- Making sounds for children Lessons on making sounds for children
- Recommendations: what to grease the pies to make them rosy and appetizing
- Pink salmon in the oven - delicious and easy recipes for baked fish Pink salmon fillet baked with vegetables
- What does a lizard tattoo mean?
- Deciphering the natal chart of the house
- What does mulberry help with?
- Photo report “Birthday of Samuil Yakovlevich Marshak in the group”
- Breathing at high pressure Breathing correctly at high pressure
- Bryansk State University named after
- Tasks to test spelling and punctuation literacy
- Macroeconomic calendar
- The Forex Economic Calendar is a reference book for every trader, regardless of trading experience and level of professionalism, and especially...
- Interesting signs about spiders