Plum beer: recipes for low-alcohol drinks. How to brew beer at home without equipment: hop recipe, video
To understand the intricacies of home brewing, we tried to make beer ourselves. Used brewery Mr. Beer, a jar of Englishman's Beer Concentrate with a packet of yeast, a packet of corn sugar and a packet of One Step Cleaner. We filmed the whole process step by step on a digital camera - so as not to forget how to act correctly when you want homemade beer again.
Olga Kuzmina brewed homemade beer.
STAGE 1: water preparation for young beer

Preparation of liquid, which became the basis for the life of the brewer's yeast culture. At the same time, care was taken not to introduce wild yeast into it.
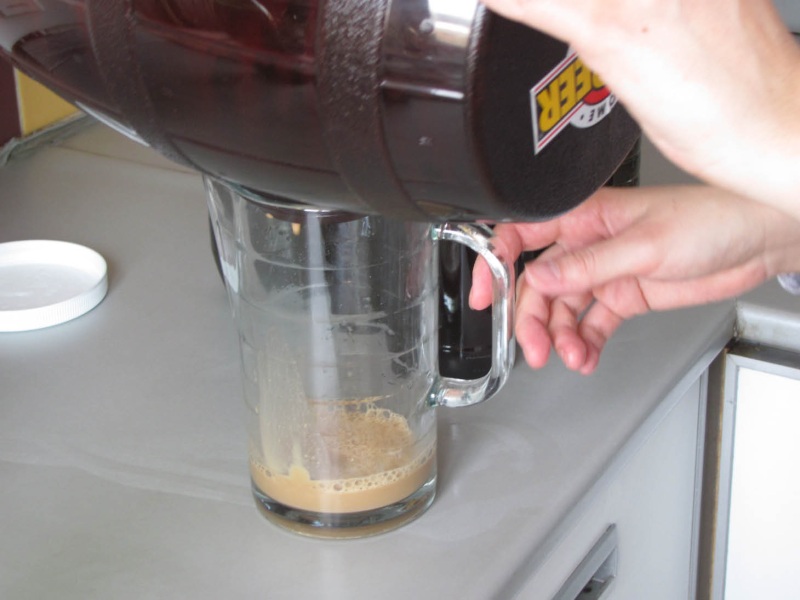
We thoroughly wash the outside and inside of the barrel, the lid and the tap with dishwashing detergent.

We are putting together a brewery. It's very simple, you just need to put the faucet in place. To do this, insert it into the hole from the outside, put it on and tighten the nut from the inside. The rubber sealing ring on the faucet makes the connection reliable (our practice has confirmed this).


Disinfection. We take 4 liters of warm water into the barrel (marks on the back wall help measure the required doses), pour half a packet of One Step disinfectant, throw in a spoon with a long handle and a bottle opener.

We screw on the lid and begin to shake the barrel to wash all the walls and the lid.

We rinse the faucet by opening it several times, while placing a plate under the solution - it will be used for a spoon and a bottle opener. Now leave the barrel alone for 10 minutes. Then open the lid, take out our spoon and cutter, and put them on a plate. We drain the solution through the tap, rinse the barrel thoroughly, and again rinse the tap. After this manipulation to internal parts We will not touch the barrels, we will try to maintain microbiological purity.

Let's start preparing the drink. Pour 4 liters of water into the barrel (bottled mineral water was used).

Remove the lid from the jar of malt concentrate; underneath there is a packet of yeast, set it aside for now. Pour hot water into a vessel and place a jar in it to warm up the malt, since it is quite thick, and when heated it will be easier to pour out.


A liter of water was poured into the saucepan, and there was just that much water left in the first bottle (so I ignored the developer’s advice and did not prepare, that is, did not disinfect, the measure). Rinse the spoon under running water. Pour sugar into the water and it will immediately dissolve. Keep it on the fire, stirring (I must say, the syrup behaves very well - it doesn’t burn). Bring it to a boil. The syrup turned out to be transparent and not very thick, the operation took a couple of minutes. Turn off the fire for now. Place the spoon on a rinsed, disinfected plate and rinse the opener.


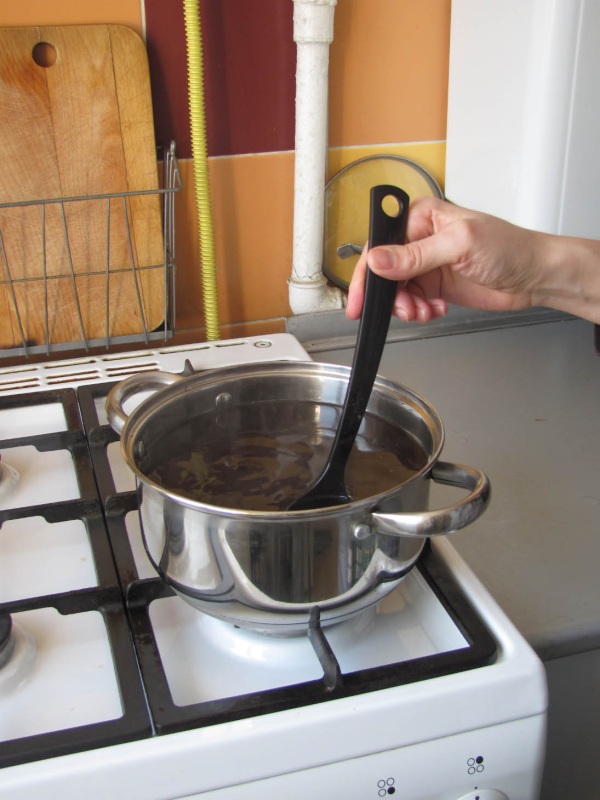
Cook the wort. Open the jar and pour the contents into the syrup. Turn on the heat again, take a spoon and stir. The concentrate is easily mixed with syrup. The liquid is again heat-sensitive: nothing burns, you don’t even have to be so careful. Bring to a boil.

We put on gloves, take a saucepan and pour the wort into the keg so that the hot liquid does not get on the walls and damage the plastic.


Add water to the 8.5 liter mark. Take the spoon again and stir the future beer. The liquid is warm, but not hot.
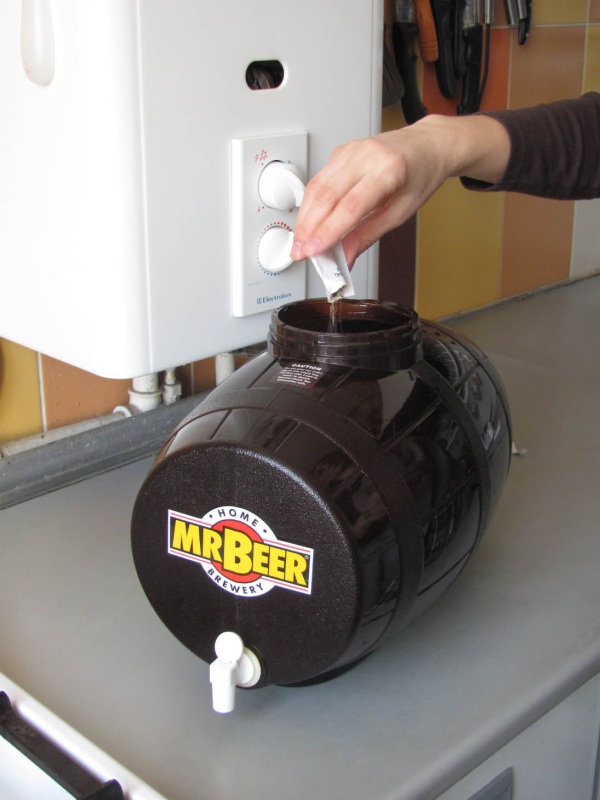

Pour brewer's yeast from the bag onto the surface of the liquid. Leave for 5 minutes, covering with a lid. Then stir with a spoon and screw on the lid. That's it, the first stage is completed, it was not difficult and took about 30 minutes. Now the barrel needs to be placed away from sun rays. Young beer will ferment for a week.
STAGE 2: send the young beer for further fermentation.
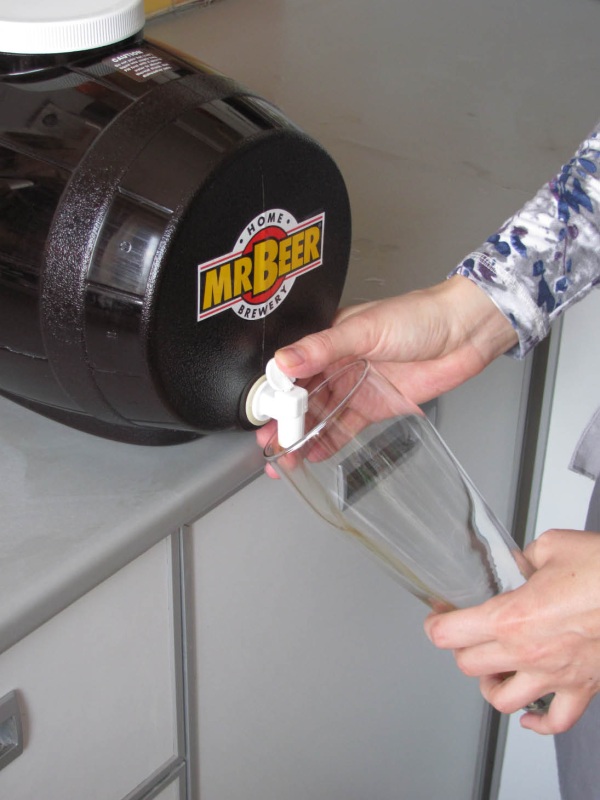
A week passed, the beer keg stood in a dark room, no one touched it. The day before the young beer was drained, it was transferred to the kitchen: the sediment raised during transportation should fall to the bottom again. To assess whether everything is going correctly, we take some young beer through the tap and try it - the drink already looks like beer with a bright bitterness. But for us, the absence of a sweet taste is more important; this is precisely what indicates that the beer can be drained. The beer contains no suspended matter and is not cloudy.

You probably noticed that the technology involves bottling beer. The fact is that we have to prepare a drink that will not undergo pasteurization. And its safety is ensured by hermetically sealed closure. An open container of any size should be used up immediately, and bottles are almost ideal for this purpose.
Most often it is recommended to buy plastic bottles (or they are included in the kit); frankly speaking, it seemed to me that choosing plastic would discredit the very idea of home brewing. After all, we do it for the sake of a unique and not so harmful (I only partly believe in the healthfulness of beer - the pancreas is still not made of iron) drink, and serve it in plastic container just disrespectful.
In addition, regular bottles are not designed to be reusable. It is best to collect a set of glass bottles with special stoppers (like mine) or buy a crown stopper installer.
For the new beer, I took two types of bottles - half-liter glass bottles with ceramic caps and plastic ones for mineral water.
The work begins again with disinfection. But glass bottles I just washed it and boiled it - less hassle (I took off the rubber gaskets, then put them back on and put them directly into boiling water with the lids, closing the bottles before pouring beer). More better option with oven - disinfection when dishes are dry. By the way, such disinfection can be done in advance.


I had to tinker with plastic bottles. I prepared a solution from half a One Step sachet, then poured it into containers, screwed on the lids, shook well and set them on their sides. While the bottles lay there for the prescribed 10 minutes, I turned them over several times. Then I washed it again large quantities water.

At this stage, you begin to understand that the sterile excitement has subsided somewhat. Now we need to add a little sugar to each bottle, I disinfected the funnel and measure (also an interesting topic: disinfection is a wet process, but the sugar must be poured dry - we will wipe it, we can introduce unwanted flora!). The sugar itself could well become a carrier of wild yeast; it is simply impossible to sterilize it; all we have to do is rely on the power of our brewer’s yeast colony. I add sugar at the rate of 1 tsp. 0.5 l - for glass and 3.5 tsp. - for a 1.5 liter plastic bottle.

Let's start bottling young beer. The bottles must be held at an angle so that the liquid flows along the wall. At first everything was fine, but suddenly it turns out that the tap has some kind of absurd character: some streams do not go down, but to the sides. You have to press the neck against the tap, and the way the bottle behaves fades into the background.
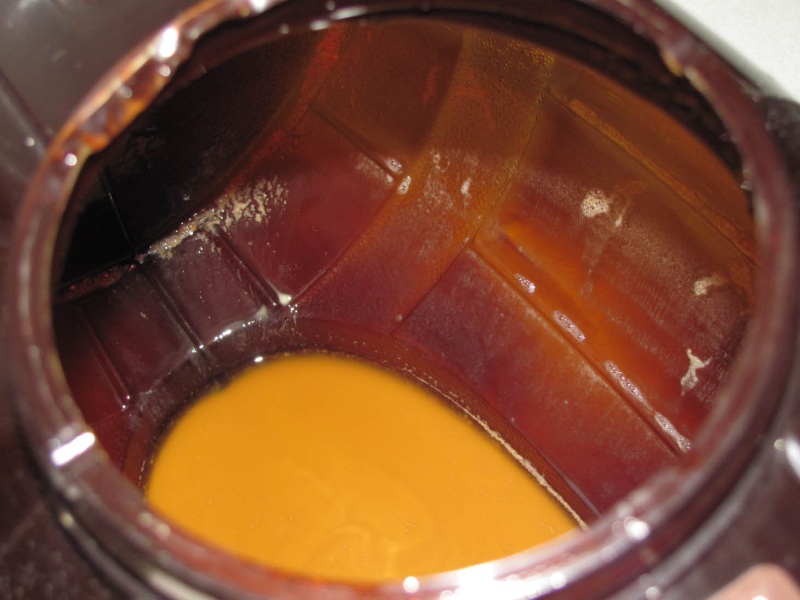
On the last bottle, the beer stops pouring out; its level is below the tap. I open the lid of the brewer and carefully tip it forward to catch as much as I can without any sediment. There was very little of it, and it is clearly visible.
By the way, I note that breweries without a tap, from which beer is drained using a siphon, are not so convenient; two processes must be controlled simultaneously - monitor the sediment and the bottles.

We cork each bottle. Then shake to completely dissolve the sugar. We drain the remainder separately, you can see how much it turned out. I thought there would be more. The bottles are sent back to dark place: a week of fermentation + a week of standing. After a week, I will put one or two bottles in the refrigerator, the rest will remain at room temperature.
As soon as I started working on the topic, I began to be tormented by the idea of how to make a convenient and serious brewery at home, because what we have is always a plastic vessel of varying complexity, with or without a tap. I would like something more convincing. But all these thoughts fade into the background when you start washing this thing. My brewer fits easily in the sink, it is lightweight and, importantly, very simple, without any tricky parts. Now that the barrel is empty, it can be used again.
STAGE 3: tasting among like-minded people
The long-awaited tasting. I won’t hide the fact that we opened the first bottle not without trepidation! As you can see in the photo, our beer looks as it should - an amber-colored drink with a large head of foam (although it quickly falls off).
When opening the bottle there was a burst of air. The taste is wonderful, bitter, rich, interesting, cannot be compared with mass-produced beer, and thanks to the malt, Englishman’s surpasses in taste the more expensive varieties that our tasting participants had a chance to try.
The drink turned out clear with bubbles constantly forming (note that we had natural carbonation). In general, the experiment was not only a success, it confirmed that homemade beer lives up to its proud name and is not so difficult to prepare.

An interesting discovery for us was a bottle that had been kept in the refrigerator for the last week - this beer was recognized as the best (special thanks to Alexey Yeshukov, our consultant, who persuaded me to do this). All the beauty homemade beer it played brighter, the taste was rated as more noble, the color was darker, the drink came out more carbonated and gave more pleasure than others. By the way, the beer in each bottle has a slightly different taste.
Any “domestication” of processes that were hitherto only available to production requires time and, most importantly, some effort. Those who are ready to seriously plunge into the topic of home brewing would do well to acquire a special set of bottles with caps, find a permanent place for the brewery, make a rack for a battery of bottles, and also, perhaps, provide a separate mini-fridge for aging and storing beer.
Thoughtful recipes, the help of like-minded people and consultants will help turn brewing into a simple but exciting activity that your friends will especially appreciate. After all, an ordinary invitation to a beer will take on a new meaning for them.
Thanks to the company pivovarnya.ru and personally to Alexey Yeshukov for their help in diving into the topic and the brewery provided for the test.
“Beer is another proof that God loves us and wants us to be happy!” Words by Benjamin Franklin. American Founding Father, politician, inventor, scientist, writer, diplomat, musician and talented businessman.
In a word, you can trust him!” Beer is another proof that God loves us and wants us to be happy!” Words by Benjamin Franklin. American Father is a founder, politician, inventor, scientist, writer, diplomat, musician and talented businessman. In a word, you can trust him!
Beer is a unique drink with a rich history. This drink is loved everywhere. IN different countries The world has its own unique recipes for its preparation. There is reason to believe that beer is the oldest alcoholic drink in human history. The first mentions of it go back ten thousand years.
It is truly known that the Sumerians and Babylonians drank beer. This drink has gone through history and has only become more popular in our time.

Equipment
- enamel saucepan minimum 30 liters
- thermometer
- 5 meters of gauze
- grain mill
- iodine and white plate
- special container for fermentation with a water seal
- hydrometer (device for measuring sugar levels)
- glass or plastic bottles made of opaque material with stoppers for the finished product
Real living beer is a substance that is constantly in the fermentation stage; as soon as it ends, the beer dies. The initial stage of fermentation occurs in the same way as with any other alcoholic drinks It is during this period that beer is “born”, its aroma and taste are established.
At this stage, it is necessary to take care of the ideal conditions in which the characteristics of the drink will take place, the fundamental one being temperature. Ideal indicators are +18-20°C. In a warmer room atmosphere, intense fermentation will not allow the beer to mature properly, and at temperatures exceeding +36°, the yeast cultures (and with them the beer) die.
Traditional recipe with malt and hops
Preparation
The first step is to thoroughly wash all equipment.
IMPORTANT! If you approach the issue of sterilization carelessly, all further work will simply go down the drain, since so-called “wild yeast” or other pathogenic organisms may get into the wort. In the end, instead of a divine drink, you will end up with a tasteless mash.
Then you need to prepare dry yeast. To activate the fungus, it is necessary to pour the entire volume of the package into a small amount of water at a temperature of 25-28 degrees for 15-30 minutes. Various manufacturers Yeast is pressed and packaged differently, so it is better to adhere to the information on the packaging.

Malt crushing
Crushing the malted grains is a very important step in the brewing process. Ideally, the grain should be divided into 5-7 pieces. It is important that the pieces retain parts of the peel. It is simply not possible to filter malt that has been ground into flour.
For correct process When grinding, it is best to use a special grain mill, with which you can obtain malt of the desired grind. You can use a simple meat grinder, but there is a risk that the grains will be crushed too much, or simply crushed.
You can buy ready-made crushed malt in the store, but often unscrupulous manufacturers add flour or starch to increase the volume. 
Preparing for brewing and mashing the wort
It is necessary to prepare a bag made of 3-4 layers of clean gauze. You will need pieces no smaller than one meter by one meter. Place the ground malt in a bag so that it does not spill out.
- Pour into a 25 liter pan, place on fire, heat to 80 degrees.
- Place the bag of malt in the pan and close the lid.
- The water temperature during the brewing process should be 67 degrees - it is at this temperature that beer is obtained with a strength of about 4%, quite dense, with a mild taste.
- After an hour and a half of continuous cooking, you need to do an iodine test.
- It is necessary to determine whether starch remains in the wort.
- Take a few tablespoons of wort and place them on a clean white plate.
- Add a couple of drops of iodine. If the color has not changed, then the malt is ready for the next stage.
- If the malt turns blue, you need to continue brewing for another 15 minutes.
- After additional time, there is no need to test again.
It is necessary to brew malt so that the natural processes of fermentation of the ingredients begin. Once all the starch has been broken down, this process must be stopped. To do this, raise the temperature of the water in the pan to 80 degrees and cook for another 5 minutes.
Then remove the bag of malt from the pan and thoroughly rinse it in 2 liters of water at a temperature of 78 degrees. Add wash water to the wort. In this way, the remaining extractive substances are washed out of the malt.
The described method of mashing wort is called “in the bag.” When using it, there is no need to use a complex filtration system and multiple transfusions.

Boiling the wort
Place the pan with the wort on the fire, bring to a boil, add 15 grams of wort. Cook for 30 minutes over high heat. Next, add another 15 grams of hops, continue to actively boil for another 40 minutes, and then add the remaining 15 grams of hops and cook for 20 minutes. In total, the entire boiling process lasts one and a half hours.
IMPORTANT! Throughout this time it should boil quite actively.
Cooling
At this stage, you need to try to cool the beer wort as quickly as possible to a temperature of 24-26 degrees. If cooling is slow, there is a risk of contamination of the wort with bacteria or wild yeast. Perfect option- cooling in 15-30 minutes. You can use a special immersion cooler consisting of a hollow tube twisted into a spiral and two plastic hoses at the ends. Run cold water through the cooler for 15 minutes.
If there is no cooler, the pan with wort can be placed in a bath with very cold water. It is best to pour ice into the bath. This method is simpler, but there is a risk of overturning a heavy container, resulting in serious burns.

Adding Yeast
Depending on the type of yeast, fermentation can be top or bottom. You must carefully study the instructions on the packaging. Top fermentation occurs at a temperature of 18-22 degrees. For bottom fermentation, it is necessary to cool the wort to 5-10 degrees.
- Add the diluted yeast to the wort and mix well.
- Place the container in a cool, dark place and install a water seal.
- It is necessary in order to avoid the intake of excess oxygen.
- It is necessary to follow the temperature recommendations indicated on the yeast packaging.
- Conditions may differ for different crops.
Within 8-12 hours, the active fermentation process begins, which lasts 2-3 days. Then the process slows down a bit. After another 5-7 days, you need to check the beer preparation - if everything goes as it should, the beer should become light. Using a hydrometer, we measure the sugar level: we take a measurement, and after 12 hours we repeat the measurement. If the difference in readings differs by hundredths, you can proceed to the next step. When big difference let the liquid stand for another day, and then repeat the measurement procedure.

Carbonation is the process of saturating a future drink with carbon dioxide. In addition, this process improves the taste of the product and ensures the presence of thick foam. Add sugar to the prepared bottles at the rate of 8 grams per 1 liter. During the transfusion process, you must not disturb the yeast, which, depending on the type of culture, can accumulate either from below or from above. It is convenient to pour using a plastic tube, one end of which is placed in the middle of the container, and the other at the bottom of the bottle.
EDIT. If yeast does get into the bottle, it will make the beer cloudy, change the taste a little, but overall will not spoil the drink.
Fill the bottles so that there is a distance of 2 centimeters between the liquid and the cork. Sugar starts the process of additional fermentation in beer, so we place the bottles in a dark, dry place for 3 weeks. The temperature should not be higher than 24 degrees. Once a week, bottles should be shaken thoroughly.
After 3 weeks the beer is ready! IN closed The drink can be stored in the refrigerator for 6-9 months, depending on the settings temperature regime refrigerator. Once the bottle is opened, the beer can be stored for up to 3 days.
REFERENCE. During the first 30 days of storage, the taste of the drink improves significantly, so it makes sense to let the beer rest for another month.
A simple recipe without equipment for home brewing
In addition to the rather lengthy traditional beer brewing technology, there are many simple and quick recipes preparations.

For the simplest things you will need:
- barley malt – 6 kilograms
- water - 22-24 liters
- hops - 6 glasses
- molasses or jam - 1.5 cups, or sugar - 200 grams
- salt - 1 teaspoon
Pour cold water into a clean large saucepan and add crushed malt. Leave for 12-16 hours. Put the mixture on the fire, add salt, and boil for 2 hours. Add hops and cook for another half hour. Carefully pass the beer through cheesecloth, add diluted brewer's yeast, molasses, jam or sugar, and mix. The beer should sit for 6-9 hours, then pour the drink into bottles and leave for another 8 hours - the beer is ready!
The drink should be stored in the refrigerator.
Homemade dark beer
To prepare it take:
- Grains of rye, barley, wheat, oats - 0.5 kg (total).
- Chicory – 30-50 gr.
- Dry hop cones – 50 gr.
- Purified water – 10 liters.
- Lemon zest - from 1 fruit.
Before cooking, the mixture of grains is fried in a dry frying pan until the grains turn brown, then crushed.
- Boil 3 liters of water in a large bowl, add the prepared grain and chicory.
- Add all the remaining water, add hops, sugar, zest and remove from heat; this is the beer wort.
- After 4-5 hours it will ferment, for this the room must be warm, no colder than 20°C, but you should not place it near a radiator so that the yeast does not die from the heat.
- The liquid is filtered through 2-3 layers of gauze and bottled, which are kept in the cold for at least 3-4 weeks.

Later specified time You can conduct a tasting, if necessary, give the dark beer additional time to brew. This drink can be stored sealed in the refrigerator for up to six months; an open bottle can be stored for no more than a week.
Honey beer recipe
Compound:
- Overripe strawberries – 2 kg.
- Dry hop cones – 25 gr.
- Purified water – 25 liters.
- Natural honey -5 kg.
Cooking technology:
- Dissolve honey completely in water.
- Add hop cones and berries
- Mix everything thoroughly.
- Tie the neck of the dish with gauze or a thin cloth (so that air can circulate easily) and leave to ferment for 4-7 days.
- After this period, the container is closed with a lid and the drink ferments for another 30-40 days; it should be stirred daily.
- At the end of the second week, the beer is tasted for sweetness; if necessary or if fermentation is weak, another kilogram of honey is added.
- The fact that the beer has fermented is signaled by the berries falling down. You need to wait another week, strain the liquid through 2-3 layers of gauze and pour into 3-liter jars, which are stored in a cold room for 1-2 months.
- During this time, a sediment forms in them, from which the beer is carefully poured into bottles, corked and stored in the basement or refrigerator.

Berries should not be washed before cooking. On their surface there are natural yeasts, without which the fermentation process will not begin.
The best snacks
Different countries prefer beers with their own characteristics, which is why snacks to go with them also differ. For example, the Germans are especially fond of strong, rich types of beer, which go well with hearty and fatty dishes:
- Veal sausages with lard and spices.
- Salty pretzels.
- Baked knuckle.
- Various types of cheese and crackers.
- Stewed in duck fat, sauerkraut.
- Obazza (spicy cheese mixture, butter, onion and paprika).
In our country, it is customary to serve beer with:
- Crackers from rye, white bread, loaf with various sauces, garlic, salt.
- Crayfish, shrimp.
- Various types of croutons.
- Salted fish (dried, smoked, dried).
- Salty varieties of hard cheese.
- Raw smoked sausage, balyk.
- Salted nuts (peanuts, pistachios)
- Smoked pig ears.

Beer experts are amazed by our habit of drinking beer with ram; they believe that such a snack is the least suitable for this drink in terms of taste. However, this tradition developed back in Soviet time, when salted and dried fish was most accessible due to the fact that they prepared it themselves from their own fishing catch. Other, more refined products for beer were scarce and expensive.
Among Americans, “junk” food is popular as a complement to an intoxicating drink:
- Chips.
- Packaged crackers.
- French fries with sauces.
- Fried chicken wings.
- Nuggets.
Experts consider this assortment to be the most unsuccessful, firstly, due to the high content of preservatives, calories and hidden fats in snacks, and, secondly, that too hot spices and an abundance of enhancers do not allow you to feel the taste of the beer itself, not to mention the to successfully highlight with products
Of course, to make beer at home, you will have to tinker. You need to carefully approach the issue of choosing ingredients; you will have to buy additional equipment. But the result is worth it! After all, in the end result, instead of store-bought beer with preservatives and dyes, you will get a high-quality natural product. Real craft beer made with your own hands!
Cooking video recipe
Look simple step by step recipe making beer at home:
The history of brewing exists from the time of Ancient Egypt . Now this popular drink is everywhere, sold in large quantities in grocery stores and bars in many varieties.
It's quite can be cooked at home using only natural products and ordinary equipment. In this regard, a simple recipe can give best result than when prepared in production.
There are many beer recipes with interesting ingredients. In the traditional case, it consists of the following components:
- Malt— barley grains, a natural filter during production. The raw material should be white, have a pleasant smell, and not sink when placed in water. It is ground, leaving the husk intact.
- Hop divided by variety. Aromatic and bitter types are used, which are combined in the preferred proportion: either the beer will be bitter or with a hop aroma.
- Yeast It is preferable to choose beer houses. Ordinary ones are also suitable if the required type cannot be found.
- Spring, filtered or (worse) boiled water.
- A little Sahara for carbonation, it improves taste and makes the foam dense. Homemade beer recipes also come with honey.
All products for making beer at home are easy to purchase. The requirement for yeast (like all other ingredients) is the best quality.
Interesting! The light beer recipe uses regular drying. And to dark varieties add 10% caramel, dried in the oven with a light roast.

Home brewery equipment
All cooking recipes only require. Namely:
- 30 liter saucepan (preferably enameled);
- fermentation;
- thermometer for temperature control;
- gauze up to 5 meters;
- silicone hose to remove sediment from the drink;
- chiller - a device for cooling wort or a bath with cold water;
- a hydrometer that measures sugar content (optional);
- bottles for the finished product.
Attention! Sometimes a tap is installed at the bottom of the pan through which the liquid is drained. How to brew homemade beer is described below.

Classic recipe
To implement the traditional method of brewing beer at home, you first need wash, dry, sterilize all the dishes. Product composition:
- water - 32 l;
- barley malt - 5 kg;
- hops - 45 g;
- brewer's yeast - 25 g;
- sugar (sand) 8 g/l.
It is possible to prepare beer at home according to step by step instructions:
- Pour 25 liters of water into a pan and heat it to 80°C. Ground malt is immersed in a gauze bag, covering the container with a lid. Keep the composition for 1.5 hours at a temperature of about 72°C, periodically turning on the heat under the pan.
- Increase the temperature to 80 degrees and hold it for 5 minutes. After this, the bag of malt is removed, washed with 7 liters of the remaining water, which is added to the wort in a large saucepan. Now all the sugars in the malt have been used.
- Boil the wort, remove the foam and add 15 g of hops. Boil for 30 minutes, then add a second portion of hops - 15 grams. After boiling for another 50 minutes, pour out the last of the hops and simmer for up to 15 minutes, then turn off.
- The wort must be cooled quickly (in no more than 30 minutes). The purity of the drink depends on this. The pan can be lowered into a bath with as cold water as possible. After this, the contents are poured into a new container through gauze.
- Brewer's yeast is diluted according to the instructions on the package and poured into the wort with stirring. The container is transferred to a dark place where the contents ferment for a week (up to 10 days) with a water seal at a temperature of about 22°C.
- After 12 hours, fermentation will become intense, lasting up to 3 days. Bubbles should come out of the water seal. As carbon dioxide escapes, the drink will become lighter in color. The absence of bubbles for a whole day is a sign of readiness.
- Carbonation (saturation with carbon dioxide) improves taste and creates dense foam. Sugar (8 grams per liter) is poured into bottles and beer is poured using a narrow hose, eliminating sediment. Leave about 2 cm near the throat (for “breathing”) and seal. After this, secondary fermentation begins.
- Bottles are stored for up to 3 weeks at temperatures up to 23°C in the dark, after which they are transferred to the refrigerator.
This recipe contains step by step guide: how to brew beer at home. Product you can try right away, but if you keep it in the cold for a month, the taste will improve thanks to endurance.
Based on this cooking method for beginners (and not only) you can come up with other recipes.

Other DIY cooking recipes
Beer is prepared at home using recipes based on a variety of components.
It is made from grain, berries, bread or crackers, with or without yeast. The following methods will help you make homemade beer with original ingredients.
Cherry
Beer, the recipe of which includes cherry fruits, has long been produced in Belgium under the name scream. This is not the only type of cherry beer drink, but the most traditional.
In fact 30% liquid, from which it is prepared, is juice. The cherry beer recipe includes the following products:
- Pilsen lager malt - 4 kg;
- Crystal malt - 0.3 kg;
- chocolate malt - 135 g;
- corn flakes -700 g;
- barley popcorn (puffed) -700 g;
- 20 g each of Whitbread Golding and Tettnang hop varieties;
- Saaz hops - 10 g;
- Irish moss - 10 g;
- water - 28 l;
- ripe cherries - 4.5 kg.
The preparation steps are as follows:
- The wort is boiled for 1.5 hours, with the first two varieties of hops added at the beginning of the process. And 15 minutes before the end of the boil, add the Saaz variety. Irish moss is added 10 minutes before the end.
- Cool to 22°C.
- This is a beer without yeast. It is poured into barrels, where it is stored for up to 4 months, after which cherries are added.
- Ripening lasts up to 8 weeks, while the strength increases.
Cherry beer can be made with yeast, but this method is preferable.
How to make rye?
There is rye beer dark and light depending on the type of malt. The shade can be copper-orange or dark red.
Making light beer at home involves reducing the proportion of rye malt to 50%, replacing it with barley or wheat, and also eliminating the light roasting of this ingredient.

- rye malt - 3 cups;
- honey - 2 cups;
- hops - 100 g;
- yeast - 1.5 sticks;
- sugar - 1 tbsp. l;
- water (boiling) - 10 l.
You need a container with the ability for liquid to flow out at the bottom, like a samovar.
The stages are as follows:
- Grind hops and malt, place in a linen bag. Mix the yeast with a tablespoon of sugar and leave to rise.
- Put honey in a saucepan, boil the samovar and pour water from it through a bag into a large container. Stir the malt.
- When there is enough water in the pan with honey, you need to mix the contents, let it cool and add yeast.
- The yeast will drop, after which you need to pour the liquid into bottles and keep in a dark place for up to 4 days. The drink is ready.
There are many other similar methods for making grain beer.
Bread based
Beer is also produced from bread, including the stages of brewing, fermentation and maturation. Compound:
- malt - 400 g;
- sugar - 200 g;
- hops - 200 g;
- crackers - 800 g;
- yeast - 35 g;
- pepper - peas;
- water - 13 liters.
The recipe for homemade bread beer is implemented in the following steps:
- In a large saucepan, mix half the sugar, malt and crackers. Add pepper to scalded hops with boiling water.
- Dissolve the yeast in 6 liters of warm water, combine it with hops and pepper, and stir. Place in a dark place for a day, without covering. Add the remaining sugar and pour in warm water, 4 liters. Cook over low heat, without bringing to a boil, for 4 hours.
- Boil the next day, then drain the liquid. Add 3 liters of boiled water to the porridge. After an hour, drain the liquid, combining it with the previous portion.
- Boil the wort, remove the foam and filter. Fill the bottles with the product, close tightly, and place in a cool place for two weeks until ready.
Viennese
The recipe for Viennese beer will require the following composition:
- Vienna malt - 3.8 kg;
- Pilsen malt - 1 kg;
- “Istra” hops – 28 g;
- hops “Early Moscow” - 20 g;
- yeast (S-33);
- 2 oranges - zest.
Beer is prepared in the following steps:
- Wort is made: malt is mashed and water is added. Cooking lasts 75 minutes at 65°C.
First, Istrinsky hops are added, and after 20 minutes, Early Moscow hops are added. The beer is brewed for an hour, then cooled to 22°C. - Yeast is added, everything is mixed and left to ferment for up to 10 days. Temperature - from 18 to 25 degrees.
- The composition is filtered, orange peel is added. The beer is left to mature for 2 weeks.
- The composition is filtered. It's ready, but we can wait another month. The general storage period is up to six months.
Velvet
The recipe for making velvet beer deserves attention with honey and cinnamon. Compound:
- rye malt - 12 kg;
- wheat malt - 1.2 kg;
- black bread - 4.8 kg;
- yeast - 100 g;
- cinnamon - 1 g;
- molasses - 1 kg;
- honey - 200 g;
- raisins - 600 g;
- hops - 140 g;
- water.
It is prepared in the following steps:
- Dry, grind the bread, mix with other ingredients except water. The hops are scalded with boiling water.
- Water is added, the mixture is brought to a porridge state, after which it ferments for 6 hours.
- 26 liters of boiled water are poured in. In a tightly closed form, the composition settles for a day in a warm place.
- The liquid is drained, water is added, 6 liters. The container is left for another 6 hours.
- Drain again, mix the drained liquids and pour into sealed bottles.
- Ripening is carried out in the cold 12 days.

But the result that will be obtained using home technology, will not work. That is why it is recommended to study the secrets of brewing.
If you already know how to make beer with your own hands from traditional ingredients, and have tried the classic recipe in practice more than once, then it’s time to start experimenting. Why not brew beer at home the way it was customary in Russian villages? For example, from beets, potatoes, carrots, wheatgrass, nettles or other simple vegetables and herbs? Or maybe try recipes for making beer at home from molasses, horse chestnuts or sugar?
Making beer at home: how to make a drink without malt
Below is how to brew your own beer without malt using molasses and horse chestnuts.
Homemade beer with molasses
Ingredients:
- 10 liters of water,
- 1/3 cup hops,
- 1 cup liquid brewer's yeast,
- 0.5 kg molasses.
Preparation:
Pour water into a saucepan, add molasses, mix well, bring to a boil and cook until the smell of molasses disappears. Place hops in a gauze bag into the resulting wort, cook for 10 minutes and let cool. Then add liquid yeast to the pan, mix thoroughly, pour into bottles and leave for a while without closing the lids. As soon as foam appears on the surface, remove it, seal the beer bottles tightly and leave them in a cool place for 4 days.
Chestnut beer

Chestnut beer is a very aromatic and tasty drink, to which ancient healers attributed magical properties, believing that it could cure almost all diseases. It can be easily prepared at home. Before brewing this beer yourself, you need to collect ordinary horse chestnuts, dry them in the oven and peel them from the thick skins.
Ingredients:
- 3 liters of water,
- 25 - 30 chestnuts,
- 0.5 cups of hops.
Preparation:
Grind the dried and peeled chestnut kernels into flour using a meat grinder and lightly fry in the oven or in a frying pan. Pour the resulting raw materials into an enamel pan, pour hot water, mix well, put on fire and heat to a temperature of 75 ° C (in hot water, starch decomposes into sugar for fermentation). Then boil the wort for 10-15 minutes, cool until room temperature, strain, pour back into the pan, add hops, bring the mixture to a boil over high heat and boil for 20 minutes so that the hop cones are softened, then filter the wort, pour into jars and cool in the refrigerator or cellar. Strain the wort prepared for chestnut beer and leave to ferment for several days, skimming off the foam daily. After this, strain the drink again, bottle it and leave it to ferment for 4-5 weeks (during this time the beer will infuse, become lighter and enriched with carbon monoxide). Beer prepared by yourself can be drunk immediately, or you can strain it again and refrigerate for another week.
How to brew your own delicious beer
Here you will learn how to brew beer at home from sugar and a grain mixture.
Sugar beer

Ingredients:
- 8 liters of boiled or settled water,
- 1.2 kg sugar,
- 1 cup brewer's yeast.
Preparation:
To make homemade sugar beer with your own hands, hot water you need to pour it into a clean tub or barrel, add the specified amount of sugar, stir it until completely dissolved and cool. After this, add brewer's yeast to the liquid, mix well and leave at room temperature to ferment for 2-3 days. During this process, foam will appear on the surface of the future beer, which must be removed. After fermentation is complete (this can be determined by the presence or absence of a sugary aftertaste), the finished beer should be strained and bottled into clean bottles. To add flavor to the drink, you can put lemon or orange peel in each bottle. After bottling the beer, the bottles should be tightly capped, the corks tightly tied with wire and stored in a cold room or cellar, constantly ensuring that the drink does not freeze, otherwise it will become unfit for consumption. With a large amount of sugar, beer acquires a sweet taste and foams heavily as a result of the fact that the amount of alcohol and carbonic acid in sweeter beer increases. Therefore, you can independently adjust not only the taste of the future beer, but also its strength, color and alcohol content.
Now let's make dark beer at home!
Dark beer

Ingredients:
- 10 liters of water,
- 500 g of grain mixture (wheat, rye, oats and barley),
- 30-40g chicory,
- 50g dried hops
- 4 cups sugar,
- zest of 1 lemon.
Preparation:
To make this beer yourself, as indicated in the old recipe, you need to fry the grain (each type separately) in a dry frying pan until Brown and grind in a coffee grinder. Combine all types of ground grains together, add chicory, mix, pour into a saucepan, add a third of water, put on the stove and boil, then add the remaining water, add sugar, hops, lemon zest and turn off. Leave the resulting wort alone for several hours, and then pour it into bottles, seal and place in a cool place.
Watch the video “Do-It-Yourself Beer”, where you can see best recipes preparing a foamy drink:
We brew beer at home with our own hands: recipes for making the drink (with photos)
First, learn how to make your own homemade beer from beets and carrots.
Beetroot beer

Preparation:
To prepare this plain beer with your own hands, medium-sized beets need to be washed well, peeled, and grated on a coarse grater. Then put in an enamel pan, pour in 6.5 liters of water, add salt, put on fire and cook at medium heat for at least 30 minutes. Pour the remaining water into a separate bowl, add the hop cones there and cook over medium heat for 10 minutes. When the hops are well boiled, add the juniper berries, bring the mixture to a boil and pour into the pan with the boiled beets. Cool the resulting beet wort to room temperature, pour in brewer's yeast, mix well and leave in a warm place to ferment for 14 days, periodically skimming off the foam that forms on the surface of the wort with a slotted spoon. Strain the finished beer using a fine sieve or a filter made of several layers of gauze for this purpose, pour into bottles, seal tightly and put in a cool place (or in the refrigerator) for 7 days. Ready-made beet beer is best drunk chilled.
carrot beer

Ingredients:
- 12 liters of carrot juice,
- 100 g hops,
- 50 g yeast.
Preparation:
Wash the carrots thoroughly, grate them on a fine grater, squeeze out the juice, boil it and strain through a cloth. Then cool it to the temperature of fresh milk, add hops and yeast, mix everything well and put it in a warm place to ferment for three days, periodically removing the foam that forms on the surface. After the specified period, strain the drink through a canvas cloth, pour into bottles, seal tightly and store in a cool place. You can drink carrot beer after a week.
Beetroot and carrot beer

Preparation:
Before making your own beer from vegetables, the root vegetables need to be washed, peeled and grated on a coarse grater. Then put in a large saucepan, add hops, juniper berries, add purified water, put on fire, bring to a boil and cook for 15 minutes. Then cool the broth to room temperature, introduce the yeast and place in a warm place for fermentation. The foam that will collect on the surface of the wort should be skimmed off at least three times. After the last collection of foam, strain the drink, pour it into bottles, cap tightly and leave to ripen in a cold place. After 2 weeks, you can try vitamin beer.
Here you can see a selection of photos on the topic “Brewing beer at home”:


How to brew the perfect beer yourself at home
Now learn how to brew the perfect beer from peas and potatoes yourself.
Pea beer

Ingredients:
- 4 liters of water,
- 1 kg green pea pods,
- 1 tbsp. l. dry sage herb,
- 0.5 cups of dry hops,
- 1 small slice of black bread.
Preparation:
Before you brew this beer yourself at home, you need to thoroughly wash the peas and tear off the tails. Then put the pods in an enamel pan, add water, put on fire, bring to a boil and cook for about 3 hours. After this time, strain the hot liquid and add hops and sage. As soon as the liquid becomes warm, add black bread and leave for 3 days to ferment. After this, pour the finished beer into bottles, cap tightly and place in a cool place.
Potato beer

Preparation:
To make potato beer yourself at home the way it was prepared in ancient times, the tubers need to be thoroughly washed, peeled, and cut into not very large pieces. Then pour in boiling water, boil for 30 minutes (the potatoes should be well boiled) and prepare the puree by mashing the potatoes well with a masher, without draining the water in which they were boiled. Cool the resulting mixture to 30 °C and transfer it to a pan suitable for brewing beer. Separately, boil the hops. Pour the cones of the plant warm water, cook for 30-40 minutes, pour the broth into the potato mixture, stir and leave in a warm place for several hours. After this, add the remaining water to the pan, add the yeast, mix well again and leave the pan with the wort in a warm place to ferment for a day. After the fermentation process is complete, the contents of the pan should be strained through a fine sieve or several layers of gauze. The drink turns out cloudy, so it needs to be clarified. To do this, beat the egg yolk well, pour into the beer, place the pan with the drink on medium heat and cook for several minutes until the yolk curls and settles to the bottom. Strain the cooled beer again and add burnt sugar, prepared as follows: pour granulated sugar into a tablespoon and hold over the fire so that it is lightly fried, but does not turn into caramel. After this, pour the drink into bottles, seal tightly with lids and put in the refrigerator. After a few days, when the beer prepared with your own hands according to this recipe has infused, you can try it.
How to make beer at home: recipes for making the drink
This collection of recipes is dedicated to how to make beer from pumpkin and sugar beets at home.
Pumpkin beer

Preparation:
To prepare this beer with your own hands at home, the pulp of the peeled pumpkin should be cut into small pieces, put in a pan, sprinkled with sugar and left for 3-4 hours. Then fill it with water, put on fire, bring to a boil and cook, stirring, over low heat for 4-5 hours (the pumpkin should be well boiled). Cool the resulting broth slightly, add hops and cook for another 30 minutes. After this, strain the mixture through a fine sieve, pour into a fermentation tank, put the yeast there, after diluting it with 300 ml of warm water, and place the wort for fermentation in a warm place. As soon as rapid fermentation is over, strain the beer again, pour into a small keg or bottle, cap tightly and put in a cool place. After 3-4 days the drink will be ready for consumption.
"Cheap" beer

Ingredients:
- 15 liters of water,
- 1.4 kg sugar beets,
- 50 g carrots,
- 300 g hops,
- 50 g dry yeast,
- 12 g juniper berries,
- 400 g salt.
Preparation:
Wash the beets and carrots, peel, finely chop, mix with water, add the rest of the ingredients, put on the fire, bring to a boil and cook for 15 minutes, then cool the liquid to room temperature, add the yeast dissolved in the same broth, put in a warm place and let it ferment. The foam that forms on the surface, which will rise high, should be collected at least three times and only after that the beer should be poured into bottles, sealed tightly and stored in the basement (cellar). After 10-14 days, you can try the beer you made yourself at home.
How to brew delicious beer at home: herbal recipes
Herbs are often used to make beer at home. For these purposes, mint, nettle, sage, burdock, wormwood, cap and elecampane are most often used. Recipes from the “Brew Beer at Home” series will help you prepare not only tasty, but also healthy drinks.
Mint beer

Preparation:
To make homemade beer with your own hands according to this recipe, you need to put the mint in a saucepan, add boiling water, close the lid tightly and let it brew for 1 hour. Meanwhile, dissolve the yeast with sugar and let it rise. Strain the mint infusion into a fermentation container, add yeast with sugar, a crust of bread and place in a warm place to ferment. When foam appears on the surface of the wort, pour the drink into bottles, cap tightly and store in a dark place.
Nettle beer

Preparation:
Before making this beer at home, the nettles need to be thoroughly washed. Then put it in a saucepan, add crushed malt, crushed ginger root, add water, put on fire, bring to a boil and cook for 15 minutes. Then, continuously stirring the resulting mass, dissolve the sugar in it, add yeast, remove the pan from the heat and place in a warm place. After the fermentation process begins, strain the beer, pour it into bottles or a small keg, seal tightly and place in a cool place for 2 weeks.
Healing beer made from medicinal herbs

Ingredients:
- 300g mixture of herbs (sage, burdock, wormwood and drop cap),
- 40g elecampane,
- 40 g horseradish,
- 15 liters of beer.
Preparation:
Place the mixture of herbs, elecampane and horseradish in a gauze bag and immerse it in a keg of beer for several days while it ferments. Further procedures are the same as with any other beer.
How else can you make your own beer at home?
Below are recipes for how to brew beer at home using ubiquitous herbs like wheatgrass and dandelion.
Wheatgrass beer

Ingredients:
- 9 liters of water,
- 0.4 kg of dry wheatgrass root,
- 25 g hops,
- 25 g yeast.
Preparation:
To make such beer at home, wheatgrass roots need to be placed in a saucepan and filled with two-thirds of the cold water according to the recipe, put on the fire, bring to a boil and cook for 1 hour, stirring occasionally, making sure that all the roots are immersed in the liquid. Then remove the foam, strain the hot liquid through a canvas and immediately add hops to it. Pour the strained roots with the remaining third of the water, bring to a boil again, boil for some time and strain. The strained liquid from the first and second brews should be clear. If it turns out cloudy, then you need to filter it several times (until it becomes completely clear). After this, mix both strained liquids, cool the wort to room temperature, add yeast and place in a warm place to ferment for 8-9 hours. After this time, white foam will appear on the surface. Pour the finished beer into bottles, seal tightly after 24 hours and place in a cool place for 2 weeks.
Dandelion beer

Ingredients:
- 2 liters of water,
- 400g young dandelions (whole plant with roots),
- 0.8 kg sugar,
- 60g cream of tartar,
- 1 cup brewer's yeast,
- 2 lemons.
Preparation:
Before preparing such beer at home, the plants need to be thoroughly washed, chopped, put in an enamel pan, add lemons cut together with the peel, add water, put on fire, bring to a boil and boil for 15-20 minutes. Then strain the hot liquid through a sieve or several layers of gauze, add sugar and cream of tartar, stir and cool. Add yeast to the cooled wort, mix again and place in a warm place for fermentation for three days. After this, strain the beer through cheesecloth, pour into bottles, cap tightly and place in a cool place for 7-8 days. After this time, the beer is ready for drinking.
If quince grows on your site, you are long years you will be provided delicious fruits– this plant is very durable, its lifespan...
Steve Koenig for Craft Beer & Brewing magazine has prepared an article with ten tips to help beginners home brewers..
Photo: Jon Van Dalen
My first home brewing purchase was a book. Before I even brewed a drop of beer, I read Charlie Papazian's book, The Complete Joy of Homebrewing. (in Russian translation it was published as “The Brewer’s Big Book. How to brew the perfect beer yourself” - editor’s note) fully. Looking back, I realize that only a small part of the information from this valuable tome actually stuck in my memory the first time. I have re-read this book more than once, and each time I noticed new details, and Charlie's passionate and encouraging style delivered true pleasure. I would also recommend reading Randy Mosher's Radical Brewing and John Palmer's The Art of Homebrewing - they are outstanding books for anyone, no matter how long you've been brewing. But there are some things that books won't tell you about, but which will be extremely important for the beginning brewer. Here are ten tips that will help you.
1. Buy a big boiler
Like most brewers I know, my first major purchase was a beginner's equipment kit. Once I had it, all I needed was a brew pot and ingredients. So I bought a 5 gallon (20 liter) boiler from of stainless steel for $35. Fool. After two weeks of brewing, I spent another $70 to buy a 7.5 gallon (30 liter) kettle. If you're ever planning on getting into grain brewing or want to reduce the chance of your wort constantly boiling over, invest in a big kettle now. You will save money in the long run.
 Copper immersion chiller for home brewing. Photo: the babbling botanist
 2. Chiller is most important
One of the best ways Reduce the chance of contamination of your beer by cooling the wort as quickly as possible. Many new homebrewers achieve this by submerging the brew kettle in a bath of ice or cold water. Depending on how many bags of ice you bought (which is an additional cost), this process can take anywhere from 40 minutes to an hour or more. You can save a lot of time, hassle and reduce the risk of infection by purchasing a chiller. They are different forms and sizes, but the most common is the immersion chiller made of copper or stainless steel. Immersion chillers typically cost $50–$70 and can cool a 20-quart boiler in 20 minutes or less. You simply connect a cold water source to the chiller, place it in the kettle 10 minutes before the end of the wort boil to sanitize it, and then run the water after you turn the kettle off. The chiller will do the rest. There are also plate chillers, but they are a little more difficult to use and cost significantly more.
3. Buy an automatic siphon
If you are transferring wort from the kettle into a fermentation tank or keg, you need a siphon. Most beginner brewing kits include a 5/16-inch (8mm) siphon. They usually cost around $10, but if you pay an extra $4 you can buy an automatic siphon (with a telescopic system and “auto-suction” - ed.) half an inch (12 mm). It will save you a lot of time when transferring liquids from one container to another.
 Yeast starter. Photo: Brülosophy
 4. Make a yeast starter
When I ask experienced homebrewers about the most... important actions the things they do to make their beer better, one of the most common responses I hear is “now I pay close attention to the yeast and always make a yeast starter.” It doesn't matter whether you buy liquid or dry yeast, but by making a yeast starter you can ensure that fermentation starts and proceeds faster. Preparing the starter only takes about 20 minutes, but it greatly increases your chances of achieving an active and quality primary fermentation phase. also reduces the chances of infection because the conversion of sugar into alcohol occurs much faster when the yeast is healthy and abundant.
5. Aerate the wort
After you have boiled and cooled the wort, there is relatively little oxygen left in it. Yeast requires oxygen for active fermentation to begin. There are several ways to oxygenate your wort. For example, you can add water, but this will dilute the mash, reducing the gravity and changing the flavor of your beer. It's best to use a compressor with an aeration stone (the kind you may have seen in an aquarium) or an oxygenation kit. They will cost you between $35 and $50 (excl. oxygen cylinder). But trust me, it's a wise waste of money.
6. Buy a bottle holder
Carboy holders seemed like unnecessary accessories to me when I first started brewing. But since then I have purchased them for almost all fermentation containers. The handles are very convenient, especially if you use large glass bottles (in the USA, many home brewers prefer glass containers for fermenting beer - editor's note). For the ability to easily lift the bottle and move it, you won’t mind $6.
 Photo: Jeremy Ricketts
 7. Use a carbon dioxide drain tube
Before I started homebrewing, I read a ton of literature about using blow-off tubes instead of water seals. I should have paid attention to this. It didn't matter whether I used plastic or glass containers, the foam during fermentation often came out through the water seal. Using a carbonation wand instead of a water seal doesn't mean your beer won't foam, but it will prevent a mess in your apartment. Place one end of the tube in the top of the stopper and immerse the other in the solution with disinfectant. Some of the actively fermenting beer may overflow through the tube into the solution container, so check it a couple of times a day and replace the solution if necessary.
8. Use... a sleeping bag
It's hard to decide to buy a mash tun when you're just getting started with home brewing, as it can be quite an expensive purchase. Some newbies believe they can't get into grain brewing without real mash. Not true! if you have sleeping bag good quality, you can mash the malt in your kettle and leave it wrapped in a sleeping bag for 60 minutes. You'll be surprised at how well it can hold temperature. And if after 15 minutes the temperature drops a little, just add hot water.
 Usage dishwasher in home brewing. Photo: Beer Syndicate
 9. Use the dishwasher
Bottling beer takes a long time. The journey from sanitizing the bottles to cleaning the fermentation tank can take as much time as actually brewing the beer, especially if you have problems with bottling. (I once poured 15 liters of disinfectant liquid onto the kitchen floor because I didn’t notice how the end of the tube quietly slipped out of the bucket). The following little trick can help you get rid of the clutter: spill bottled beer on the open dishwasher door. Place the beer container on top of the dishwasher and the bottles on open door. If something spills, the liquid will not end up on the floor, but inside the dishwasher. In addition, you can wash bottles in it before bottling.
10. Cover the stove with foil
If you've ever brewed beer on the stove and your wort has boiled over, then you know how difficult it is to clean the stove afterwards. Of course, it is best to stop the boiling, but you may not have time. Then spend a couple of minutes preparing the stove to save a lot of time later while you clean it. Remove the burners and place a layer aluminum foil over the entire area of the stove, and then return the burners to their place. If your wort boils over, you just need to remove the foil and throw it away.


- Turkey stewed in a slow cooker: spicy, with vegetables, in sour cream, cream and walnuts
- Types of speech: description, narration and reasoning
- Martyrs Tatiana. Moscow Church of St. Martyrs Tatiana Temple of the Martyr Tatiana at Moscow State University schedule
- Milotici: return of the Russian village Moravov Alexander Viktorovich
- Why you shouldn't cry in front of the mirror
- Martyrs Tatiana. Moscow Church of St. Martyrs Tatiana Temple of the Martyr Tatiana at Moscow State University schedule
- Milotici: return of the Russian village Moravov Alexander Viktorovich
- Making sounds for children Lessons on making sounds for children
- Recommendations: what to grease the pies to make them rosy and appetizing
- Pink salmon in the oven - delicious and easy recipes for baked fish Pink salmon fillet baked with vegetables
- What does a lizard tattoo mean?
- Deciphering the natal chart of the house
- What does mulberry help with?
- Photo report “Birthday of Samuil Yakovlevich Marshak in the group”
- Breathing at high pressure Breathing correctly at high pressure
- Bryansk State University named after
- Tasks to test spelling and punctuation literacy
- Macroeconomic calendar
- The Forex economic calendar is a reference book for every trader, regardless of trading experience and level of professionalism, and especially...
- Interesting signs about spiders