How to install a spotlight in a stretch ceiling. How to make a backlight under a stretch ceiling. Types of spotlights
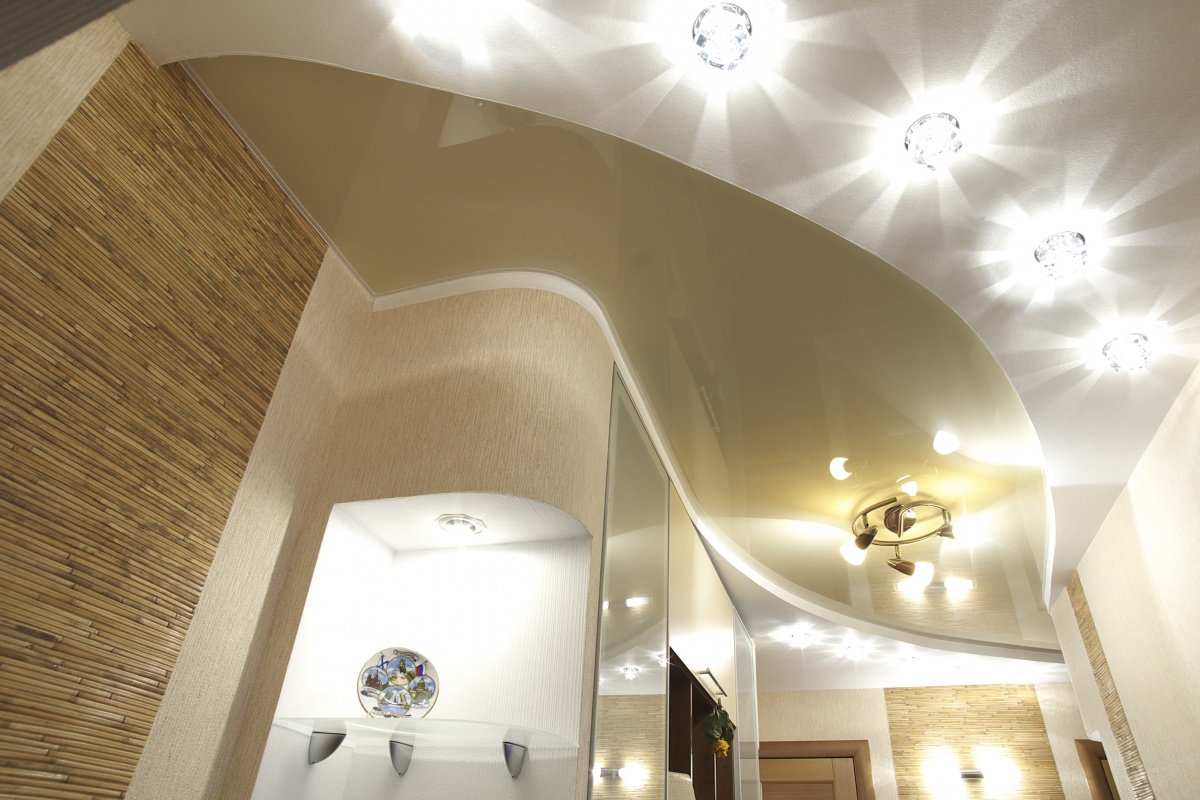
A spotlight today is not so much a source of light as the most important element of decor. In creating coziness in a room, he takes great value, and this is obvious - a chain of small beautiful lights, successfully inscribed in the ceiling structure, has a huge interior appeal.
Certainly, great importance has a choice of fixtures themselves. It affects not only appearance ceiling in the future, but also how difficult the installation will be.
Spotlights are a lighting device that emits beams of light directed downwards. True, there are such designs where light can be redirected, but they are not used so often.
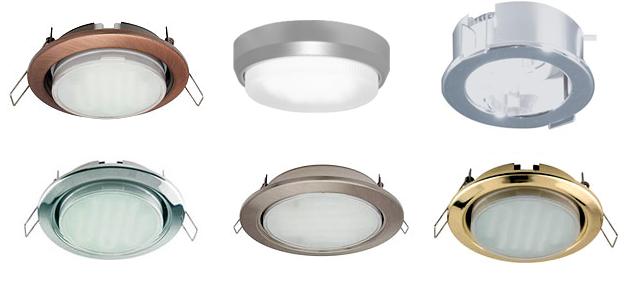
The case of this device can be made of plastic. This is the most cheap option, which is not so bad, but the duration of its use can be called into question. An alternative to plastic is glass, thermoplastic, metals and their alloys. Often, to give the lamp a luxurious look, the device is covered with bronze, chrome or polished brass.
Three types of lamps are most in demand:
- Ordinary incandescent lamp. It is still in use, but it is predicted that the good old incandescent lamp will soon have to be abandoned - it is significantly inferior to its more modern competitors. If you still liked this particular option, its installation will require up to 12 cm of space from ceiling to floor. Commonly used open type construction, closed is used when the humidity in the room is above normal.
- Halogen lamp. Certainly more interesting option. Installation of such lamps will take no more than 6 cm of space. Such lamps will be a more economical option, and their durability, of course, is much higher than that of a traditional lamp. But there are some nuances that cannot be hidden: almost all halogen lamps are powered by a twelve-volt voltage source, which means you will have to purchase a transformer. It is masked behind sheets of drywall. You can also find halogen lamps at 220 V, but their service life will be short.
- LED bulbs. This option forces you to fork out, but there is something to pay for. First, the lamps are used for a very long time. Secondly, outwardly they look better than their competitors. But they also need a transformer to connect them.
Almost all LED strips are equipped with a built-in controller that can set various programs and effects. to install led strip with a controller, the ceiling must be at least two levels high.

Dimensions
In shape, color and size, spotlights differ from each other. The size of the luminaire is selected according to the parameters of the ceiling structure, this is usually found out in the process of work - you look at the future design of the ceiling, determining how the luminaires should be built into it, and what place in the overall composition is assigned to them.
When choosing a lamp, look at the degree of protection of the device, this is indicated on the packaging. The first number is the size of the particles that can penetrate the lamp. For example, marking with the first number 1 means that particles of 50 mm can get into the device. And if the first digit is 4, then particles of 1 mm can get into the device.
It is indicated on the packaging and the degree of moisture resistance. For example, “one” on the label indicates that the device is protected from drops that fall vertically. And the number 7 means that the lamp is able to withstand a short immersion.

You can place the lamps according to the following parameters:
- The distance from the lamp to the wall is no more than 0.6 m;
- The distance between the rows of built-in spotlights is no more than 1 m;
- The distance between the lamps in one row is no more than one and a half meters.
You can place built-in lamps in a checkerboard pattern, which means observing the offset of the rows. This will improve the quality of lighting in the room.
Holes for lights
There are several ways to make a hole in drywall for a lamp. This work can be done with professional tools, and various improvised means.

Ways to create holes:
- With the help of an electric jigsaw. With this tool, you can make a hole of literally any shape and any size, and get a hole very close to a round one. The side surface of the gypsum board in this case is sanded with sandpaper.
- Using a circular drill on tiles. A more familiar name is “ballerina.” And although “ballerinas” are designed to drill holes in ceramic tiles, such a tool is very useful in drilling holes for lamps. The most important thing is the ability to set the hole diameter with millimeter accuracy.
- Using a drywall crown. This method allows you to do everything as quickly as possible. You can purchase a set with canvases of seven diameters and one holder at any construction market. The maximum cutting depth is 18mm.
- Using a hacksaw blade for metal. This is what it is handy tool, which is always found in the pantry or garage. Remove the sheet from the hacksaw, drill several small diameter holes in the drywall, and then insert the sheet into the hole.
- With a drill. Here you will have to make the maximum perforation of the plasterboard. Close to the outline of the hole, with any drill with a comfortable diameter, drill many holes next to each other. Then carefully knock out the middle, remove the remaining teeth with a knife, and then use the sandpaper.
- By creating tattoos. In the preparation for drawing, if you have one, take a meter, and, setting it to the desired radius, pierce the sheet through 2-3 mm. With a knife, cut the sheet along the contour of the hole on both sides. Then put the sheet on supports so that there is no support under the hole, but there is support next to the hole. Hit the center of the contour with a hammer - this will knock out a hole.
There are other ways, for example, cutting with a knife, but they are more laborious.

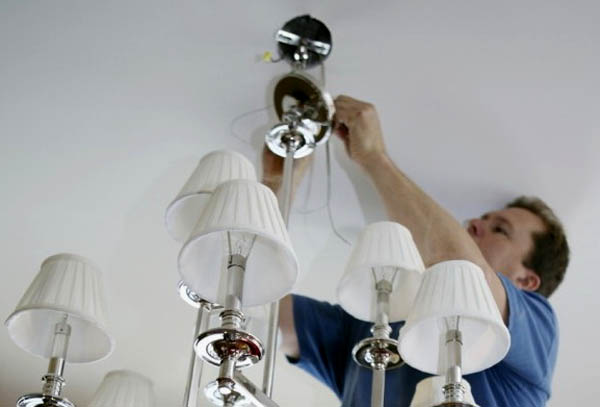
How is the installation
Special Skills this process does not require, and it is not physically difficult to do this. The main thing is to make the markup correctly, knock out the holes well, and installation will be a matter of technology.
Installing spotlights in drywall will look like this:
- Markup - on drywall you outline the location of the lamps;
- In any way, drill holes that match the diameter of the fixtures in size;
- Pull out a de-energized electrical cable through the hole, attach a light source to it;
- Fix the device into the hole with spring clamps (clamps are included);
- After the device is installed, screw in the light bulb and put on the outer decorative ring.
After that, check if the lights are working.

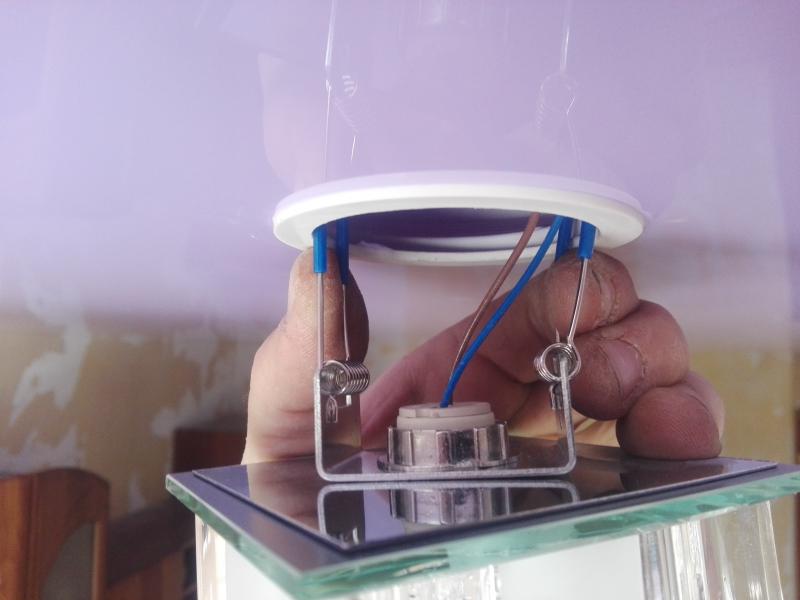
Installation with safety in mind
If there are already terminals on the spotlights, you simply connect them. If there are none, you will have to purchase them. Choose those that are rated for a current of at least 6 amperes.
If you know how to solder, then this method of connection is also suitable, but without soldering experience it is better not to do this.
Each device traditionally has three wires - "0", ground and phase. If your home does not have grounding, leave the terminal free. When you finish the connections, check if the installation is done correctly, if the luminaires are working. And only after that insert them into the hole.
If the product has a very elastic spring, it will be difficult to compress it, installation will become more complicated. Therefore, the ends of the antennae springs can be pulled together in advance with a thin wire, after that, insert the device halfway into the hole, and cut the wire.
Installation and connection of spotlights in drywall (video)
The importance of lighting a space cannot be underestimated. Right light can hide flaws, advantageously emphasize the advantages of the room. And, conversely, in problematic light, not only beautiful interior looks unattractive, but the appearance of the residents of the house is distorted towards an unhealthy look. An example of this influence can serve as fitting rooms in clothing stores with different lighting.
In addition to the aesthetic and visual component, the quality of light in rooms affects the psychological and physical health criteria.
What lamps can be installed in a stretch ceiling
The rooms in the house are designed for some function and fulfill their roles. Based on these roles, lighting standards were developed for each functional meter of the room. Depending on international recommendations, the area of the room, the power of the lamps, you can determine which lamps to install in the house so that the lighting is profitable. The type of ceiling covering also affects the choice of fixtures. , for example, has its own operational features, which somewhat limit the owners when choosing lighting equipment.
Restrictions apply to:
- Power bulbs (40 watt lamp does not damage the PVC film);
- Forms of lighting engineering (from round to square shapes, but taking into account the fastening, which should not damage the tension base);
- The impossibility of repairing electrical wiring or installing additional lighting if the tension system.
For ceiling structures spotlights are most suitable, but there are other options to choose from.

It is possible to mount lighting equipment thanks to:
- Hook;
- Special bar;
- Cross-shaped plates.

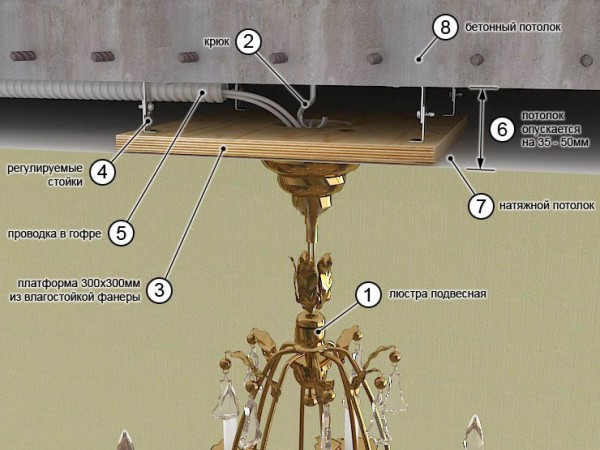
The builders themselves install the mounting hook and laying the power supply in houses with reinforced concrete slabs. If the initial location of the hook does not match the plans for lighting the room, you can insert it in the right place with your own hands. To do this, a hole is drilled in the ceiling plate with a puncher and a hook is installed using a dowel or a special anchor.
You can install the hook using a wooden bookmark, which is attached to the ceiling, and the hook itself - to the bookmark.
The height of the hook, as well as the distance from the ceiling to the tension structure, must be known in advance in order to properly fit the wiring. On the finished stretch fabric, a place fixed with a thermal ring is cut out, where the hook ends, to which the pendant lamp is suspended.
Luminaires that are equipped with a special mounting plate ( metal profile with studs), can also be used for stretch ceiling systems. In this case, a beam is installed on the ceiling, the height of which will eventually be less than the distance from the ceiling to the stretch film by a couple of millimeters. A plate is attached to the beam, and the lamp itself, after tensioning the tension structure, is the same as in the case of a hook.
The mounting of the cruciform plate is carried out in the same way as the metal bar. With the difference that 5 holes are made on the PVC film with a heat fixer (four of them for attaching the plate, the fifth for the chandelier itself).
Easy installation of spotlights in a stretch ceiling
Thanks to the design of spotlights, damage to the film of the tension system from temperature effects is excluded. Suspensions, which are components of fixtures, make it easy to install this type of lighting at home. The abundance of available training videos allows you to familiarize yourself with the stages of fastening.
Spot light installation kit consists of:
- Rack legs;
- Racks of the lamp itself;
- protector ring;
- Thermal insulating ring;
- Lamp directly.
Basic steps for installing spotlights:
- Ceiling is being prepared. For this, the necessary electrical communications are carried out. At this time, the future frame for the tension system can be mounted.
- The ceiling is marked for future fixtures. To do this, ideas are preliminarily worked out, the composition of the main and auxiliary light is drawn up.
- With a special leg, the internal structure is attached to the ceiling.
- Communications are displayed in the rack.
- A protective ring is put on the rack.
- The working condition of communications is rechecked. (Wiring for all lamps should be connected in parallel).
- The final installation of the tension system is carried out, the canvas is stretched.
- At the installation sites internal system A protective heat-insulating ring is put on the PVC sheet, which also performs the function of a retainer.
- The web is cut inside the fixing ring.
- The wires are connected and the lamp is installed.
How to make a backlight under a stretch ceiling
Thanks to the system, you can advantageously use the space between the ceiling and the film for additional lighting. To do this, take advantage of the LED strip.

This type of lamps are mounted:
- To the ceiling;
- To the frame profile of the tensile structure.
The backlight plays the role of an exclusively auxiliary light, but at the same time it looks very impressive in modern rooms.
Exist color options such illumination.
The tape is attached to the frame if it is enough to decorate the room around the perimeter. To create a pattern on the entire ceiling surface, the tape must be attached only to the ceiling.
Quick installation of fixtures in a stretch ceiling (video)
It is worth taking care of protecting the film in those places where the lamps are mounted, choosing suitable lamps, and installing the bases for lighting equipment reliably and on time.
Consider how the installation of fixtures in stretch ceilings. Most often, spotlights are installed. They are good because they are suitable for any room. In addition to them, there are other types of lamps that can be installed in a stretch ceiling.
Varieties of lamps
To date, the following types of lamps are distinguished:
- LED (do not heat up, last up to 5 years, high cost);
- halogen (direct light in the right direction, shine brighter than conventional lamps, at the same power);
- incandescent lamp (most often installed in rooms with high humidity, such as in a bathroom or pool);
- luminescent (do not heat up, have good light output and reasonable cost);
- point (the most common, suitable for any room).
So, in order to answer the question of how to install fixtures in stretch ceilings, you need to know the installation requirements.
Basic installation requirements
First of all, it is worth noting that the light source must have low power. This is necessary so as not to damage the film coating.
Advice: When choosing spotlights, you need to pay attention to the presence of wide sides. They must be mandatory, as they will hide the reinforcing ring.
Hiding a model, you must choose trusted manufacturers, since it is very difficult to open them, if necessary.
Mount the light bulbs in such a way that the light falls down, and not on the surface of the ceiling. The distance between the surface and the ceiling must be at least 10 cm (this is especially true for incandescent lamps, 6 cm is enough for halogen lamps).
Before stretching the canvas, it is necessary to fix the wiring.
Fixing spotlights
To fasten light bulbs to a stretch ceiling, it is necessary to carry out their installation very carefully and carefully, since PVC film is very delicate and it is easy to spoil it.
To install a spotlight in a stretch ceiling, you need:
- lighting device;
- cyanoacrylate glue and knife;
- a special ring to strengthen the material;
- acrylic box (its size must match the lamp).
Before you begin to mount the light source, you need to prepare the coating:
- conduct all communications in the interceiling space;
- firmly mount the frame.
On a note: It should be noted that all preparatory work must be completed before the tension cover is installed. Of course, it is quite possible to mount a lamp in the finished ceiling, if the wires have been wired into the coating structure in advance.
Mounting technology:
- First of all, you need to install the mounting profile.
- At the marked height, boxes with lamps are installed, each of which must have a nut (it is necessary so that you can adjust the desired height). The bottom edge of the box should always be no lower than the canvas.
- In order to remember the location of the devices in the future, it is necessary to make notes on the floor using a laser.
- Stretch the canvas.
- Make holes for lights.
- On the film mark the middle of all lighting fixtures. Then apply glue to the marked places. A reinforcing ring is put on the glue.
- Carefully make a hole in the middle of the ring through which you can adjust the height of the acrylic box.
- Connect to electricity.
- The light source is placed in a box.
Chandelier installation
Not every chandelier can be mounted in a stretch ceiling, so it must be chosen correctly.
Choice
In this case, it is necessary to follow a few rules so that the installation goes smoothly.
Selection rules:
- first of all, when choosing, you should pay attention to the fact that the design is not made in the form of a plate (the base gets very hot when illuminated, since it is made of thin metal);
- it is best to give preference to simple models, rather than intricate ones, if you are going to mount it yourself;
- so that spots do not form on the surface of the canvas, preference should be given to models with a ceiling and an internal light bulb;
- in case the design was chosen without a ceiling, it is recommended to give preference to the model that is endowed with a mirror reflector;
- energy saving light bulbs are the best option.
Fastening
To date, there are two ways to attach the chandelier to the surface. The most popular mounting method is the "ceiling hook". Additional tools, fasteners and material are not required. Preference should be given to the anchor hook, as it is reliable and durable.
Mounting process:
- make a hole in the surface with a perforator;
- hook attached;
- the hook must be positioned so that it is a few centimeters above the canvas.
Mounting the chandelier using the mounting plate:
- the lamp is tried on to the surface;
- if there is an old hook, then it is not necessary to remove it (suddenly it will come in handy for the next chandelier), so it is enough to bend it;
- using the bar, make marks where fasteners will take place;
- make holes;
- install dowels;
- fastening the bar (it is installed either above the ceiling or at the level).
In order for the installation to be successful, without difficulties, it is worth considering some nuances:
- Before installation work you need to make sure that the electricity is temporarily turned off. All work must be done with construction gloves.
- In order not to spoil the canvas, it is not necessary to fasten the lamp strongly. If you still need to firmly attach it, then in this case a gasket must be placed between the panel and the bar.
- Before you start installation work, you need to look at the hidden wiring plan. If there is no plan, then in this case you can use a special device with which you can determine the location of the wiring.
Related videos
To ensure high-quality lighting in the room, it is necessary to properly install the fixtures in the stretch ceiling.
In this case, the light will fall evenly, not irritate the eyes, will not be too bright.
When arranging such a ceiling, one chandelier, which is mounted in the center, will not be able to provide all the lighting requirements.
It is worth installing spotlights. As the video in the article shows, it is not so difficult to mount lighting with your own hands.
Stretch ceilings are essentially a thin film stretched over ceiling surface. Traditional chandeliers are not suitable for such a coating.
Installing fixtures in a stretch ceiling involves the use of spot or LED bulbs.
There are such options for the placement of lamps: they can be placed outside the tension structure, or they can be built-in.
Outdoor lighting fixtures need to be fixed with your own hands like a chandelier. Lamps are located below the level of the canvas.
Such light sources are considered the best option for installation on the canvas, as the lamp cools faster.
Outdoor luminaires illuminate the room brighter due to the large dispersion angle. In addition, they do not affect the life of the tension structure.
Recessed lighting devices do not protrude beyond the level of the canvas. The entire body with the lamp is located inside the ceiling, only the glass of the ceiling and the decorative ring are visible.
With this arrangement, the lamp can heat the thermal ring, as a result, the web is heated.
If mistakes are made when installing spotlights, this can lead to irreversible consequences - the stretch ceiling will be damaged.
Despite the fact that such light sources give a narrow beam, it is often preferred to install just such light bulbs.
For the decorative lighting device, a number of LED elements are used. Their power is low, so they are not suitable for the main lighting of the room.
Alternatively, you can choose an LED strip. It is attached to the canvas. With its help, you can zone the room into parts, according to their functional purpose.
Requirements for luminaires on stretch ceilings
For tension structures, not all light sources that will appeal to the owner of the room are suitable.
Lighting elements must meet certain requirements:
- The shape of the landing node of the lamps on the canvas must be necessarily round. For square lighting elements, round landing nodes are also made. When analyzing the options for lighting elements for your room, you need to pay attention to this;
- There must be a mounting flange on the lamp body. It is located inside the lighting device. There must be a difference of at least 10 mm between the outer and inner diameters of the housing. Otherwise, the thermal insulation ring will be visible, from which the aesthetic appearance of the entire room will deteriorate;
- The lamps must be coated with a paint that does not allow light to pass through. This is necessary so that point devices do not shine through the canvas. As a result, a light circle will form around the light bulb;
- When choosing spotlights, it is important to pay attention to the power of the lamp. There are restrictions regarding the distance between the lighting fixture and the canvas. If choose lamp more power than provided by the technical requirements, the canvas will be deformed under the influence of temperature.
Installation of fixtures
For stretch ceilings today you can choose a large number of types of lighting fixtures.
Canvas - the design is not dense, it will not be able to hold the lighting elements, so it will definitely sag.
To prevent this from happening, when creating lighting with your own hands, there should be a scheme that should be followed.
Technology during installation various kinds the lamps on the canvas are about the same. Fasteners, racks, profile guides are fixed on the base.
As a base ceiling, it is worth taking the main surface made of wood, concrete, and other materials.
Fastening elements must be installed before stretching the canvas.
A special hole is made in the stretch ceiling through which the lamp is installed.
When installing lighting fixtures, it is important to use a thermal ring. It will protect the surface of the canvas from heating, because polyvinyl chloride melts from exposure to high temperatures.
In addition, the thermal ring will reinforce the entire structure.
Spotlights
Spot lighting devices are the most popular in the formation of lighting on tension structures.
Together with the lamps themselves, the kit includes racks that must be fixed to the base ceiling. These elements fit in size to each other, so there will be no problems with installation.
When choosing this type of lighting device, you should pay attention to the rack. Its height should be equal to the space between the ceiling and the canvas.
The rack must be attached to the ceiling surface with screws or dowels. They are also included, if not, then in any hardware store they can be purchased.
The fastener must be firmly installed. To do this, use a pair of fasteners.
In addition to the stand, the set of spotlights includes a ring and guides. The ring diameter must be the same as the bore diameter.
The ring can be adjusted with guides up or down.
Spotlights can illuminate small area rooms. For the whole room you will have to buy several devices. The number of light sources depends on the area of the room.
LED lights
Installation LED lamps do-it-yourself is performed to achieve several goals. Such lighting can zone the room, or you can create an intimate atmosphere in the room.
For installation, a special scheme with the placement of devices is required. Niches in stretch ceilings are decorated with such elements. As the main light source, LED devices are not suitable.
When installing LED lamps, neon cords are used. When switched on, they do not emit heat energy.
This is extremely important, since the canvas on the ceiling does not withstand high temperatures.
No reflection is created on the surface of the canvas from LED lighting fixtures, which is important for creating comfort in the interior. The technology for mounting LED lamps is shown in the video.
When installing fixtures in the canvas on the ceiling with their own hands, experts recommend following certain rules.
The technology developed by the masters will help to properly install and connect the devices:
- The element for lighting the room must be installed so that it can be easily removed and returned to its place. It is necessary to remove them periodically in order to clean them of dust, which will inevitably accumulate on the surface;
- The wires with which the lamps are connected must be of high quality insulated. They should not go into a stretch under the surface of the canvas and be securely fastened;
- It is necessary to install devices with the expectation that, if necessary, it is easy to get to the connection point. Access to the lighting fixture units must also be provided;
- You need to be prepared for the fact that the lamps will fail, so the device itself must have a presentation for the entire warranty period;
- No load should be created on the canvas, therefore, when attaching spotlights, you need to use a ring, a special platform, they are attached to the base base;
- If a built-in lamp is installed, the temperature regime should be strictly observed.
How to install a lamp in a stretch ceiling? This question often arises among those who have encountered a problem for the first time. In our article we will try to analyze this topic from "A" to "Z".
After all, the installation of a lamp is not only installation, but also the choice of the number of lamps, the lamp itself and, of course, the wiring for it. We will try to analyze all these questions in the most accessible language.
Calculation of the number of fixtures and their choice
Any work begins with planning and preparation. This step is no less important than quality installation so pay close attention to it. In our case, from correct selection the number and type of fixtures will depend on the comfort of the room and the durability of the lighting.
Calculation of the number of fixtures
At the very first stage, we need to decide on the number of fixtures. This parameter does not depend on our wishes, but on a number of parameters, which we will discuss in this section.
- First of all, this is of course the minimum illumination that should be created in each particular room. This parameter is calculated in a scientific and practical way and is contained in SNiP 23-05-95. For various rooms it is different, but we will take an ordinary living room as an example, in which the minimum illumination rate should be 150lx.
- We note right away that SNiP gives the minimum lighting standards, and we need comfortable ones. When calculating the minimum illumination standards, parameters such as operational losses, safety factors and similar variables are taken into account. As a result, this norm grows by about one and a half times. To create more comfortable lighting, it is better for us to increase this rate by two.

Note! If elderly people or people with poor eyesight live in your house or apartment, then this rate can be increased even more. For example, up to 2.2 - 2.5 times. But here it is important not to overdo it, because an increase in the norm of illumination leads to an increase in costs, and can lead to a blinding lighting effect. Therefore, an illumination of about 300 lux is considered optimal.
- The next step in choosing the number of fixtures is to calculate the area of \u200b\u200bthe room. The instruction requires doing this to determine the total illumination. To do this, multiply the area of \u200b\u200bthe room by our minimum illumination. For example, for a room of 15m2 with an illumination rate of 300 lux, the total illumination is 4500 lux.

- Now it remains for us to calculate how many lamps can produce such a total illumination. To do this, we need to decide on the type of lamps that we will use. We will talk about this below. For now, let's take an 8W LED lamp as an example.
- It is capable of delivering a luminous flux of about 700lm. This parameter is usually indicated on the packaging of the lamp. Although these figures can not always be trusted.

- But let's move on to the calculation. To obtain the required number of lamps, we need to divide the total illumination of the room by the luminous flux of the lamp. As a result, we will get a value of 6.4. Here, depending on the design of the room, you can take the nearest larger or smaller value.
Note! Such a calculation is very approximate, and is only suitable for rooms with a ceiling height of up to 2.5 - 3 meters. If you want to achieve more accurate results, then you should use the utilization factor method, which is an order of magnitude more difficult.
Selection of fixtures
Installing spotlights in a stretch ceiling has its own nuances. This is the inadmissibility of heating, and the limited space between the base and stretch ceiling, as well as some other aspects. But let's talk about everything in order.
- So, our stretch ceiling has one unpleasant feature. Under the influence of temperature, it can be deformed. This imposes certain restrictions on the choice of fixtures. First of all, we immediately exclude incandescent lamps, as they can heat up to high temperatures.

- For residential premises, halogen, diode or fluorescent lamps can be used (see). All of them can also heat up during operation. Therefore, so that this heating does not affect our stretch ceiling, we need to use lamps with low power lamps. Usually this is a power equivalent to 60 watts of an incandescent lamp, or even less. After all, the lower the lamp power, the less it can heat up, and the lower the likelihood of deformation of the ceiling.

- The next aspect is the depth of landing of the lamp itself. The fact is that usually between a concrete ceiling and a stretch ceiling they usually try to leave minimum distance. Especially in Soviet apartments, where the ceilings can hardly be called high. Therefore, the height of the luminaire must correspond to this distance when it comes to built-in models.
- In general, fixtures for stretch ceilings can be of two types - built into the ceiling and overhead. For recessed fixtures, the base, lamp, reflector - everything is located in the space between the ceiling and the tension part. For overhead luminaires, between the concrete and stretch ceilings, there is only a luminaire fastening to the ceiling.

- Which of these options to choose comes from design preferences. But here it is necessary to take into account purely technical nuances.
- Recessed downlights give a more directional light. As a result, such a parameter as uniformity of illumination, which is very important for living rooms, can only be achieved by increasing the number of such light sources.
- Another aspect of built-in luminaires is that the lamp can emit light not only into the room, but also into the space between the ceiling and the stretch ceiling. As a result, all engineering structures can be seen through under the ceiling, and this is not very beautiful. Therefore, if you decide to stretch the ceiling with your own hands, then it is better to opt for overhead lamps - it's easier.

- By the way, we've touched on the issue of uniformity of illumination. Let's briefly dwell on it. To achieve this indicator, there are special standards for the location of fixtures. However, it is worth remembering that the location of the fixtures is selected based on the design of the room and the location of the furniture.

And finally, let's say a few words about the choice of lamps.
There are three parameters to pay attention to:
|
|
First, it is the temperature of the light of the lamp. It can vary from 2000K to 7000K. Light with a temperature of 2000K - 3000K is considered warm and is recommended for rooms intended for relaxation. Light with a temperature of 5000 - 7000K is called cold white and is recommended for office and study rooms. |
|
|
Secondly, it is the color rendering index - Ra. The closer it is to 100, the better this light renders colors. Ra not lower than 80 is considered the norm for residential premises. Almost all modern LED and halogen lamps fall under this parameter, but fluorescent lamps, or, as they are also called "housekeepers", can not always boast of such a result. |
|
|
Well, the last aspect is the pulsation of light. It is characteristic of diode and fluorescent lamps. To normalize this parameter, an appropriate coefficient has even been introduced, which for residential premises should not exceed 20%. |


The installation process of spotlights
Now let's take a step-by-step look at how to install a spotlight in a stretch ceiling. Here we, again, will need to perform a number of preparatory measures, and only then perform the installation itself. Let's start, as always, with preparation.
Preparing the installation of the lamp
We note right away that preparation is one of the most important aspects. Namely, in the process of preparation, we will perform the main technological operations.

- First of all, we carry out the marking on the ceiling of the places where the lamps are installed. This is done according to a plan drawn on paper with a ruler and pencil.
- At the next stage, we carry out laying to the places where the wire is connected. Many sites recommend that the wire be laid in plastic corrugation, but this is not necessary. After all, the installation is carried out on a fireproof coating, and according to the norms of the PUE, it is possible to mount the wire directly on such surfaces.

- Now, as for the cross section of the wire itself. On many resources, it is recommended to choose it according to the PUE table, but there is one pitfall here, since this table is intended for all electrical installations. For wiring in residential premises, there is a norm that the wire for lighting must have a cross section of at least 1.5 mm2.
- That is, we make a choice according to the table, but if our value is below 1.5 mm2, then we accept it. But usually a cross section of 1.5 mm2 is enough.
Note! The question of the material of the wire you should not have at all. Indeed, for residential premises since 2001, according to the norms of the PUE, it is allowed to use only copper wire.

- After the wire is laid, you can begin the installation process of the adjustable lamp mount. Usually it is attached to the ceiling with dowel-nails, and the movable part to the fixed part with screws.

- Then the movable part of the mount is installed in such a way that it is above the expected level of the stretch ceiling. To do this, you can pull the thread, as in the video.

- If the luminaires use GU 5 - 3 or similar lampholders, then you can already now connect them to the wiring. At the same time, they must be securely fixed so that they do not interfere with us during the installation of the ceiling.
Installation of fixtures
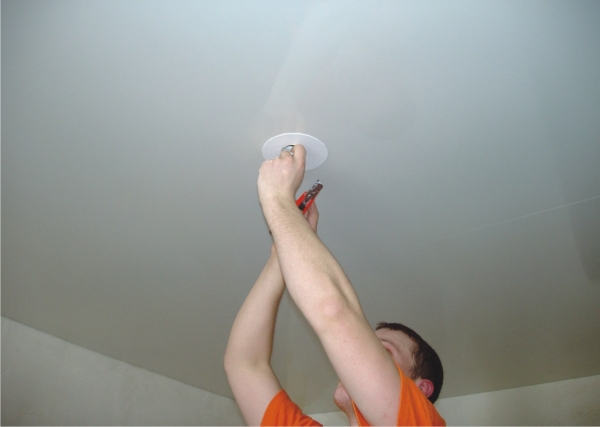
Well, we have come to the last stage of the installation of fixtures. It is carried out after the stretch ceiling is fully stretched and almost ready for use.

- First of all, we find the lamp mounts. Some for this purpose set marks on the floor in advance, some simply remember their location. In principle, if they are not far behind the ceiling, they can be felt.
- We mark the place that we will need to cut out under the lamp, after which we paste the thermal ring on it. It is necessary to protect the ceiling canvas from the temperature effects of the lamp and to prevent its tearing (see).

- The thermal ring is glued to the adhesive Cosmofen, Somafix, Contact or the like. Here, price and personal preferences in this matter are already decisive factors. Literally in 2-5 minutes the glue dries completely.

- Now it remains for us to cut the ceiling material inside this thermal ring. It is important to do this carefully and without damaging the thermal ring.
- After the stretch ceiling has a hole for the lamp, we just need to connect it. If we already have a cartridge connected, then simply insert the lamp and fix the lamp at the installation site. This completes the connection.
Conclusion
Installing fixtures in a stretch ceiling is not a very difficult matter in physical or technical terms. But it requires accuracy and accuracy of movements. Therefore, before doing this work on your own, at least once follow the actions of professionals. Better yet, get a recommendation from them.


- Business growing vegetables in a greenhouse all year round
- Board game publishing as a business
- Electricity meters - types and types, main characteristics
- Which wire to use for wiring in the house: recommendations for choosing
- How to choose the right circuit breakers?
- Cable voltage drop formula 0
- How can wires be connected in a junction box?
- What happens when the sun goes out What happens when the sun goes out
- History of the Olympic Games for Children
- So is the earth round or flat?
- Predictions about the near future
- What awaits the world in the near future!
- Unusual representatives of the animal world
- Why the Americans were definitely on the moon Apollo mission
- Dimensions and pathologies of the fetal egg
- Samples of dialogues "Seller-buyer Dialogue in English on the topic of shopping
- Fetal egg, yolk sac: normal size by week
- From the history of the design and construction of the high-rise Aswan dam The settlement where the Egyptian dam was built
- Butterfly effect - what does it mean
- Beautiful aphorisms, quotes and phrases about the evening