Carving with your own hands from wood. Wood carving for beginners: secrets of craftsmanship from experienced craftsmen
Wood carving is a rather complex type of decorative and applied art. To master the craft, masters require constant practice, good tools, and creativity. However, the final result of the carver’s work depends not only on these factors. The quality of the material used for processing also plays an important role. What kind of wood do craftsmen use for wood carving, and how do they prepare it? Answers to these and other questions are presented below.
The importance of material quality
Not every wood is suitable for carving art. Since materials have different properties: humidity, strength, softness, flexibility, etc. Therefore, the choice of a specific option depends on:
- simplicity and speed of processing of workpieces;
- visual appeal of the product;
- the ability to make small and complex ornaments;
- durability of the product (figurines, furniture, etc.).
Which tree to choose with all the variety of species? The selection of a specific material is largely determined by the technique in which the master works.
Popular breeds
Hand carving can be carried out on blanks of various woods. However, there are several most popular breeds that are preferred. Among them:
- Linden. Workpieces made from this rock lend themselves well to processing with cutters and chisels. The wood itself has a fine-fiber structure, thanks to which craftsmen can create complex and delicate ornaments. Smooth White color Linden trees are another reason why carvers choose this particular species.
- Alder. What kind of wood is used for wood carving if the craftsman needs a unique shade of the species? First of all, of course, alder. Such wood changes color: initially the workpiece is white, but over time it acquires a reddish tint, and then light pink.
- Birch. It is easy to process, so it is often used for relief and geometric carvings. Due to their low strength, birch blanks are used in the manufacture of paintings, panels and other decorative items.
- Oak. What kind of wood is needed for carving if the master wants to make a figurine or decorative furniture? Oak will become best choice. It is characterized by high strength, durability, and resistance to damage. That is why benches, chairs, kitchen utensils etc.
What trees are suitable for carving, besides the species mentioned? First of all, it's maple. Its wood is similar in color to birch, but has an attractive texture and hardness. Maple is more difficult to process with cutters (small chisels, cerasics, cranberries, etc.), so large ornaments and relatively simple patterns are created on the blanks. Pine, cedar, yew and fir are also widely used in carving art. They need to be better prepared before work, since the rocks contain a lot of resins.
Quality criteria
How to choose wood for carving, given that the materials differ in properties? When preparing, it is important to consider:

- Humidity. This indicator directly affects the durability of the finished product. Excessive moisture in wood can lead to deformation, cracking, and loss of attractive appearance. Therefore, freshly cut material is not suitable for processing. If there is a need to create relief and ornament, craftsmen choose dry blanks with a humidity of about 8%.
- State. What wood is absolutely not recommended to use? One that has knots, growths and other defects. This material is difficult to process due to twisted fibers. They prevent the master from moving the tool in the desired direction. In addition, chips and cracks form faster at the site of knots, which leads to product breakage.
- Weight. The heavier the material, the higher its strength. Therefore, craftsmen try not to use heavy wood when making panels, paintings and other products that require delicate processing. Heaviness can also indicate high humidity.
This is basic information about which wood is best to choose for further carving. When selecting a specific workpiece, craftsmen are also recommended to always take into account the technique in which they are going to work.
Features of preparation
Choosing wood is the initial stage. After the master has decided on the breed, he will need to prepare the material. This measure is necessary in order to prevent early damage to the product and deformation. How to prepare wood for carving, what methods exist?

The main method is drying. This procedure helps remove excess moisture that accumulates in the wood. It is optimal if the material is dried in fresh air. It is important to reduce humidity to a level of 15-20%. The drying procedure itself can take a long time - several months if the workpieces are large.
As soon as the humidity reaches the required levels, the wood is brought into the room (away from heating devices). This is necessary in order to further dry the fibers of the material. It is desirable that the moisture content in the workpiece does not exceed 8-10%.
How to prepare wood for carving using alternative methods? Masters can use the digestion method. This method is suitable for preparing blanks small size. To do this, they are placed in boiling water, boiled over low heat for several hours. This procedure helps to quickly and effectively eliminate intracellular moisture in the fibers of the material. After such heat treatment, the workpieces must be dried for a week (on average).
If you don’t know what kind of wood is suitable for carving with chisels, or how to properly prepare the material, but at the same time you want to become the owner of original products, the masters of the Russian Bondar company will help. Our specialists are experts in the manufacture of unique carved furniture, souvenirs, and figurines that connoisseurs of exclusive items can order.
Creative people who want to occupy themselves with a very interesting and useful activity should pay attention to wood carving for beginners. IN Lately this type of creativity is becoming increasingly popular, although some time ago it was almost completely forgotten. Before engaging in such an activity, it is necessary to understand that this type of work can be quite dangerous, so it cannot be recommended for children who have not yet learned to handle sharp objects. And adults who are going to engage in wood carving should understand for themselves all the rules for using tools. For wood carving, not only conventional, but also electrical devices can be used. They require careful adherence to safety precautions.

While experienced virtuoso masters only need one glance at an instrument to determine its quality, beginners are often lost in all the variety presented in stores. Experts assure that in this case, the most expensive option is not always the best, since brand promotion, advertising, transportation from other countries, and so on play an important role. Those who do wood carving professional basis, they know that domestic instruments can be of simply excellent quality, but cost three times less than their foreign counterparts.

In addition, a master’s kit may contain a lot of other tools. They may be needed for complex work. For beginners, the bare minimum will be enough, but good quality so that your hands immediately get used to the correct movements. Experts recommend that beginning craftsmen stock up on a set of a dozen tools and gradually improve their skills and replenish their arsenal.
Material for work
In addition to tools, it is very important to choose the right wood for the job. This task is very difficult for beginners, so you need to listen to advice experienced craftsmen. Each type of material has its own pros and cons. If the wood is soft, it is quite easy to work with it, but in this case there are expected to be a lot of defective products. This includes aspen, linden and birch. When it comes to wood carving for beginners, a video about which can be seen below, these wood options are most suitable.

If you have a lot of knowledge and experience allows you to work with more expensive types of wood, you can take oak, boxwood or mahogany. These materials are more expensive and difficult to work with. They are distinguished by their durability and hardness, which is not always good, since it is difficult to carve from such wood. Craftsmen often get injured when working with hard wood, since any careless movement can lead to trouble. As a result, either the person or his instrument suffers.

For contour and slotted wood carvings, it is recommended to use coniferous wood. Applying large-sized ornaments to spruce or pine is quite simple. However, here you need to take into account that some irregularities may appear between the growth rings when working with a chisel. The thing is that the difference in wood density will make the instrument jump.
Virtuoso craftsmen love to work with aspen, linden, and juniper; beginners can be advised to take a closer look at coniferous species, that is, spruce or pine. For the first work, you can use inexpensive material, such as pear or birch.
Before you cut
One can understand the impatience of a novice carver, who thinks that it is enough to learn to hold tools in his hands, and the tree will obey him. These are all illusions. Before something remotely resembling a work of art comes out from under the cutter, you will have to work hard, since first of all it is necessary to study the features and properties of the material, since each type of wood is unique, requires individual approach and a special processing method; learn to take into account such features as ease of processing, the ability to acquire smoothness or maintain a matte shine, and the perception of finishing; be able to distinguish the texture of 3 main cuts - along and across the fibers, at the end; master the rules and basic carving techniques that every carver follows. Of course, as you gain experience, you will develop your own techniques and habits, but there are basics that remain unchanged regardless of the technique in which the carver plans to work.
There are basic methods of carving, without the ability to perform which it is impossible to move forward, achieve mastery and rise from a banal spoon cutter to an artist-wood carver. Let's look at these techniques.
1. An oblique cut (Fig. 46), in order to be clean and smooth, must be made along an inclined line (hence its name) to the wood layer and in the direction of the running fibers. Otherwise, scuffs and chips will form on the material.
Rice. 46. Making an oblique cut: A- Right; b- wrong
2. Cut across the grain of the workpiece (Fig. 47). To perform this technique, a semicircular chisel is used, the movements of which are carried out on both sides in the direction from the edge to the center of the workpiece. You should not cut from one edge to the other in one pass, as in this case it will not be possible to avoid chipping.

Rice. 47. Making a cut across the grain of the workpiece: A- Right; b- wrong
Secrets between the lines
Is it possible to paint in such a way that the wood grain is not visible?
In this case, we can talk about painting on wood, which uses bright colors that tightly cover the wood, for example the famous Khokhloma painting. Carvers use a variety of paints, including watercolors, which are varnished on top. But special means are also intended for this, for example, golden bronze powder, aluminum powder, which are mixed with varnish and then coated with the product. This looks especially impressive on contour carvings, when a golden or silver pattern appears on a black background.
At the end, this technique (Fig. 48) is performed similarly. If you do not follow this rule, chips will form, which will affect the quality and appearance of the product.

Rice. 48. Making a cut on the end plane of the workpiece: 1 - Right; 2 - wrong
Secrets between the lines
Do wood products require special protection?
It must be said that any product of decorative and applied art, even being perfectly polished, requires mandatory paint coating, which not only gives the object completeness, brightness, shine, but also protects it from harmful factors. For this purpose, varnishes based on cellulose ethers, all kinds of enamels, covering paints, polyester varnishes and other means are used. Of course, the wood is carefully prepared before final finishing.
3. Thread of a straight double-sided notch directed across the grain of the workpiece (Fig. 49). The technique can be roughly divided into 2 stages: in the first, the knife-jamb is held vertically, in the second - obliquely, and at the same time the edges are cut off on both sides of the central marking line (the middle of the notch).

Rice. 49. Performing a straight two-sided notch across the fibers of the workpiece (arrows indicate the direction of movement of the knife): 1 – marking; 2 - middle line
4. The thread of the double-sided notch, which runs obliquely to the direction of the grain of the workpiece (Fig. 50), just like the previous cut, is carried out in several stages. The cutter is held vertically and cuts a straight center line to the full depth of the notch. Then one inclined side of the recess is made in the direction along the fibers and the second inclined side is cut, but in the opposite direction. Violation of the sequence of stages results in such defects as rough cuts, scuffs, etc.

Rice. 50. Making a double-sided notch that runs obliquely to the direction of the grain of the workpiece (the arrows indicate the direction of tool movement): 1 – marking; 2 – edges of the notch
5. Thread of a straight double-sided notch directed along the fibers of the workpiece (Fig. 51). Depending on the structure of the wood (straight-grain or non-straight-grain), carving will be carried out differently. In the event that the texture lines of the annual layers are located parallel to the side edges of the workpiece being processed and are distinguished by a straight-layer structure, it is carried out easily, but it is necessary in the following sequence. First of all, the center line is cut to the full depth of the recess, then the side edges are made along inclined lines, but unlike previous type thread, the cutting direction can be any.

Rice. 51. Making a straight two-sided notch directed along the fibers of the workpiece (arrows indicate the direction of tool movement): 1 – edges of the notch; 2 - middle line
Secrets between the lines
Are they presented to paint and varnish materials special requirements?
First of all, it must be said that finishing a product with paints and varnishes requires various solvents, thinners, leveling compounds, etc. Varnishes must cover the product with a thin transparent film that does not mask the wood texture, have a pure color, impart dullness or gloss, be water- and light-resistant, easy to sand and polish. The choice of one or another varnish is determined by the purpose of the item, its composition, and the nature of the finish. Among the most commonly used are varnishes NTs-222, NTs-221 (light), NTs-224 (dark), NTs-49G (matting), pistachio varnish (can be mixed with paints), etc.
If the wood has any defect, for example curling, in which the direction of the grain deviates from a straight line, the carving must be done differently. First of all, the middle line is cut, vertically and in one direction, after which the side edges are made in two directions (Fig. 52). First one in the direction of the center, then the second in the direction from the center.

Rice. 52. Making a straight two-sided notch directed along the fibers of a workpiece made of twisted wood (arrows indicate the direction of movement of the tool): 1 - middle line; 2, 3 – side edges
6. The carving of the recess, which runs along a circle or along a curve (Fig. 53), is carried out in a certain sequence, the observance of which determines the final appearance of the workpiece.

Rice. 53. Making a notch that runs along a circle or along a curve (numbers show the order of movement of the tool in sectors, arrows indicate the direction of movement of the tool when making side faces, and crosses indicate the meeting point of the edges of the notch): A– order of work; b– dihedral notch; V– semicircular recess
Secrets between the lines
How to apply the varnish and can it be removed if necessary?
Varnishing is finishing decorative item, which is carried out after it has been sanded, cleared of lint, filled with pores, covered with primer and sanded again. Usually the varnish is applied with a brush or swab, in some cases they resort to pouring. It is also practiced to dip the product in varnish or apply it by spraying. Sometimes, for example, when restoring a product, it is necessary to remove the old layer of varnish. To do this, select the appropriate solvent, among which are white spirit, solvent No. 646, kerosene, acetone, etc.
The work is performed either with a semicircular chisel or with a jamb knife. First they cut according to midline, then along the side edges, observing the direction of movement, and especially carefully you need to carve in those places where the edges of the recess meet. To make the carving look neat and beautiful, the wood needs to be removed chip by chip - alternately from each side.
Secrets between the lines
Is it possible to eliminate leaks?
When applying varnish to large surfaces, as well as when using a brush as a tool for applying varnish, smudges may appear. They reduce the decorative qualities of the product and therefore need to be leveled. To do this, use solvents (not to be confused with thinners), for example, NTs-31 distribution liquid, under the influence of which nitro varnishes are leveled.
Secrets between the lines
What is polish?
Polishes are special solutions with a reduced content of film formers, containing plasticizers such as soluble wax, colloidal substances, etc. The polish is applied with a swab to a surface that has already been varnished and sanded for the purpose of polishing. Once dry, it gives a hard, glossy surface that can be polished to a mirror finish. There are alcohol and shellac polishes, which are classified into light, cloudy, transparent (No. 13, 14), red (No. 15), black, cloudy (No. 16).
7. The carving of a semicircular recess, which is located obliquely on the workpiece (Fig. 54), should be carried out taking into account the fact that one side of the recess goes along the direction of the layers of growth rings, therefore it is cut without difficulty and turns out smooth, and the other - against the direction of the layers of growth rings rings, and therefore usually has scoring marks. To make the notch look neat, the wood is cut in opposite directions, first on one side of the center line, and then on the other.

Rice. 54. Making a semicircular recess, which is located obliquely on the workpiece (arrows indicate the direction of movement of the tool)
The middle of the recess must be done with extreme care, without forcing the thread; the wood must be removed carefully, in thin layers. Chips from one direction must necessarily fall into chips from another direction. In this case, the recess will be without scoring.
8. The carving of a round concave recess on the workpiece face can be done in different ways.
First way(Fig. 55)

Rice. 55. Carving a concave recess on the workpiece face using the first method (arrows indicate the direction of tool movement): A- view from above; b- side view
The thread is made from the marking line, directing it parallel to the location of the fibers in the wood of the workpiece, and leads to a vertical line that passes through the center. In this case, the meeting place is cut towards the center along a vertical line (indicated by an arrow in the figure).
Secrets between the lines
What are the grinding and polishing processes?
Typically, carvers process products by hand. For grinding, use fine-grained sandpaper or microcorundum powder (the latter is applied with a damp swab). The surface prepared in this way is covered with 2 or 3 layers of polish, drying each one, and treated with special polishing pastes (a mixture of abrasive with binding liquids), for example No. 290, polishing first the wet surface, then the dry one. The paste is removed with polishing water (a mixture of abrasive and emulsion).
Secrets between the lines
What is a smoothing iron and how is it used?
This is the name of an instrument that is cut from bone, hardwood or polystyrene and polished. A smoothing iron is used to polish small items that have been previously sanded and freed from lint. They are first lightly ironed, then processed with some effort, making sure that the product does not collapse or become deformed. The use of polishers has some limitations, for example, they are used to polish wood whose growth rings are the same in density. If this condition is not met, the surface of the product acquires some waviness.
Second way(Fig. 56)

Rice. 56. Carving a concave recess on the workpiece face using the second method (arrows indicate the direction of tool movement)
When working, the tool is directed parallel to the layers of wood towards each other. The meeting points are cut across the grain towards the center.
9. The carving of a round concave recess at the end of the workpiece is carried out in different ways.
The notch is made with lateral movements along the wood fibers, directing the cutter of a semicircular chisel from the center in a circle (Fig. 57).

Rice. 57. Making a round concave recess at the end of the workpiece using the first method (arrows indicate the direction of tool movement): A- view from above; b- side view
The second method (Fig. 58) is carried out with another tool - a cranberry, and the carving is made from the center to the edges. The cutting lines can be straight or slightly curved (Fig. 59).

Rice. 58. Making a round concave recess at the end of the workpiece using the second method (arrows indicate the direction of tool movement): A- view from above; b- side view

Rice. 59. Making a round concave recess at the end of the workpiece using the second method using curved lines (arrows indicate the direction of movement of the tool)
10. Carving of a round convex shape on the workpiece face is carried out in 2 ways, which differ in the direction of movement of the tool. In both cases, the carving is carried out in 4 directions, but in the first method, from a vertical line passing through the center of the convex shape to a horizontal line, also passing through the center, along the direction of the wood fibers (Fig. 60).

Rice. 60. Making a round convex shape on the workpiece face (arrows indicate the direction of tool movement)
Secrets between the lines
Is it possible to bleach wood in an accelerated way?
If it is necessary to bleach wood, resort to a proven product. But it must be said right away that the composition requires increased safety measures, since it contains toxic substances. So, mix 20 ml of a 30% sulfuric acid solution, 15 ml of 20% oxalic acid, 25 g of sodium peroxide and 1 liter of water. Apply the composition to the wood with a grass brush, and after achieving the effect, wash it off with a soda solution.
Secrets between the lines
What rules must be followed when bleaching wood?
There are several of them, and all of them are time-tested. Upon reaching required result bleaches are washed off with water. When using acid bleach, use water instead of water solution soda You cannot test different bleaches on the same product, even if the previous one has been thoroughly washed off. Glued products should not be subjected to this procedure, since the wood is impregnated with solutions, and after drying it may warp or come apart.
During carving using the second method (Fig. 61), the tool is directed along the layer of wood from a vertical line passing through the center of the form to the edges. Moreover, the cuts are made parallel to each other.

Rice. 61. Making a round convex shape on the workpiece face in the second way (arrows indicate the direction of movement of the tool)
11. Convex thread at the end of the workpiece (Fig. 62). This technique is carried out in the direction of the structure of the wood, sequentially moving from the edge of the mold platform to the top.

Rice. 62. Making a convex shape at the end of the workpiece (arrows indicate the direction of tool movement): A- view from above; b- side view
These are the basic carving techniques that are used in almost all types of relief. But it must be said that the carver’s arsenal is not limited to them, and other techniques will be described below.
Secrets between the lines
How to use oil primer?
It is used as an independent product and preparatory (before coating with oil varnish). It is known that oil dries for quite a long time, but if the product is kept in a hot and extinguished oven, oven, or even in a container for open fire, this process can be accelerated. In the latter case, the product is covered with clean calcined sand.
From book Modern encyclopedia baths author Dominov EduardChapter 1 PRIMUM FUNDAMENTUM: FIRST OF ALL – THE FOUNDATION! The choice of bathhouse foundation design depends on many factors, and economic considerations play an important role: the difference in cost and labor intensity between different types of foundations is very significant. Together with
From the book Extreme Cooking. How to live without money: Russian extreme food author Tsyplyaev Vladimir Removich From the book Ceramic Products author Doroshenko Tatyana NikolaevnaBefore you start sculpting Where to get clay Clay, clay... What is it and where do you get it? Nature has prepared clay for us. This is a clastic rock consisting of tiny particles and flakes of alumina (aluminum oxide), silica (silicon oxide) and water. But where to look
From the book Speech without preparation. What and how to say if you are caught by surprise author Sednev AndreyWood carving is an amazingly beautiful and very popular type of hand-made wood processing these days. The carved interior details captivate with their magnificent appearance and reflect rich national traditions.

Creative people who are simply itching to do something very interesting and useful should pay attention to wood carving. Girls and women may think that this is only a man's activity. And they will be wrong, because there are no fewer women woodcarvers than men.

About wood carving for beginners
Can be used to decorate indoor and outdoor spaces different kinds carvings and techniques for implementing the plan. If you are interested in this type of needlework, then you must understand that you need to master the methods and techniques of wood processing, acquire necessary tools and improve your carving skills.
IN modern world smartphones and tablets, a wooden stand decorated with wood carvings looks very original.


Skillfully executed carvings in the form of simple and ornate patterns and ornaments seem to enliven the world and endow it with sophistication, charm, emphasizing the taste of the owner of luxury items and the talent of the craftsman.


The works of the best carvers decorate the temples. Pay attention to the photo of the iconostasis of the upper Church of the Savior of the Image Not Made by Hands, which is located in Moscow, in the Church of the Intercession Holy Mother of God in Fili.

Modern masters with delicate taste create real masterpieces.

And thanks to finishing technologies and protection of the finished product from the destructive effects of mold and insects, these wood carvings have served people for hundreds of years.
Pay attention to the magnificent carved pieces of furniture:


Stylish doors:

Delightful handmade figurines:


Very often, connoisseurs collect handmade carved items. Wonderful chess that is worthy of any collection.

Perhaps, over time, your wood carving masterpieces will be carefully preserved by collectors or decorate temples.
Types of wood carving
Of all types of wood carving, it is very interesting openwork or through thread on wood, which is characterized by some transparency, in which only the image remains, without a background. An example is an applied carving - this is an ornament that is attached to a finished background after production by a craftsman.

Geometric carving woodworking – This is a type of carving in which the pattern is formed using many simple geometric shapes(a diamond is often used).

Oriental carving on wood it is distinguished by its whimsical shapes. Egypt is the cradle oriental type wood carving.


Relief carving on wood. In this technique, the image is located above the background or at the same level with it. These are carved panels various shapes with a three-dimensional image.

- This is a flat-relief carving, but distinguished by an abundance of carved and stucco decorations, various colors, curls, leaves, figures of people in unnatural poses, fabulous fantastic animals.

Originated in the village of Kudrino. Well-known products in this type of carving are boxes, vases, dishes, ladles, and home decor items. The main element is floral ornament: rosettes, curls and twigs.

Volumetric (sculptural) carving Great for making sculptures, animal and human figures, toys.

- a subtype of volumetric thread. This is the main industry of the village of Bogorodskoye in the Moscow region. The famous Bogorodsk toys are figurines of animals and people made of linden and alder.

Most often used to decorate wooden Scandinavian churches. Wood carvers decorated the inside and outside of church buildings with images of Gods and various animals.


- the simplest and most unique type of carving. On a flat background, the master cuts out grooves - grooves, forming a pattern. Carved landscapes - images of landscapes on wood.
All these types of carvings are quite conventional. Each master chooses the most suitable one, taking into account work experience, quality of wood and creative inspiration.
What can be decorated with carvings? The most simple staircase transformed, decorated with carved balusters. Balusters

- these are figured columns in the form of columns, a stylish and noble decoration of the staircase. Wooden balusters look organically with a spiral wooden staircase. Bas-relief. .

Another name is "low relief". This is a sculptural image on a plane. Most often these are figures of people and animals
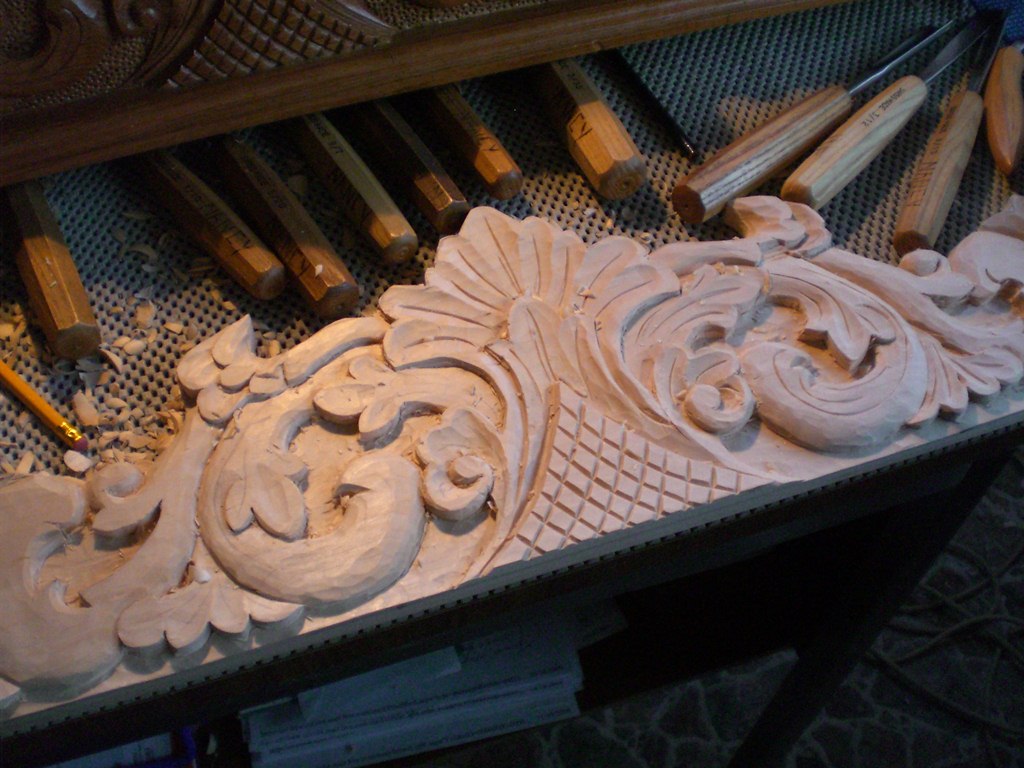
As in every business, wood carving has its own secrets and nuances, which allow one to reveal the beauty of wood in a wonderful ornament. It is necessary to select special tools for wood carving and stock up on the necessary blanks and sketches for wood carving, which will be embodied in the form of drawings, borders, lace or genre scenes.
Basic tools
Very high requirements requirements for the quality of carving tools. Of course, skill plays an important role, but well-selected and sharpened tools will help bring your idea to life. Experienced carvers will tell about its quality at first glance at a tool, but beginners get lost in the store because of the huge selection.
IN basic set for wood carving includes:
- several knives and chisels;
- needle files;
- hacksaws for metal;
- vice;
- sandpaper;
- drill with several types of drills;
- bars.

Knives should be made only from high quality steel. It is better to purchase them in specialized stores for creativity. Although on initial stage Just sharply sharpened knives will do. An excellent start would be knives from Tatyanka, Narex, Kogatana, etc.
It is not necessary to choose an expensive foreign-made instrument, because domestic instruments can be of the same good quality, but much cheaper
As your skill grows, you may need a set of tools, a milling machine, a drill, etc.

Chisels for carving
Sometimes, instead of a chisel, a sharpened screwdriver or file is used for wood carving.

Flat chisel- this is a long rod, at the end of which there is a flat cutting edge. Very often it is used for primary wood processing.
Semicircular chisel- This is one of the most important tools for work. They differ somewhat in the degree of roundness, that is, they are medium, round and sloping.
It still happens V-shaped version of chisels. It can be useful for geometric wood carving, which we will introduce you to below.
Beginners need only a small wood carving set of good quality to immediately get used to the correct movements and pressure.
In this video there is a wonderful master A. Yuryev shared with us which tools to choose for carving.
How to protect yourself from injury when carving wood
Any tool of a master carver can be compared to a straight razor, therefore, when working with it, you must strictly follow safety precautions. The material must be positioned so that you can work freely with a knife or chisel, eliminating the possibility of the sharp edge hitting your hands.
The work place should be comfortable and clean. All the extra ones in this moment tools must be carefully folded, because they are very sharp and can cause injury.

Materials for work
Each type of wood for carving has its pros and cons. Soft wood is easy to work with, but there can also be a lot of defects. These are aspen, linden, birch. This wood is best for beginners.
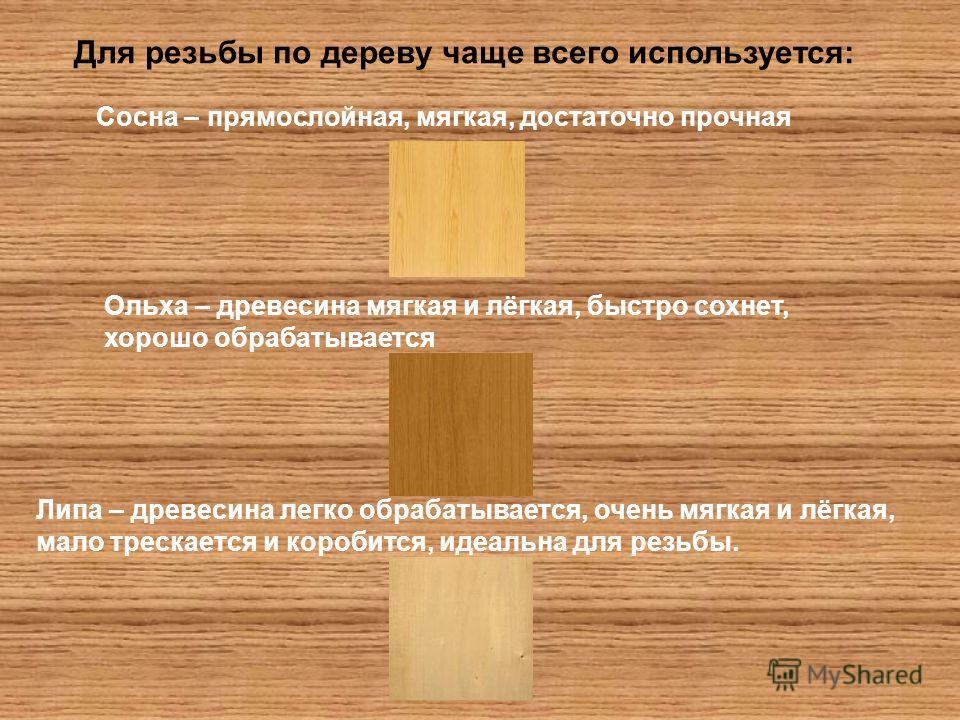
Oak, boxwood, mahogany are more expensive and complex wood. It is hard and durable, so it is difficult to carve from such wood. Very often there are troubles when working with such types of wood. Either the instrument or the craftsman may be harmed.
An experienced carver can easily work with a variety of woods, including juniper. Well, for beginners it is better to use inexpensive materials - spruce, pine, pear or birch.
Whatever tools are chosen for wood carving, safety precautions must be strictly observed!
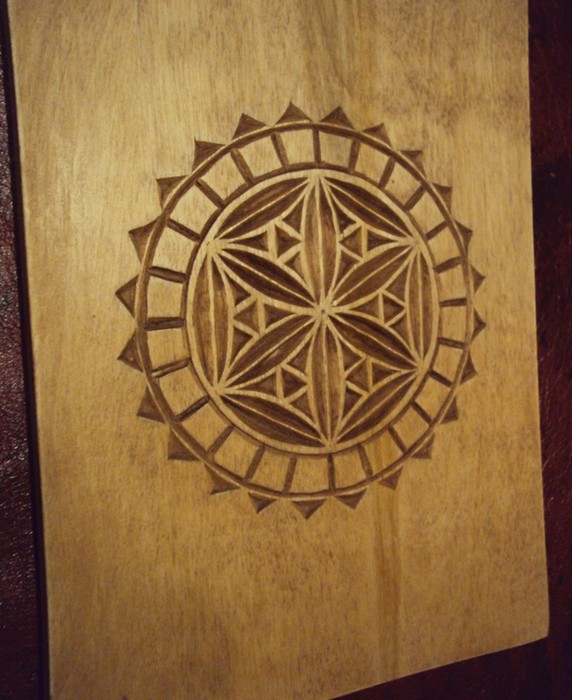
Geometric carving technology
Geometric wood carving is considered the simplest and is perfect for beginners. To create the intended design, you need to have a small set of wood carving tools and clearly follow the design. For geometric wood carving great value has symmetry and repetition. This achieves a wonderful play of light and shadow.


Cutting boards using this technique and wooden panels look wonderful in the kitchen.

Geometric carving consists of sequential cutting out of simple geometric shapes: rectangles, triangles, squares, rhombuses. But the result is a wonderful ornament that looks different in different lighting.
Execution Sequence any wood carving is like this:
- First, a wooden blank is made (board, deck, blank).
- Next is rough leveling of the surface of the workpiece, during which all defects and roughness are removed.
- Then a decorative relief is formed using special cutters.
- After the main carving is completed, the finishing process is grinding, impregnation, painting, varnishing.
You cannot work with a workpiece on your knees! The master must have a table to work on.
Master class “Geometric wood carving on a cutting board”
Tools. You will need 2 knives for wood carving: a triangular jamb knife and a feather knife, a ruler, a compass, a pencil.

A triangle jamb knife is necessary for cutting triangular shapes of various configurations, as well as for cutting long straight lines. A pen knife is used to cut long lines such as a petal or groove. Carving knives should be sharp and comfortable.
First stage. We make a sketch of the pattern on the board. It can be applied using a compass and ruler. Or you can print out carving patterns taken from the Internet and use carbon paper to transfer them to a prepared cutting board.

Second phase. Cut out the petals. We use a pen knife.

During work thumb presses tightly to the board, and forefinger touches wood easily. This will help regulate the depth of the knife into the surface and the angle of inclination. And your thumb will help you move the blade smoothly. First, we cut in one direction at an angle, then we turn the board over and cut on the other side.

If the shavings curl like a rope, the knife is good and sharp. It must be periodically sharpened with a piece of leather with GOI paste.

Third stage. We cut out the triangles with a blunt knife. Using the heel, at an angle of 45 degrees, we cut the knife into the wood, not reaching the edges of the pattern on three sides. The slots should meet on all sides in the shape of a pyramid. The sliver falls out and forms a beautiful triangle.


Fourth stage. What we couldn’t cut, carefully clean it so that the edges are frequent and even. Using the same principle, we cut out grooves and triangles around the perimeter of the board.
Fifth stage. We polish everything sandpaper, treated with natural impregnation. All! The work is done. We decorate the kitchen useful and beautiful cutting board with wood carvings.
Wood carving designs
To perform wood carving, photographs, drawings and sketches are simply necessary. Large patterns for wood carving are used for large items: for house facades, interior decoration carvings of churches, windows.
For interior items and furniture, carvers use small patterns that are carefully worked out by the craftsman.
YOU WILL NEED IT
We offer you an archive from . Choose, print, create.
Video master classes on wood carving for beginners
Of course, the wood carving looks especially impressive in the video. Channel "HAND WOOD CARVING" shows the features of geometric carving for beginners.
A woman's view of wood carving. Channel tatianacarving shows us how to make flower petals and leaves.
Konstantin Belyaev on his channel he talks in detail about wood carving cutters.
And in this video Ivan the Builder shows how to make relief-planar carving:
We will be very glad if this article inspired you to take up wood carving!
Wood carving
Modern carving
It does not have a strict classification, since they can be combined in the same product different types threads.
Conventionally, we can distinguish types of threads:
- through thread (this includes cutting and slotted threads)
- blind thread (all subtypes of relief and flat carving)
- sculptural carving
- house carving (is a separate direction, since it can combine all three of the above types).
- Chainsaw Carving (Performing primarily sculptural carvings using only a chainsaw.)
The conditional classification of thread types is as follows:
Through thread

Walnut
Through thread is divided into actually end-to-end And invoice, has two subtypes:
- Proriznaya thread - (through sections are cut with chisels and cutters)
- Propilnaya thread (actually the same thing, but such areas are cut out with a saw or jigsaw).
A slotted or saw-cut carving with a relief ornament is called openwork.
Flat grooved thread
Flat grooved carving is characterized by the fact that its basis is a flat background, and the carving elements go deep into it, that is, the lower level of the carved elements lies below the background level. There are several subtypes of such carvings:
- contour thread- the simplest, its only element is a groove. Such grooves create a pattern on a flat background. Depending on the chisel you choose, the groove may be semicircular or triangular. The semicircular one is cut with a semicircular chisel, and the triangular one is cut with a corner cutter, a corner chisel or an ordinary knife in two steps.
- staple (nail) thread- the main element is a bracket (outwardly similar to the mark left by a fingernail when pressing on any soft material, hence the name nail-shaped) - a semicircular notch on a flat background. This notch is made with a semicircular chisel in two steps: first, the chisel is deepened into the wood perpendicular to the surface, and then at an angle at some distance from the first cut. The result is a so-called bracket. Many such brackets different sizes and directions and creates a drawing or its individual elements.
- geometric (triangular, trihedral notched) thread- has two main elements: a peg and a pyramid (a triangular pyramid buried inside). Carving is performed in two stages: pricking and trimming. First, the sectors that need to be cut are pricked (outlined) with a cutter, and then they are trimmed. All elements are performed with a knife-jamb. Repeated use of pyramids and peg at different distances and at different angles gives a great variety of geometric shapes, among which are distinguished: rhombuses, swirls, honeycombs, chains, radiances, etc.
- black glaze carving- the background is a flat surface covered with black varnish or paint. As in a contour carving, grooves are cut into the background, from which the design is built. different groove depths and their different profiles give interesting game chiaroscuro and contrast of black background and light cut grooves.
Relief carving
Relief carving is characterized by the fact that the carving elements are located above the background or at the same level with it. As a rule, all carved panels are made using this technique. There are several subtypes of such carvings:
- flat-relief carving with a cushion background - can be compared with contour carving, but all the edges of the grooves become rolled over, and sometimes with to varying degrees steepness (from the side of the picture more sharply, from the side of the background gradually, gently). Due to such oval contours, the background seems to be made of pillows, hence the name. The background is flush with the design.
- flat-relief carving with a selected background - the same carving, but only the background is selected with chisels one level lower. The contours of the drawing also become shaved.
- Abramtsevo-Kudrinskaya carving (Kudrinskaya)- originated in the Abramtsevo estate near Moscow, in the village of Kudrino. The author is considered to be Vasily Vornoskov. The carving is distinguished by a characteristic “curly” ornament - curling garlands of petals and flowers. The same characteristic images of birds and animals are often used. Like flat-relief, it comes with a cushion and a selected background.
- carving "Tatyanka"- this type of carving appeared in the 90s of the XX century. The author (Shamil Sasykov) named this formed style in honor of his wife and patented it. As a rule, such carvings contain floral ornaments. Characteristic feature is the absence of a background as such - one carved element gradually merges into another or is superimposed on it, thus filling the entire space.
Sculptural carving

USSR stamp, 1979, Bogorodskaya carving
A distinctive feature is the presence of sculpture - images of individual figures (or groups of figures) of people, animals, birds or other objects. In fact, is the most complex look carving, since it requires the carver to have a three-dimensional vision of the figure, a sense of perspective, and maintain proportions.
It is considered a separate subspecies Bogorodskaya carving. The art of chainsaw carving, which is becoming increasingly popular both among carvers and connoisseurs of beauty, can also be considered a type of sculptural carving. Popularity is easy to explain. Chainsaw carving is, first of all, an action, a performance, a show. Increasingly, festivals, competitions, and demonstration performances by chainsaw carving masters at public events, presentations, and exhibitions began to be held. Unlike other genres of wood carving, the viewer not only sees the final result of the master’s painstaking and long work, but also visually participates in the process of creating the sculpture.
see also
Notes
Literature
Wikimedia Foundation.
2010.
See what “Wood carving” is in other dictionaries: wood carving - Wood in art has been used since ancient times in architecture, sculpture, and decorative applied arts , especially folk (utensils, furniture, often tinted or decorated with carvings, intarsia, painting, gilding, etc.)…… …
Dictionary of Temple Architecture ARTISTIC WOOD CARVING, one of the oldest and most common types of artistic woodworking, in which a pattern is applied to the product using an ax, knife, cutters, chisels, chisels and other similar tools. WITH… …
encyclopedic Dictionary ARTISTIC WOOD CARVING, one of the oldest and most common types of artistic woodworking, in which a pattern is applied to the product using an ax, knife, cutters, chisels, chisels and other similar tools. WITH… …
FLAT-RELIEF WOOD CARVING, one of the most common types of carving. The relatively shallow relief (5-20 mm) maintains the same height with the same depth of the main background. The main motifs of flat-relief carvings are floral ornaments... GEOMETRIC WOOD CARVING, one of the most ancient and widespread types of wooden ornamental carving. It is made in the form of recesses of two, three, tetrahedral shapes, which in combination give big number ARTISTIC WOOD CARVING, one of the oldest and most common types of artistic woodworking, in which a pattern is applied to the product using an ax, knife, cutters, chisels, chisels and other similar tools. WITH… …


- Turkey stewed in a slow cooker: spicy, with vegetables, in sour cream, cream and walnuts
- Types of speech: description, narration and reasoning
- Martyrs Tatiana. Moscow Church of St. Martyrs Tatiana Temple of the Martyr Tatiana at Moscow State University schedule
- Milotici: return of the Russian village Moravov Alexander Viktorovich
- Why you shouldn't cry in front of the mirror
- Milotici: return of the Russian village Moravov Alexander Viktorovich
- Why you shouldn't cry in front of the mirror
- Making sounds for children Lessons on making sounds for children
- Actors Spiderman Aunt May Aunt May in Spiderman
- Pink salmon in the oven - delicious and easy recipes for baked fish Pink salmon fillet baked with vegetables
- What does a lizard tattoo mean?
- Deciphering the natal chart of the house
- What does mulberry help with?
- Photo report “Birthday of Samuil Yakovlevich Marshak in the group”
- Breathing at high pressure Breathing correctly at high pressure
- Bryansk State University named after
- Tasks to test spelling and punctuation literacy
- Macroeconomic calendar
- The Forex Economic Calendar is a reference book for every trader, regardless of trading experience and level of professionalism, and especially...
- Representatives of the arachnid class are creatures that have lived next to humans for many centuries. But this time it turned out...